


While soil blocks are typically used in the spring to get a head start on planting, you can make them any time of year to start seeds for transplanting into the garden. Soil blocks offer an alternative to plastic garden pots, which are costly and take up valuable space in the shed or greenhouse in the off season, plus they provide benefits for overall seedling health.
“Soil blocks, [when] properly used, eliminate transplant shock and maximize the healthy number of plants per flat,” says Pat Patterson, a master gardener with the Ohio State University Extension. She uses a chef’s knife or slender lathe to carve her blocks to the desired size, but garden centers and seed catalogs now sell multiple sizes of soil blockers to make the task even easier.
And trust me, making soil blocks is not difficult—though your hands might cramp up, depending on the number of trays you plan to seed. To get started, all you need is a couple buckets, a soil blocker, water and your preferred soil mix. Patterson’s soil-mix recipe contains one-third each of compost, pre-moistened coir, and fine grit or perlite, but you can use a mix that suits your growing conditions and available materials. Try peat moss in place of coir, for example, or lime and sand in place of perlite. Regardless, fresh soil is best for maintaining high levels of oxygen and organic matter in the mix.
Materials
- 2 large buckets (one for soil and one for water)
- soil mix
- water
- trowel
- soil blocker
- propagation tray
- gloves (optional)
Step 1: Mix soil and water.
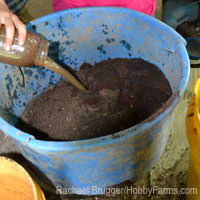

In one bucket, add approximately 4 quarts water to 10 quarts soil. This ratio might vary depending on the moisture present in your soil mix. When compacted in your hand, the mixture should remain in a clump; if it crumbles, add more water. Use warm water, as it’s more easily absorbed by the soil-mix components than cold.
Step 2: Load soil blocker.

Take the soil blocker in both hands and push straight down into the soil-water mixture. There should be enough mix in the bucket that it thoroughly fills the blocker while allowing it reach the bottom. Shift the soil blocker slightly around its axis so the soil more readily packs inside. Repeat this three to four times, rotating the direction of the soil blocker to ensure equal soil distribution among all blocks.
Step 3: Punch out blocks.

Have a propagation tray ready that allows ample drainage. Wipe off the sides of the soil blocker, and set it down in the tray so the sides are flush with the tray corner. Gently pull up on the body while pushing down on the lever, giving gentle shakes if necessary to release the soil blocks. Dip the soil blocker in a bucket of water to rinse. Repeat steps 1 through 3, lining up each set of soil blocks snugly with those already on the tray, until the tray is full.
Step 4: Plant seeds.
")
Place one or two seeds in the crevice of each soil block. Only plant seeds that you would other-wise transplant, Patterson says, and follow any seed-packet instructions for presoaking or scarification. Cover blocks with soil mix, water thoroughly, and, fertilize if desired. Ensure blocks stay moist until seedlings are ready to transplant.
If making small blocks, such as the 3/4-inch size, you can plug them into larger blocks when seeds begin to sprout. Otherwise, once you have strong seedlings, you can place the entire block into the garden, spacing according to seed-packet directions.
