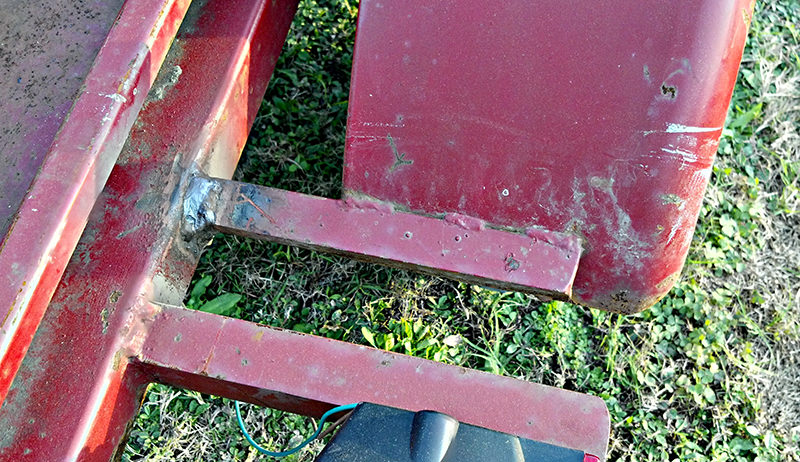
They are lightweight and not prone to rust like their steel counterparts. Aluminum trailers come in all shapes and sizes for use around the hobby farm. However, they’re more expensive to own and because aluminum is a soft metal, it can flex when heavily loaded, sometimes causing welds to break on the frame and cross-members. Repairing stress points immediately after they occur will keep your trailer safe, prolong its life and protect your investment.
You don’t need to be a professional welder to make a simple aluminum repair, but you need to have the right equipment. This repair can be made with a tungsten-inert-gas (TIG) welder or a metal-inert-gas (MIG) welder, which is far more common and easier to use.
Spray transfer is a process used when MIG welding aluminum that is 1/4 inch or thicker. It provides excellent fusion and bead appearance with little or no spatter, making cleanup easy. Spray transfer requires more power than a 115-volt MIG welder can produce. Find a MIG welder that uses a 200- to 230-volt input with an output of at least 200 to 250 amps.
Achieve the best results with the following:
- Shielding gas: Protects the weld from atmospheric gases, such as oxygen, nitrogen, carbon dioxide and water vapor. Use only pure argon.
- Welding wire: 4043 is a silicon alloy, which eases welding with good control of the weld puddle. 5356 is probably the most widely used and offers greater tensile strength.
- Spool Gun: Aluminum can easily bind in the welder like a wet noodle before feeding out the 15-foot gun cable. Welders that can accommodate a spool gun are ideal. The spool guns feature a 4-inch-diameter, 1-pound spool on top of the gun so the wire only feeds a few (less than 12) inches to the contact tip.
- Stainless Steel Brush: Avoid puddle contamination by dedicating a brush for aluminum only.
Repairing Aluminum Welds
Before attempting the real repair, practice on scrap aluminum coupons available from local farm equipment stores or scrap yards. When MIG welding aluminum, use a push technique: Angle the gun back 10 to 15 degrees, point the nozzle in the direction of forward travel and push the weld puddle forward. This technique produces less penetration with less burn-through and creates a wider, flatter bead appearance.
Step 1

Use an angle grinder to completely remove the cracked weld. For cracks leading onto the frame, drill stress-relieving holes at the ends of the crack prior to welding.
Step 2

Next, vigorously brush the area to be welded using a stainless-steel wire brush. Dedicate this brush for aluminum-use only to avoid weld contamination. The aluminum should appear bright and shiny indicating that the dull oxide layer is completely removed.
Step 3

Weld in a well-ventilated area free from flammable material and remember to wear proper skin and eye protection.
Step 4

Make all the gas and electrical connections to your welder. This welder (the Hobart Handler 210) has a door chart that helps set the voltage and wire-feed speed based on your material thickness.
Step 5

Begin welding at the drilled end of the crack where restraint is greatest and move forward. This repair on 3/16-inch aluminum is being made with .030-diameter 4043 aluminum wire, a voltage setting of 6 and wire-feed speed of 85.
Step 6
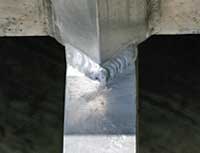
Lastly, use the wire brush to polish the weld or blend-grind the bead for a seamless appearance. A good weld bead will look like a row of stacked dimes. The discoloration at the edges indicates good penetration and a strong weld.
Tips For Achieving A Perfect Weld
Incorrect wire feed and voltage are the usual troublemakers that hinder a sound MIG weld. Avoid the most common welding problems:
- Mind your gas coverage while welding; avoid wind and breezes.
- If spatter occurs, adjust the wire-feed speed to match the voltage.
- Check the contact tip at the gun’s nozzle. It should be replaced if the opening appears oblong rather than round.
- Burn-back results from the wire melting back into the contact tip, which is caused by loose tension on the drive roll, a blocked contact tip or too high voltage.
- If the weld appears to “crown” or sit on top of the joint, there’s insufficient
penetration. This is caused by a travel speed that’s too slow, excess wire-feed speed or insufficient voltage.