


I grew up loving occasional visits to downtown Raleigh, North Carolina’s dive-like Krispy Kreme shop, where we drooled over magic conveyor belts carrying the dough circles.
I still remember one warm spring morning when we loaded up my mother’s car with boxes of glazed doughnuts to sell in a friend’s neighborhood, ideally situated with close-together houses, each with a lot of kids.
What we were raising money for is lost to all our memories. But the mouthwatering taste of the few leftover doughnuts remains.
In recent years, I’ve watched with amusement as doughnuts have become all high-
falutin’. In the latest trend, they can’t simply be rounds of fried dough. Instead, they have to be flavored with hibiscus, or maple and bacon, or Earl Grey tea (a problem if you can’t picture doughnuts without coffee).
You’ll find doughnut dessert towers at wedding receptions and spot precious mini doughnuts on restaurant dessert menus.
But high-falutin’ flavors can’t disguise a doughnut’s humble roots. The doughnut as we know it likely came from the Dutch and Germans, often made as part of pre-Lent feasting. It took hold with ease in colonial America and has held a presence ever since.

My grandmother made them in rural Nebraska, and I wonder if she even bothered using a recipe. I can’t find strong evidence of one.
But I’m fairly sure that the cake doughnuts she made—humble, homemade rounds, hot from the fryer—would still satisfy me more than the trendy ones available today.
Fit to Be Rolled
Chill Your Dough
For both yeast and cake doughnuts, dough can stay in the refrigerator several days. You could even make it on Friday night for use on Saturday and Sunday mornings, splitting the batch so you fry only as much as you need for each sitting.
You can save some time with yeast doughnuts by reducing the dough’s first rise to just
30 minutes before knocking it down and chilling it, or omit that rise completely. The dough will still rise somewhat in the refrigerator.
The dough for cake doughnuts can be cooked with no chilling (best for drop doughnuts), a brief 30-minute rest in the refrigerator or up to two days in the refrigerator.
Doughnuts are one of many items you could potentially sell at market.
Start Simply
Mix up an uncomplicated batch of cake-doughnut dough (see recipe below), and shape your entire first batch as doughnut holes (that is, scoop balls of dough, drop them into the oil, and call it good) to get comfortable with frying.
Even if you’re a doughnut-making pro, you’ll appreciate the simplicity of these fried balls rolled in sugar. They make for spur-of-the-moment happiness.
Once you’ve made a batch of cake-doughnut holes, roll out your next chilled batch for making doughnuts. Cold dough is less sticky, decreasing the amount of flour needed for rolling (and for yeast doughnuts, that slow, cold rising only improves the flavor).
Let It Rise
Once the process of making cake doughnuts feels like a piece of cake, try fluffy, light but substantial yeast rounds.
Don’t expect these to be like the fried-air Krispy Kremes. These doughnuts have more heft and therefore offer more satisfaction. Versatile yeast doughnuts can be shaped into doughnut holes (double-dipped in glaze, they’re deceptively light bites), traditional rounds and fabulously flavorful filled doughnuts.
(You can even, as my filling-obsessed daughter discovered, pipe a squirt of filling into yeast doughnut holes.)
This dough, with its soft, smooth feel, rolls like a dream. For filled doughnuts, be sure to roll the dough no thicker than 1⁄4 inch.
The rounds will look pitifully thin, but a brief pre-oil rise before the shock of the hot oil when they cook will puff them up beautifully, while still cooking them all the way through.
If you roll the dough any thicker, the doughnuts turn a deep brown long before the center is cooked. For traditional, hole-in-the-middle rounds, the dough can be slightly thicker.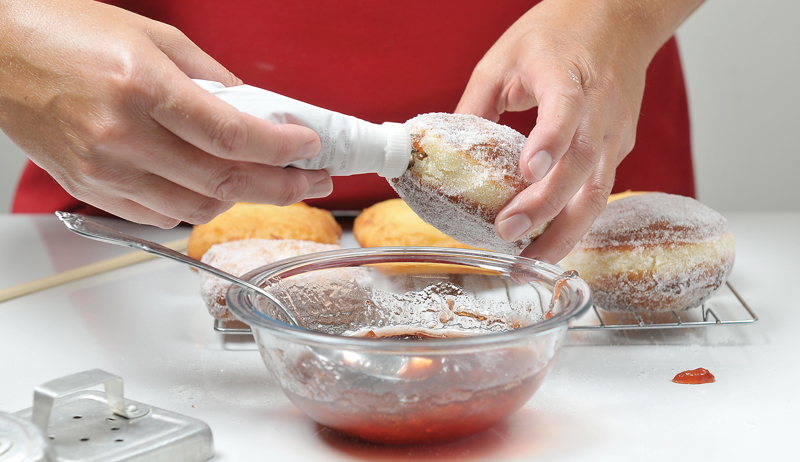
Cut to the Chase
Cut out doughnut holes with a small, round cutter, cutting as close together as possible. Or use a 3-inch cutter to cut out circles, then a 1-inch cutter to cut the center hole.
Gently press scraps together to cut out more doughnuts.
Get Creative
Nobody said doughnuts have to be round or have a middle hole. Use cookie cutters to make oval doughnuts for football season, hearts for Valentine’s Day or simple flowers for any special occasion.
(For flowers, use cutters with just a few large petals. Small, tightly scalloped edges will disappear in the frying.)
Try making a jeweled heart or a flower center by poking the filling hole in the center of a flat side and leaving a dab of filling poking out the front of the doughnut.
If you’re concerned that you can’t eat them all at once or you’re practicing self-restraint, try mixing some cooked mashed potatoes into your dough. It will help your finished doughnuts stay fresh and moist.
Tip
You don’t need an electric deep-fryer to fry doughnuts (or anything else). Unless your stove responds slowly to any changes you command, there’s little reason a versatile cast-iron Dutch oven or chicken fryer combined with a quality thermometer (which you would need even with a deep-fryer to verify that it truly has hit and maintained 350 degrees Fahrenheit) can’t do the job right.
The Inside Counts
Old doughnut recipes generally call for frying in lard or shortening, but I rarely use either.
For convenience, cost and—most important to me—a high smoke point, I choose canola oil. Peanut oil also works and can add a pleasant flavor, but it costs more, too.
You can also save money by reusing oil as long as it is strained well after each use and stored in an airtight container. But each round of frying lowers its smoke point, so use caution. (Also, overused oil will begin to taste rancid because of oxidation.)
Heat the oil slowly so it warms evenly and you don’t run the risk of having it get too hot, too fast, while you’re preoccupied with the dough.
An oil depth of 2 to 4 inches is ideal. Greater depth means less temperature fluctuation when you add cold dough.
However, if you have a very responsive cooktop and a good thermometer, feel free to use less. Just keep a close eye on the temperature.
In a Glaze
As soon as the doughnuts have cooled enough to touch them, dip in a glaze or roll in sugar or cinnamon sugar. (If rolling doughnuts in confectioner’s sugar, wait until they’re completely cooled.)
Let warm doughnuts cool a bit more before piping in your filling. I try to chill my fillings before using them. They’re less runny and stay put better.
The recipes and variations here are just the beginning. With a couple of basic recipes, it’s easy to experiment and develop your own twist on these traditional treats. However you make them, fresh doughnuts made by hand will fill your heart and belly with warm, sweet goodness.
Doughnuts for chickens? Before bagged feed, keepers got creative.
Sidebar: Tools of the Trade
A few tools make doughnut-making easy:
Cutters
I prefer a large cookie/biscuit cutter and a 1-inch round cutter for cutting out the holes rather than doughnut cutters meant to let you cut out doughnuts and holes in one move. I find they don’t work as well and often get the hole stuck.
Cookie Scoop
For making cake-doughnut holes, scoop balls of dough with a cookie scoop, which looks like a mini-ice cream scoop with a release lever. Find these at kitchenware shops.
Spider or Slotted Spoon
A spider—a large wire-mesh skimmer found inexpensively in kitchenware stores and Asian markets—or slotted spoon makes flipping doughnuts and lifting them from the oil easy.
Candy Thermometer
I trust my inexpensive candy/deep-fry thermometer, a tall rectangle with a clip to attach to my pot. It’s easy to read (I check it constantly while frying) and easy to clean. Plus, the clip means hands-free monitoring.
Cooling Racks
I like to remove my doughnuts to a cake grid set over a baking sheet, both as they come out of the fryer and again after being dipped in glaze. However, you could just drain the doughnuts on paper towels.
Pastry Bag With a Round Tip
Using a pastry bag makes filling doughnuts easy. I use a chopstick to poke a hole in the doughnut, then squirt in the filling, gently moving the tip back and forth to get as much filling in as possible without splitting the doughnut. If you don’t have a pastry bag, use a sealed plastic zip-top bag with one bottom corner snipped off.
Recipe: Basic Yeast Doughnuts & Marshmallow Filling
This master recipe makes wonderful plain, glazed doughnuts and can be used for endless variations.
Note: The eggs should be at room temperature. If using them straight from the refrigerator, warm them in a bowl of hot water for a few minutes first.
Yield: 18 filled doughnuts or 18 doughnuts and 18 holes.
Ingredients
Yeast Doughnuts
- 6 T. (3⁄4 stick) unsalted butter, at room temperature
- 1⁄2 cup white sugar
- 2 large eggs, at room temperature
- 1 tsp. vanilla extract (or 1⁄4 to 1⁄2 tsp. almond, lemon or orange extract)
- 1⁄2 teaspoon salt, preferably fine sea salt
- 4 cups all-purpose flour
- 4 tsp. instant yeast
- 1 cup milk, lukewarm (heated to 110 to 120 degrees F)
- oil or shortening, for deep-frying
- filling, optional
Marshmallow Filling
- 1 cup (2 sticks) unsalted butter, softened
- 7 ounces marshmallow creme
- 2 tsp. vanilla extract, or to taste
- pinch of salt
Yeast Doughnut Preparation
In large mixing bowl, beat butter and sugar on high speed until light and fluffy. Beat in eggs one at a time until fully incorporated, stopping to scrape down sides of bowl with spatula.
Beat in vanilla and salt.
Add 2 cups flour and yeast, and beat on low speed until just mixed. Beat in 1⁄2 cup milk on high speed for 2 minutes. Beat in one additional cup flour, then remaining 1⁄2 cup milk.
Mix in 1⁄2 cup flour and beat for 1 minute. Dough should be very moist and sticky. If it is, add the remaining 1⁄2 cup flour. If not, don’t add any more.
Scrape dough into greased container, then cover with plastic wrap and lid. Let rise until doubled (~1 hour). Gently press down dough and chill, covered, overnight or up to several days.
Roll out dough on lightly floured surface to 1⁄4-inch thick. Cut into desired shapes. Let stand, covered, 20 minutes.
In deep pot, cast-iron pan, Dutch oven or electric fryer, heat oil to 350 degrees Fahrenheit. Gently add doughnuts to oil, being careful not to overcrowd pan.
Cook 1 minute, turn and cook 1 minute more, until golden, adjusting the heat as needed.
Using spider or slotted spoon, remove to cooling rack set over baking sheet. As soon as they’re cool enough to handle, roll in granulated sugar or cinnamon sugar as desired.
When fully cooled, pipe with filling as desired.
Marshmallow Filling Preparation
Beat butter on medium-high speed until light and fluffy, then beat in marshmallow creme, scraping down sides of bowl, until fluffy and well-mixed.
Beat in vanilla and salt. Taste and add additional vanilla as desired.
Recipe: Basic Cake Doughnuts
For quick doughnut holes, simply scoop small balls of dough and drop them into the oil.
Yield: about 5 dozen doughnut holes or 20 doughnuts and 20 holes
Ingredients
- 3 large eggs
- 1 cup white sugar
- 3 T. unsalted butter, melted
- 1 1⁄2 tsp. vanilla extract
- 1 tsp. baking soda
- 1 cup buttermilk or plain yogurt
- 3 1⁄3 cups flour
- 1⁄2 tsp. salt
- 1 1⁄2 tsp. baking powder
- oil or shortening for deep-frying
- cinnamon sugar (stir together 1 T. cinnamon and 1 cup white sugar) or confectioner’s sugar
Preparation
In large bowl, beat eggs and sugar on high speed until light and fluffy. Beat in butter and vanilla.
Dissolve baking soda in buttermilk. Beat into egg mixture. In medium bowl, whisk together flour, salt and baking powder.
Add to egg mixture and mix on low speed until just blended. Refrigerate mixture for at least 30 minutes or up to several days.
In deep pot, cast-iron pan, Dutch oven or electric fryer, heat oil to 350 degrees Fahrenheit.
On lightly floured rolling board, dust dough with flour, then roll or pat it out with floured hands to 1⁄4-inch thick. Cut doughnuts in desired shapes.
Gently add doughnuts to the oil without overcrowding the pan. Cook 1 minute, turn over and cook additional 1 minute, keeping the oil at 350 degrees. Using spider or slotted spoon, remove to cooling rack set over baking sheet.
When cool enough to touch but still hot, roll doughnuts in cinnamon sugar, or when cooled completely, roll in confectioner’s sugar.
(Doughnuts keep, loosely covered, for 1 day.)
Recipe: Pumpkin Doughnuts
The pumpkin makes this dough sticky. If at all possible, chill it overnight unless you plan to make freshly scooped doughnut holes.
If you have pumpkin-pie spice on hand, use 4 teaspoons spice in place of the cinnamon, nutmeg, ginger, cloves and cardamom.
Yield: ~5 dozen doughnut holes or 20 doughnuts and 20 holes
Ingredients
- 3 large eggs
- 1 cup granulated sugar
- 3 T. unsalted butter, melted
- 1 1⁄2 tsp. vanilla extract
- 1 cup pumpkin purée
- 1 tsp. baking soda
- 1/2 cup buttermilk or plain yogurt
- 3 1⁄3 cups flour
- 1⁄2 tsp. salt
- 2 tsp. baking powder
- 2 tsp. ground cinnamon
- 3⁄4 tsp. ground nutmeg
- 3⁄4 tsp. ground ginger
- 1⁄4 tsp. ground cloves
- 1⁄4 tsp. ground cardamom
- oil or shortening for deep-frying
- cinnamon sugar, maple or ganache glaze
Preparation
In large bowl, beat eggs and sugar on high speed until light and fluffy. Beat in butter and vanilla. Beat in pumpkin.
Dissolve baking soda in buttermilk (or mix into yogurt); beat into eggs.
In separate bowl, whisk together flour, salt, baking powder, cinnamon, nutmeg, ginger, cloves and cardamom.
Add to egg mixture and mix on low speed just until blended. Refrigerate mixture at least 30 minutes or up to several days.
In deep pot, cast-iron pan, Dutch oven or electric fryer, heat oil to 350 degrees Fahrenheit.
On lightly floured rolling board, dust dough with flour, then roll or pat it out with floured hands to 1⁄4-inch thick.
Cut doughnuts in desired shapes.
Gently add doughnuts to the oil without overcrowding the pan. Cook 1 minute, turn them over, and cook additional 1 minute, keeping oil at 350 degrees.
Using spider or slotted spoon, remove to cooling rack set over baking sheet.
Roll the doughnuts in cinnamon sugar, dip both sides in Maple Glaze, or dip the tops in Chocolate Ganache (recipe below) and then serve.
Doughnuts keep, loosely covered, for 1 day.
Recipe: Ganache Glaze
I like to make this with a mixture of dark chocolate and semi-sweet chocolate chips. I use more chocolate when I want a thicker glaze. For a thinner glaze, add 1 tablespoon honey to the ganache.
Flavor it with a touch of espresso powder, a teaspoon of peppermint extract, or just a touch of another extract or liqueur as desired.
Ingredients
- 1⁄2 cup heavy cream
- 4 to 6 ounces chopped chocolate or 3⁄4 cup to 1 cup chocolate chips
Preparation
Bring cream just to boil. Add chocolate and let stand 1 minute. Whisk until smooth.
This article appeared in Hobby Farm‘s Best of Hobby Farms Home 2019, a specialty publication produced by the editors and writers of Hobby Farms magazine. You can purchase this volume, Hobby Farms back issues as well as special editions such asBest of Hobby Farms and Living off the Grid by following this link.
