

Every farm needs a good pair of sawhorses. These multi-purpose platforms are for more than construction projects. With a sheet of plywood across the top, they become the support for a table when extra company arrives. In the shop, they might be a work bench. You can drape a blanket over them, and youngsters have an instant tent or cave, and they can even be used to support boards you’re cutting. I recently saw some for sale at a major lumber retailer at a very reasonable price—only six times as much as you would pay for the materials to build a better one from scratch.
When selecting the wood for your sawhorse, think about how you will use it. If it will be outdoors in the elements, you may wish to use treated lumber or a durable wood, such as cedar, if it’s available. Also, the wood should have straight grain and be free of defects. Hopefully, you have enough scrap lumber to build your sawhorses, but if not, this design makes good use of common lumber sizes.
Use this how-to as a baseline for building a sawhorse that best suits your needs. If you are taller or shorter, for example, by all means, adjust the height of the legs. You can also put hinges on the legs on one side and a chain or pivot on the end cross pieces to allow the sawhorses to fold up to save room. If you have plywood scraps laying around, use them to make the braces.
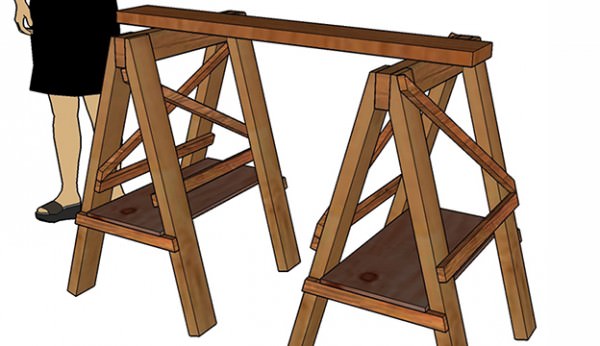
The main frame is made of 2×4 lumber, and the cross bracing is a 1×4 ripped in half lengthwise.
Materials:
- 2 8-foot 2x4s
- 2 8-foot 1x4s (You can substitute 1/2-inch or thicker plywood strips for bracing, if you prefer.)
- 4 3/8-by-3-inch carriage bolts with washers & nuts
- 20 2½-inch deck screws
Tools:

- tape measure
- speed square
- skill saw (or hand saw)
- table saw (if possible)
- power drill
- 3/8-inch drill bit
- 3/4-inch spade drill bit
- Phillips driver bit
Step 1

Cut your 2×4 into the following pieces: a 24-inch length for the top rail and four 36-inch lengths for the legs. Put a 15-degree bevel on one end of each leg. You can either measure 15degrees or use the measurements in the drawing.
Step 2

Attach the legs to the top rail, squaring them at the ends. For the strongest joint, use 3/8-inch carriage bolts. You could substitute long deck screws, but don’t use nails, as they will work loose.
Step 3
Rip the 1×4 boards lengthwise to make two 1?-inch strips. Precise width is not critical.
Step 4

Screw a 15-inch strip of wood 12 inches up on each end of the sawhorse. Use two deck screws at each attachment point.
Step 5

Screw a 24-inch strip of wood 16 inches up on each side of the sawhorse. Use two deck screws at each attachment point.
Step 6

The diagonal strips will be about 30 inches long. It will be easiest to cut them square, then trim them flush with the legs. Use two deck screws at each attachment point.
Step 7 (optional)

Lay a sheet of plywood across the bottom end supports to make a shelf to hold tools and materials.

Your sawhorses are now ready to use, whether for a construction project or table support at a local farmer’s market. When you aren’t using them, stack them neatly to take up less space.
Find more DIY projects on HobbyFarms.com:
- How to Build Raised Beds
- How to Build a Portable Shade Shelter
- How to Build a Lambing Jug
- How to Build a Hay Feeder
- How to Build a GAP-Approved Barrel Sink
About the Author: Dave Boyt has a degree in forest management from the University of Missouri. He is managing editor for Sawmill & Woodlot Management magazine and manages a family tree farm in southwestern Missouri.
