

|
I like simple things, and the basic design of my workbench is simple and easily adapted.
With a little thought, I know that you can certainly make one finer and even more versatile.
My Workbench Specs
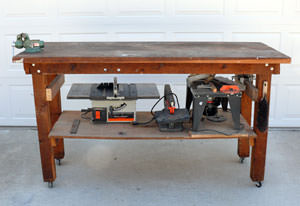
The bench stands 34″ high with a work surface of 29 1/2″ x 72″ and a shelf 16 ” above the floor.
The odd width is due to the use of three 72″-long 2 x 10s (true measurement 1 3/4″ x 9 1/2″).
My choice of working height, as well as redwood lumber, was simply personal choice. In the case of the wood, it is solid without being too heavy which has been nice when breaking it down for moves.
A Frame for the Surface
Two, 24″-long 2 x 4s inside two, 60″ 2 x 4s, all on edge with corners roughly squared, form a frame for the surface.
After drilling pilot holes, I nailed them together with 16-penny nails and then did the same with the planks, nailing them to the frame.
The Legs
The surface sits on two sets of 4 x 4 legs. Each set is stabilized with two, 24″-long 2 x 4s nailed in place.
I bolted the leg sets to the inside corners of the table frame, staggering the holes so they didn’t intersect. The sets are positioned so their cross braces face each other.
Two, 10″ boards laid between the lower crosspieces on opposite leg sets add stability to the workbench. They also serve as shelving to store my bench top table saw, router and scroll saw.
A set of lockable casters attached to the legs makes it easier to clean the work area and move the bench away from the wall for larger projects.
For most of the 30 years I’ve had my bench, I’ve envisioned the day that the space between the legs was filled with drawers that held my hand tools and various supplies. Perhaps someday I will build them.
Until then it will be what it is, a workbench plain and sturdy.
