


For an urban gardener, it’s singularly rewarding to stow several pints or quarts of homegrown produce after toiling in the kitchen. Unfortunately, the traditional methods of water-bath and pressure canning, although effective, can require equipment and labor that some people would rather not do.
By the time you’ve picked and prepared produce at its freshest, sanitized your equipment, filled your jars and waited patiently for moment when the water-bath canner finally reaches a rolling boil, half a day has passed. In my own canning determination, I’ve found myself stuck in the kitchen during early morning hours, cleaning pans and waiting for jars to seal with a reassuring pop. Knowing the short window to can vegetables in their prime, I’ve favored stocking my pantry over getting an adequate amount of sleep.
Additional frustration with processing jars mounts when a recipe goes awry or water is siphoned out of the jars due to broken seals. The practice of canning can’t be rushed and requires careful consideration of volume, acidity and fundamentals of food safety. Canning must occur when produce is fully ripe, but not blemished or rotting. What’s more, even small-batch canning requires bulk quantities of vegetables most small gardens simply can’t produce at one time.
Some gardeners are contented sacrificing several hours of their day the canning process—and they should continue to carry on this tradition. However, for time-crunched gardeners who need alternative methods for preserving produce and herbs from their gardens, here are a few options.
1. Freezing

When it comes to freezing, you’ll find many vegetables in your garden are possible candidates for longer-term storage in the icebox. For many low-moisture vegetables, the single step of blanching, just to brighten the color and disinfect the vegetable, gets the job done before packing into a freezer-safe, vapor-resistant plastic bag or packaging with a vacuum sealer. Take care to clean, peel and core the vegetables, in addition to cutting them in your preferred consistency, to save freezer space and make life easiest when it’s cooking time. Pack freezer bags and press out all the air before stashing away.
Even though freezing is fast and usually a single step, it’s not always the ideal method for maintaining quality and texture of your foods. Salad greens and herbs are sure to wilt in the freezer, though there’s a sneaky trick to freezing them in an oil base (see below). Moisture-heavy fruits and vegetables, such as cucumbers, apples, citrus and watermelon, will lose most of their moisture during the defrosting period, so it’s advisable to eat these vegetables fresh.

Other vegetables, such as summer squash, potatoes and onions, won’t completely turn to mush when once thawed, but their lack of texture can be distasteful if you attempt eat them cold or raw. If you freeze these vegetables, plan to use them in a cooked dish, and prepare for a soft, unstructured texture. Freeze chopped peppers in small plastic bags only if you don’t mind sacrificing their snappy texture for use in dishes like soups, chili and stews. The best types of produce to freeze, and likely best use of your limited freezer space, include the summer favorites: tomatoes, green beans and corn. Frozen tomatoes shouldn’t be eaten raw, but will come in handy for soups, sauces and other cold-weather favorites.
Be sure your deep freeze, freezer or icebox maintains a temperature of below zero degrees Fahrenheit. Most vegetables should be discarded from the freezer after three months or when freezer burn appears.
2. Drying

Drying is a well-established method for making food last longer. Once moisture is removed from a plant, leaving on 5 to 25 percent of the original water content, the chances of contamination from microrganisms are greatly reduced. Many growers are familiar with dried beans, herbs, peppers and tomatoes, but many other vegetables, including beets, peas and winter squash, can be dried and stored for later.
Individual methods of drying will depend on the level of humidity in your environment, but options include dehydrating, open-air or sun drying, or oven drying. Drying requires three elements: heat, air circulation and air dryness. In some climates, open-air or sun drying is possible when temperatures and air circulation remain consistent for several hours. Dehydrators provide ease of processing with perforated trays and thermostat-control temperatures.
But for those who don’t own a dehydrator or live in hot, low-humidity climates, food can be dehydrated in a closely monitored oven. Always wash and blanch vegetables before drying. You’ll want to put a breathable barrier between your drying rack and vegetables. This can be accomplished by laying a barrier of cheesecloth or synthetic netting over the tray. Place your racks in a 140-degree-F oven, giving at least 3 inches of space between racks lined with a cheesecloth or other barrier. Prop the door of the oven open and use an internal thermometer to measure the heat, which should stay between 140 and 150 degrees F for several hours. Shift trays from top to bottom, bottom to top every half hour.
Less-tender herbs, which include rosemary, thyme, parsley and sage, are dried easily in most climates without the trouble of oven processing. Simply tie bunches of stems together and hang upside down. Tender-leaf herbs, such as basil, mint tarragon and oregano, will mold if not dried quickly. To prevent molding, wrap small bunches in a paper bag, tie at the stems and hang upside down.
Dried foods should be closely monitored for any signs of spoilage. Store them in moisture-resistant containers or in glass jars and in dry, cool climates where light is low. Dried foods will last six to 12 months.
3. Quick Pickling
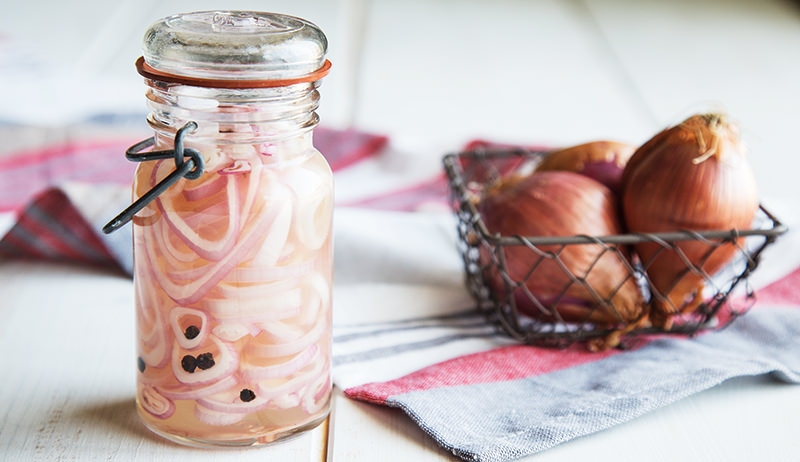
Pickled vegetables are versatile, tangy ingredients you can use to add color and flavor to tacos, burgers, sandwiches, salads and even main dishes. In addition to the ubiquitous cucumber pickle, beets, turnips, radishes, zucchini, okra, carrots, green beans, onions, garlic and even watermelon rind all make fine pickles. While some pickles are spicy and others tangy and some sweet, all quick pickles share one commonality: preserving brine.
To make your brine, boil 1 cup of any kind of vinegar, 1 cup of water, 1/2 cup of sugar, and 1 tablespoon of pickling or kosher salt until all ingredients are dissolved. Add in your spices, which could include herbs like dill, thyme, oregano, basil, red pepper flakes, spices such as cumin, chili or peppercorns, and garlic cloves. Press your fresh, washed vegetables into a pint or quart mason jar, as tightly as possible. Evenly distribute the brine to each jar until all ingredients are submerged. Store in the refrigerator for 24 hours before eating. These pickles will keep for up two weeks in the refrigerator.
4. Preserving in Oil

Oils mixed with dried or fresh vegetables are delicious when used in pizzas, pastas, marinades or salad dressings. Low-acid foods, such as garlic and mushrooms, are eligible for short-term preservation in an oil base. Peppers, whether dried or fresh, add a natural element of heat to oils.
However, cooks must use caution when preserving with oil, as its oxygen-free environment facilitates the growth of dangerous bacteria. Food safety experts recommend immediately refrigerating garlic, mushroom and herb oil mixtures for a maximum of four days before using, freezing the liquid or discarding. Because of their high acidity, dried tomatoes in oil can stand at room temperature for a maximum of four days before they should be relocated to the refrigerator.
Making a pesto is a smart option for preserving greens and herbs, which are famous for degrading fast. In a blender or food processor, chop 1/4 cup oil; 1/2 cup nuts, such as pine nuts; and 3 to 4 cups of greens; along with any desired herbs and seasonings. Freeze in ice cubes trays, and once frozen, move to freezer storage bags for later use.
5. Cellar Storage
A simple form of short-term food preservation, cellar storage will extend the life of a few vegetables from your garden. Cellars should be cool, 50 degrees F or below, dry and devoid of light. Carrots, potatoes, onions, garlic, winter squash and sweet potatoes will last for four to six months in these conditions, with potatoes preferring cooler temperatures, as they are susceptible to sprouting.
Your options for keeping the harvest fresh until you’re able to eat it are plenty, so don’t let a single fruit or vegetable you worked hard to grow go to waste.
