


 Photos by Rhoda Peacher Topiary Candidates Herbs
Ornamentals
 Want to Try …Trellising? Click here for more>> |
I recently received a postcard from a friend who visited Paris, but it was not of the Eiffel Tower or the Champs-Elysées—it was the awe-inspiring topiary shapes of the gardens at the Palace of Versailles, the pleasure grounds of King Louis XIV.

Homemade, small-scale topiary steps start here>>
I studied those same gardens in landscape architecture classes.
They’re often held up as an ideal of garden perfection: harmony, visual pleasure, peace and structure all side by side in a relaxing stroll around the grounds.
Why is the formal French style so appealing? Although topiary and plant shaping is not unique to the French—it can be found the world over—it seems to have a common appeal.
What is it about such formal design that gives us a sense of peace and comfort?
Inherent in the lovely shaping and pruning lies the secret to household sanity: It’s tidy! It’s the idea that we can control our world.
Gain a Feeling of Control …
Wouldn’t it be nice if we could just wield a pair of hedge clippers and get the laundry, dishes and children’s rooms all in perfect order with a few whacks?
What could be more soothing than a walk down a yew allée toward a boxwood parterre, surrounded by perfectly geometric shrubberies and carefully manicured borders?
I personally love to walk in the woods and observe the natural beauty of things; there’s a calming feeling about looking at the lack of structure and control that nature has while still rendering the results gorgeous and balanced.
A fallen forest tree, covered in moss and ferns, cushioned in a pile of slowly moldering leaves is a beautiful, peaceful thing; however, it can make me think of the tree leaning over my compost bins that I’m worried might fall on them, and the moss that keeps growing on my front steps that’s slippery, and how I really need to get the pile of last fall’s leaves spread on the beds before the spring rains stop.
Squirrels scampering up and down an oak tree collecting acorns is endearing and entertaining. Squirrels scampering in and out of my painstakingly placed bird netting eating all my just-ripened strawberries is not.
The sense that we can actually control our gardens, the idea of a picture-perfect, not-a-leaf-out-of-place, ordered landscape (maintained by someone else) is a daydream that can invariably settle the mind of a harried housewife or a frenzied farmer.
We all long for structure, cleanliness, completion of chores and having “nothing to do.” “When I get this work done, I’ll …” or “Once we finish that project, we’ll …”
How many times a season do we say that, planning for the arrival of our long-awaited friend, Leisure Time, bringing us a chance to stroll around our own grounds, admiring all our hard work and what we’ve finally accomplished?
For farmers, that time never comes. Seasons keep rotating, bedding has to be changed again, livestock always need to be fed; if we stop milking or checking nest boxes, we stop getting food.
Not only will our larder be diminished: Produce left unpicked will biologically signal the plant to slow down production.
Work is the endless lot of the farmer and a warm afternoon stroll through the tranquility of gardens like Versailles or Villandry remains an elusive treat.
… With Miniature Topiary
But wait! You can achieve the same effect, with no airfare, accommodations, jetlag or Berlitz language lessons at all.
In fact, the word “topiary” comes from the Latin “topiarius” meaning “a creator of places,” which the Romans adapted from the Greek word “topia.”
You can create your own sense of place—come home to your very own miniature Versailles, easily pruned and shaped, and even useful in making that coq au vin in the crockpot for dinner! It’s time to try your hand at small-scale topiary.
Just like bonsai—the ancient Chinese art of aesthetic miniaturization of trees and shrubs—this form of topiary uses small-leafed plants to create miniature works of art.
It’s easy to do, cheap and fun; you can even use the end products as gifts for friends or relatives, or to enhance your culinary prowess.
Everyone will love windowsill-sized pots of herbs, especially when they’ve been pruned and trimmed into little shapes and forms.
For those you make for yourself, I find it only takes a few minutes a week to water and trim them in order to keep them in their formal shapes.
And it can serve as a mini-vacation to a land of formal gardens, complete with the satisfying aroma of lavender from France, rosemary from Italy and thyme from Greece.
Materials for Ornamental Topiary:
- Small-leafed herb plants, such as thyme or rosemary; or small-leafed fuchsias or vining plants
- Wire, depending on shape of topiary desired
- Wire cutters
- Small, sharp, pointed scissors or shears
Step 1 (Option 1):
Root cuttings of chosen plants in water (fuchsias are particularly easy to do). This can give you nice, straight stems to begin your topiaries if you want to do a standard (or “lollipop”) shape.
The benefit of starting your own cuttings is that you choose your stem shape and size from infancy.
The downside is the time it takes for them to grow large. However, it’s quite a bit cheaper than buying nursery starts.
Step 1 (Option2):
Buy 4-inch high plants at the nursery. This is quick and easy, and can give you a jump-start on your topiary, but can be expensive and leaves you at the mercy of the plant shapes the nursery has on hand. Oftentimes growers will trim out central or straight leaders to encourage a bushier plant, which is considered more marketable. If buying, consider the plants carefully based on the shapes you hope to achieve.
Step 2:
Repot the plants into larger pots to encourage new growth and vigor.
Step 3:
Determine what shape you want the final topiary to be. Your options are limited only by your imagination and by the growth patterns of the plant.
Long, straight stems can be tied onto wire frames, while vines can be twisted carefully around circular or heart-shaped mini-trellises.
Fuller shrubs can be gently stuffed inside three-dimensional shapes and errant growth pruned back to the structure.
If the plant has a strong central stem, it can be tied gently to a stake and allowed to grow in an upright fashion or encouraged to grow into a trunk. Once it’s tall enough, it can be topped and the main growth pinched off to make a full-topped standard.
Step 4: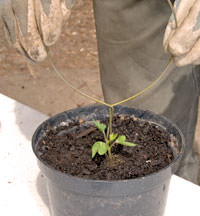 If a wire structure is to be used, cut the wire (I use basic, wire hangers) to the desired final shape and size, and carefully push it into the soil at the base of the plant.
If it’s a three-dimensional structure, you can tuck the plant into the center of it.
Step 5:
Water regularly and give the plant lots of natural or strong, artificial light to promote short, sturdy growth.
This is the hardest step for me because it also requires patience.
You can’t force a plant to grow faster than it will; by trying, the result is often long, spindly, weak growth that’s more prone to breaking and disease. It won’t form the thick, leafy stems you want for a full, shapely topiary.
You can also fertilize the plant with a product like Miracle-Gro, but again, be moderate. Too much chemical fertilizer can actually burn the roots, thus killing the plant, or promote long, spindly growth that isn’t conducive to topiary training and trimming.
Step 6:As the plant grows, trim it occasionally.
- If it’s in a three-dimensional shape, trim off the growth that has extended outside the wire frame.
- If it’s a twining plant or one you’re training in a linear shape, gently twist new growth onto the wire trellis and trim off errant growth.
A good way to promote bushy growth, especially on fuchsias and other ornamentals, is to pinch off the growth tips in the middle of a pair of branching leaves, like removing the buds from basil.
Doing this with every branching pair results in exponential growth as well as a bushier habit. On multi-stemmed, fine-leaved plants like thyme or rosemary, just pretend your clippers are miniature hedge trimmers and snip around the perimeter to shape it.
Here are some other fun ideas to try:
- Create a small espalier by making a wire frame to grow the main branches along and trim those to form.
- Or pull longer side branches down to soil level, pin them down with a stake and repeat as they root.
- You can grow a little row of vertical branches like a miniature windowsill hedge to block the view of your neighbor’s trash cans.
- How about three different flavors of thyme with braided “trunks” and a multicolored crown? Or a variegated fuchsia twisted with a solid green-leafed one? Or a small vine twining in the shape of the first letter of someone’s name?
The choices are limited only by your creativity.
Repeat steps five and six until the plant reaches a size and shape you’re happy with.
At this point, it’s complete; with a ribbon tied around it, or placed or replanted into a pretty, decorative container, it makes a perfect gift.
You can also keep it on your kitchen windowsill to get frequent, short-term doses of nirvana from the sense of control you have over this one small thing in your house. Use the clippings in your cooking or leave them out to dry for storing in spice jars.
What could be better—tranquility, control, beauty and culinary satisfaction, all wrapped up in one small
package?
About the Author: Kelly Wood imagines that she lives in Greece by clipping thyme while avoiding the work on her farm in Portland, Ore.
This article first appeared in the Fall 2008 Hobby Farm Home. For more articles like this, review past issues of Hobby Farm Home. You can also subscribe today>>
