


Whether you’ve hatched chicks from an incubator or had them delivered, one fact is clear: They will need a warm, safe place to live until they are large enough to be allowed into the main coop with the rest of the flock.
The solution is to place the chicks in a simple box known as a brooder while they grow, develop feathers and become more self-reliant. You can make your own brooder out of simple materials, and it can be as basic or as elaborate as you’d like.
For this project, we’re constructing a brooder made out of a clear plastic storage tote, an item that is readily available and easy to modify. The design of this brooder is based on the size of the plastic storage tote we had on hand, but you can easily make any needed modifications if your brooder box is a different size.
There are several key criteria to meet when raising chicks in a brooder, including the following:
Temperature: For newly hatched chicks, the temperature in the brooder should initially start out at 95 degrees F, but it needs to decrease by 5 degrees F every week as the chicks grow and develop feathers. Generally, you adjust the temperature by raising the lamp higher and farther away from the brooder, but you could also control the heat by means of a dimmer switch.
In any case, it’s critical to keep a thermometer inside the brooder to allow you to monitor the temperature. Also, pay attention to the behavior of your chicks. If they’re crowded together under the light, they may be too cold; likewise, if they’re spread out and seem to be avoiding the area directly under the light, the brooder may be too hot.

Cleanliness: It is critical for the bedding to stay dry and clean to prevent a buildup of moisture and bacteria that could cause illness to the still-vulnerable chicks. A few inches of pine shavings can work just fine, but don’t use cedar shavings because they are not safe for chicks.
Size: Don’t overcrowd the brooder; you can always make another one or use a box with larger dimensions if you’re raising a large number of chicks.
DIY Brooder Instructions
Level of Difficulty: Intermediate
Time Needed: 2 hours
Step 1: Measure and Cut Lid

Begin by making modifications to the lid of the brooder. For the dimensions of our storage tote, a hole of 91⁄2 by 14 inches was just about right. Leave a couple of spare inches free on each side of the hole to avoid interfering with the locking mechanism and structural components of the lid. Use a ruler (or framing square) and pencil to mark straight lines for your cuts and then carefully use a utility knife to remove the plastic.
Step 2: Measure and Cut Hardware Cloth

Use wire snippers to cut out a 101⁄2-by-15-inch section of 1⁄2-inch hardware cloth. This spacing will allow plenty of airflow but still keeps the chicks protected. Wear gloves and eye protection when handling the hardware cloth. Once you’ve cut the hardware cloth, set it aside momentarily.
Step 3: Drill Holes

Next, use the strips of 1⁄2-inch plywood to create a frame around the hole in the plastic lid as shown in the photos. Once the frame is in position, use the electric drill to make several holes in the plywood strips and all the way through the plastic underneath. Use a drill bit with a diameter that is just slightly larger than the diameter of the bolts. (For us, this was a 9/16-inch bit.)
Step 4: Add Bolts

With the holes prepared in the plywood and plastic, put the hardware cloth back in place under the plywood. Use the 1-inch bolts and nuts to secure the hardware cloth in place. Use pliers and a screwdriver to tighten the bolts.
Step 5: Add Accessories
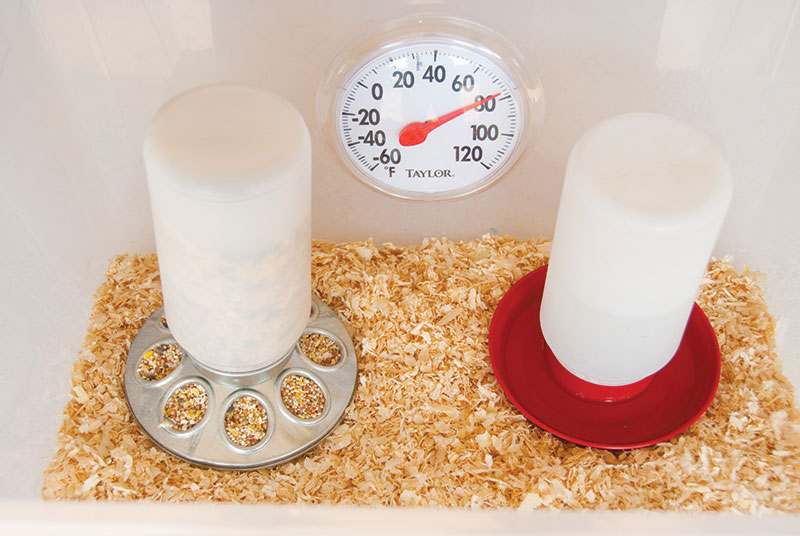
Add a few inches of bedding to the brooder, along with a feeder and waterer for the chicks and a basic thermometer, which will allow you to monitor the temperature in the coop.
Step 6: Mount Lamp and Test Temperature
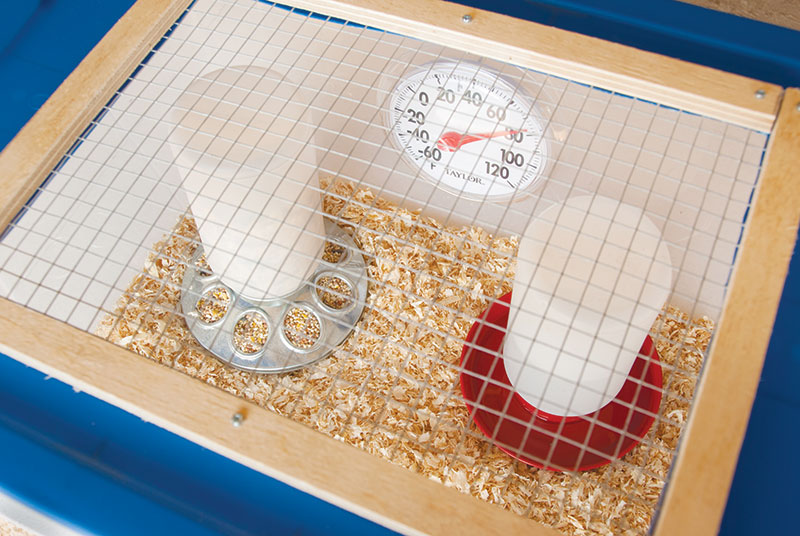
Test out the brooder before using. Mount the heat lamp nearby, pointed at the hole in the lid of the brooder, and observe the thermometer until you reach the desired temperature (initially 95 degrees F). You will probably need to adjust the heat lamp’s wattage/distance and experiment until you find the right combination to give you the proper temperature.

This article was excerpted with permission from Chicken DIY: 20 Fun-to-Make Projects for Happy and Healthy Chickens (CompanionHouse Books, 2018) by Samantha Johnson.
This story originally appeared in the May/June 2018 issue of Chickens magazine.
