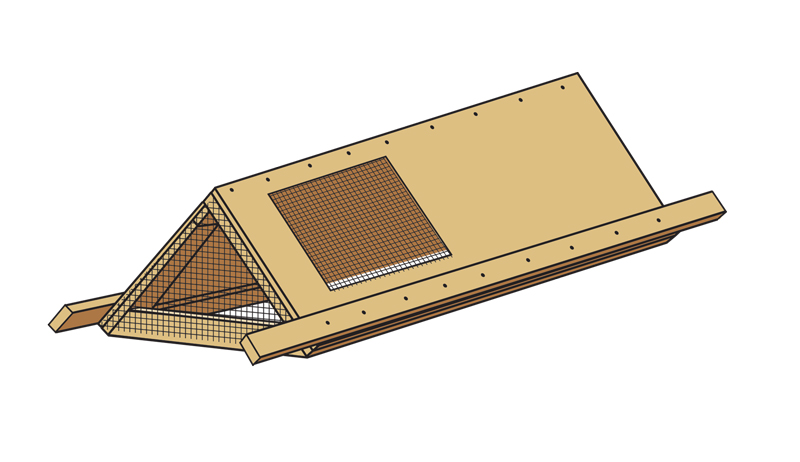
An easily adaptable mobile pen, this A-frame chicken tractor works well for a smaller flock of birds. This design includes handles, so you’ll have to recruit a helper to move it. But you could add wheels if you wanted to.
As with the enclosed pen, remember to include all of the essentials, such as waterers and feeders, when you put your pen to use. We’ve included instructions for an easy-to-make portable nesting box for this design.
Tools & Materials for Your Chicken Tractor
- (2) sheets of 1⁄2-inch construction-grade plywood, 48-by-96 inches
- (8) 96-inch lengths of 2-by-4 pine
- (1) 48-inch length of 1-by-2 pine
- ~100 galvanized 2-inch deck screws
- ~12 galvanized 3-inch deck screws
- tape measure
- pencil
- electric screwdriver
Step 1: Frame the Plywood
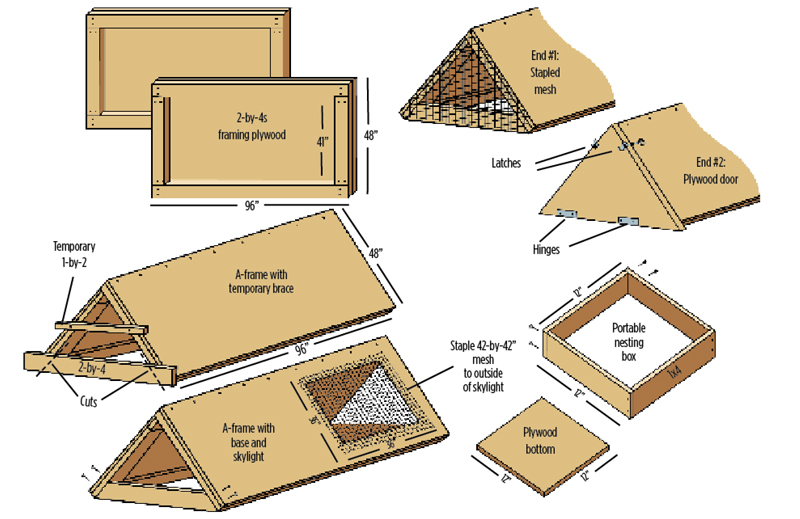
You’re going to first frame your plywood with 2-by-4s. Measure, mark and cut two of the 96-inch 2-by-4s into four pieces that measure 41 inches each.
Lay two of the plywood sheets on the ground and screw 2-by-4s (long side down) around the edges of each sheet, with the 41-inch pieces inside the four remaining 96-inch pieces. Place a screw at each end and then every 6 inches or so.
These frames will strengthen the plywood and give you a way to screw the sheets together.
Read more: These 50 tips will help any poultry-keeper with their feathered flocks!
Step 2: Make the A-Frame
Using a helper if needed, carefully lift the two framed plywood boards until they meet at an angle to establish the frame of your chicken tractor. They should resemble a capital letter “A” and meet on the inside so that they’re flush at the top.
Secure the boards together at the A’s apex using screws drilled in at both ends and roughly every 6 inches in between.
Step 3: Add the Base
On one side, temporarily brace the boards with a piece of 1-by-2 that’s 48 inches long. Screw the 1-by-2 horizontally across the opening of the A-frame about halfway between the apex and the ground.
Next, place a 2-by-4 across the bottom of the A-frame’s opening and mark the cuts needed for that 2-by-4 to fit inside the frame. Do this for both sides.
Position the 2-by-4s in place on each end and screw them in so that they’re flush with the plywood sheets. Remove the 1-by-2.
Step 4: Create Skylights
A few inches in from one side of the A-frame, measure and mark off a square that’s 36 inches per side. Drill a series of holes at one corner of the square so that you have a starting point for your handsaw.
Using a handsaw, cut out the marked area. Repeat these steps on the other side.
Cover the squares by stapling a 42-by-42-inch square of mesh over each opening. Place a staple at each corner and roughly every 2 inches in between, making sure no jagged edges are poking out.
These skylights aid in circulation and give the hens some sunshine while inside the chicken tractor.
Step 5: Cover One End
Working on the end of the A-frame nearest your skylights, cover the open end with mesh by measuring the triangle. Adding 6 inches to each of the three sides for overlap, and staple the piece to the structure.
Place a staple at each point, and then every 2 inches or so in between, trimming away any jagged edges using your wire cutters.
Step 6: Create a Hatch
Now you’ll build the access door for the other end of your A-frame chicken tractor. Measure the opening and cut a piece of plywood to fit the space. Attach the hinges to the base of the door and the structure’s 2-by-4 with screws, and then attach the hook-and-eye latches at the top, approximately 6 inches down from the A-frame’s apex, one on each side.
The door should open from the top, giving you access to the nest box you’ll put inside.
Read more: Make sure you keep these 8 things out of the chicken coop!
Step 7: Add Handles
Placing screws roughly every 6 inches, attach the two 144-inch lengths of 2-by-4 pine to each long side of the structure’s base. Leave 2 feet hanging out on each end for handles.
Step 8: Make a Portable Nest Box
This removable nest box will simply sit on the ground inside your A-frame chicken tractor.
First, cut four 12-inch lengths of 1-by-4 and screw them together, short side down (this creates the “walls” of your box), into a square. Then cut a piece of plywood to fit the bottom of your nest-box frame and screw it into the 1-by-4s, placing a screw at each corner and several in between.
This article originally appeared in the January/February 2021 issue of Chickens magazine.


