Bats in the U.S. can be extremely helpful to farmers wanting to control pest populations around their crops. Offer these flying miracle workers a place to stay on your farm by building and installing bat houses.
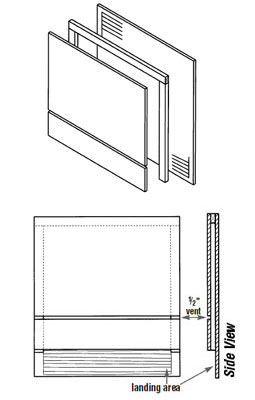
Illustration courtesy Bat Conservation International
Materials
- 26½- by 24-inch piece 1/2-inch AC, BC or T1-11 outdoor-grade plywood (backboard)
- 5- by 24-inch piece 1/2-inch AC, BC or T1-11 outdoor-grade plywood (landing area)
- 16½- by 24-inch piece 1/2-inch AC, BC or T1-11 outdoor-grade plywood (front board)
- 1 pint dark, water-based stain, exterior grade
- 1 1×2 pine furring strip in 24-inch length
- 2 1×2 pine furring strips in 20½-inch lengths
- one tube paintable latex caulk
- 20 to 30 1-inch exterior-grade screws
- 1 pint water-based primer, exterior grade
- 1 quart flat, water-based paint or stain, exterior grade
- 1×4 board in 28-inch length (optional, but highly recommended for roof)
- black asphalt shingles or galvanized metal (optional)
- 6 to 10 7/8-inch roofing nails (if using shingles or metal roofing)
Tools
- table saw or handsaw
- caulking gun
- variable-speed reversing drill
- paintbrushes
- screwdriver bit for drill
- hammer (optional)
- tape measure or yardstick
- tin snips (optional)
Step 1
Roughen inside of backboard and landing area by cutting horizontal grooves with a sharp object or saw. Space grooves 1⁄4 inch to 1⁄2 inch apart, cutting 1⁄32 inch to 1⁄16 inch deep.
Step 2
Apply two coats of dark, water-based stain to interior surfaces. Do not use paint, as it will fill grooves.
Step 3
Attach furring strips to inside of backboard using 1-inch screws, caulking first. Start with 24-inch piece at top and space each additional strip at 3/4-inch intervals. This will be the roost chamber.
Step 4
Starting with the top furring strip, attach front board to furring strips using 1-inch screws (caulk first). Leave 1⁄2-inch vent space between top and bottom front pieces.
Step 5
Caulk all outside joints to further seal roost chamber.
Step 6
Attach roof (optional, but highly recommended) with 1-inch screws.
Step 7
Apply three coats of flat stain or paint to the exterior. Use primer for first coat.
Step 8
Cover roof with shingles or galvanized metal (optional) using roofing nails.
Step 9
Mount on barn or other farm structure. South or east sides usually work best.


