
I’ll never forget my surprise the day I discovered what looked like a gray tree frog resting in the dead space just beneath the hinged lid of my compost bin.
That afternoon was a scorcher, but the frog looked cool and collected in its shady spot. A steady supply of gnats and flies buzzed around the greens and other refuse I’d recently added to my compost pile. (The insects were plentiful, because I hadn’t yet taken the time to give the fresh material a proper pitchforking.)
Like insect pollinators, migratory birds, and even native flowers and trees, many kinds of amphibians are in trouble these days. We’ve increasingly taken over their natural habitat for our own needs. We’ve also exposed these super-sensitive creatures to pesticides, fungicides and other toxins.
Like the “canary in the coal mine,” frogs and toads are important indicators of environmental—and, by extension, human—health.
They’re also an important part of the food web, serving as sustenance for larger animals. For their part, toads are especially useful for controlling insect pests that might otherwise help themselves to your crops.
Learn more about the benefits toads bring to the garden!
Made in the Shade
Fortunately, just as we put up birdhouses and even solitary pollinator habitats, so, too, can we create a little more space for area amphibians.
Want to give these creatures a helping hand where you live? Amphibians prefer shelter that’s shady and moist, and you can easily provide them with both.
The following amphibian habitat is based on one from the National Wildlife Federation‘s recently updated Attracting Birds, Butterflies, and Other Backyard Wildlife by David Mizejewski.
“We’ve got much better data nowadays than we did when I wrote the original edition on the real impact of native plants and wildlife within our neighborhoods and our yards—anything that’s not wilderness,” Mizejewski notes.
“The ultimate goal is to inspire people to take very personal, very local actions. I really try to focus on positive actions, and the fact that this stuff really does work.”
Read more about creating habitats for solitary native bee species.
Dig It
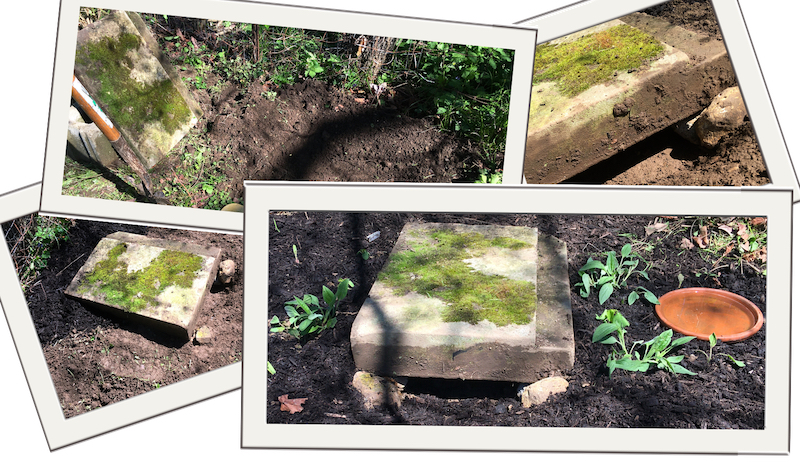
To start, you’ll need an out-of-the-way spot, some scrap wood—I used a stone slab—a couple of large rocks and a shovel.
Choose a section of untreated scrap plywood that’s at least half an inch thick and one to two square feet wide. I didn’t have any untreated wood on hand, but I did have a 16-by-16-inch paving stone, which worked perfectly well.
Remove any brush or weeds from the area where you want to establish your amphibian habitat.
Next, dig a shallow, uniform pit. It should measure the same length and width as your board. As for the depth, you need only dig down about two inches deep. I used a brick to smooth and pack both the floor and walls of my pit.
Place your board over the top of the pit. The back edge of your board should rest directly on the dirt. The front edge of the board will rest on your two large rocks.
Place one rock along the front left side of the pit. The other goes along the front right side. (See picture below.)
This elevated area in front is the entrance to your new habitat. Toads and other amphibians will seek refuge from the sun’s rays in the deep shade created underneath.
Susan Brackney
Finishing Touches
I packed a layer of mulch along the back and side edges of the roof of my habitat. I also planted some extra black-eyed Susans, spotted jewelweed and common milkweed plants nearby. All native to my area, they’ll eventually fill in the space around the amphibian habitat. As they do, they’ll help to attract insects, which, in turn, will bring around new frogs and toads.
I topped the remaining patches of exposed soil with a thick layer of mulch to smother any weedy competitors and lock in moisture. Because amphibians also need access to water, I placed a clay saucer nearby.
Rather than use my chlorinated municipal water, I topped it off with water from my rain barrel.
Want to add a few more toad rest stops around? Turn some clay pots upside-down and partially bury them at an angle, so that they create a little extra shade. (If your pots include drainage holes, be sure to plug these up in order to keep the sun’s rays out.)
Keep some extra saucers of fresh water near each of your semi-buried pots—and then? Keep an eye out for countless new frog and toad friends.


