


Whether it’s a 5-acre hobby homestead or a larger farm with hundreds of acres, fencing is a big job.
And no matter what style of fencing is used—electric or wooden fencing for livestock, welded wire to keep predators out of a garden/orchard or simply a decorative fence to spruce up the boundaries of your property—one common denominator is that they all require posts.
There are a couple of tricks to help you set them securely so that they last for a long time to come. Here are a few suggestions to help you put up posts like a pro.
Types of Diggers
There are several different tools you can use when digging a posthole for solid fencing.
Manual Hand Diggers
For small fencing jobs, a manual, hand-powered posthole digger might do, especially if you aren’t in a big hurry and can afford to tackle the job slowly, digging only a hole or two at a time.
It’s certainly a good workout if nothing else. But hand diggers can really prove their value when repairing fencing. This is where a hand posthole digger is an excellent digging tool as well as a time-saver.

Suppose you have one or two fence posts that need work. Perhaps they are rotting at ground level and simply need replacement.
In the time you could actually warm up the tractor, detach whatever implement is currently on it, hook up a three-point post hole digger and maneuver your tractor into the exact spot, you could probably have the new hole dug by hand—job done with only a little sweat required.
Obviously, for tens or hundreds of posts, this isn’t the tool. But think of your hand digger like an ax, hammer or screwdriver—fast, light, simple, reliable and always ready to use.
Hand diggers also have a role when you’re using auger tools. You might need to use the hand diggers to straighten the edges of a crooked hole or make other fine adjustments.
These farm fencing fundamentals will help you keep things secure.
Handheld Auger
One step up from a manual hand digger is using a handheld auger with a small engine for posthole digging. There are various sizes of these available, coming in one- or two-person versions.
The good news here is that the engine and auger take over the job of penetrating the ground and raising soil to surface. If all goes well, a hole can be dug start to finish in only a couple of minutes.
The bad news is that handheld augers can be quite fatiguing to use. Because of the strong torque from the engine, the handles of the auger constantly try to pivot—sometimes with a powerful jerking force if the auger hits a stone.
This requires the operator(s) to constantly brace against the machine, which is hard work. Additionally, once the auger gets all the way to the bottom, it can be challenging to raise back up.
One technique that can help is to lift the auger out of the hole several times to bring the soil up in smaller amounts.
3-Point Auger Digger
If you already own a tractor with a 3-point hitch, then using a 3-point posthole auger makes a lot of sense. It takes most of the physical work out of the project and reduces much of the job to simply determining the post locations and operating the tractor.
Yet even though the tractor is doing the heavy work, this is a job that does take some time, particularly for many posts. You’ll need to maneuver the tractor into the exact spot—within a couple of inches of your target—and also take care that the auger is going in straight. (Having an assistant or two on hand is a big help.)
Also, fencing tends to be one of those jobs that you don’t do every day, so the question becomes: Should you purchase an auger or simply borrow or rent one for your occasional fencing project?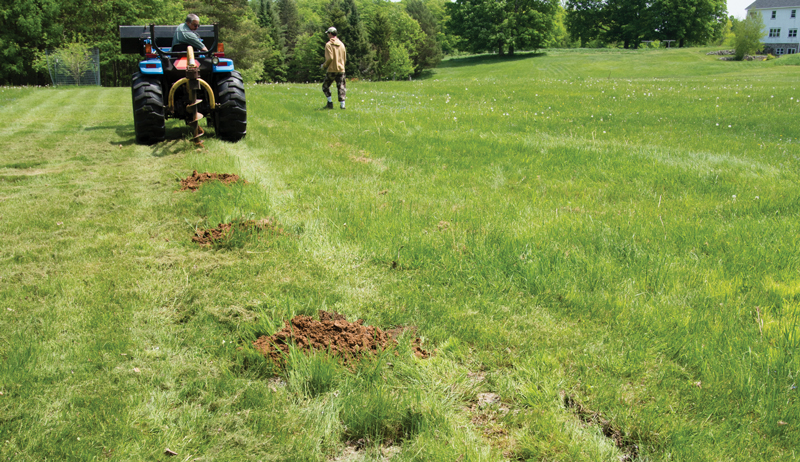
Skid Steer Auger
Similar in concept to the 3-point version, skid steers can also be equipped with powerful posthole augers, too.
One benefit here is that you’re operating the auger in your forward field of vision and don’t have to constantly look over your shoulder the way you do on a tractor.
Check out these 4 tips for auger drilling fencepost holes.
Other Tools To Have
Like most construction and farm jobs, post installation requires a small fleet of tools to get the job done. So in addition to your posthole diggers, you’ll probably want to load up on the following.
Levels
Slopes and uneven ground can fool your eyes into thinking a post is set straight even when it’s not.
Combat the problem by keeping a carpenter’s level on hand. Or better yet, use a handy post level that fastens right to the post while you’re installing.
A post level offers multiple bubbles to help you keep the post properly oriented as you backfill.
Digging Bar
You won’t be digging the hole with the digging bar. However, you will want it around for prying out any large rocks that might appear in your hole and for tamping down the soil during the backfilling process.
You’ll want to use the tapered end of the digging bar to force soil down into the hole alongside the post, and then use the flat end when you’re done to tamp down the soil right at ground level.
Shovel & Steel Rake
Digging a posthole removes a lot of soil from the ground, and you’re going to need all of it (and probably more!) to backfill again around the new post (unless you’re using concrete or gravel).
A shovel will help you get the bulk of the soil back in the hole, and a steel rake will make quick work of the rest.
You’ll also want a shovel to remove turf or sod prior to using an auger. Remember: Most 3-point attachments don’t apply force down, so they may have trouble penetrating thick grass.
Water Container
Pouring a small amount of water into your post hole as you set it can help with soil compaction and make the difference between a firm post and one that is a bit loose.
Gravel or Construction Aggregate
This is for rot prevention. (See later in this article.)
Choose the right kind of fencing for your livestock type.
Backfill Like a Pro
For solid fence posts that won’t wiggle, proper backfilling is key. One helpful tip is to dig a hole significantly larger than the post that will go in it.
Next, consider adding and packing down a few inches of gravel or aggregate as a base at the bottom of the hole for additional drainage. This provides any water that does seep into your hole with a place to go and prevents pooling at the bottom of your post, cutting down on some rot issues.
And speaking of rot, there are a few ideas you can use to help keep your posts standing as long as possible.
Cedar posts are naturally rot-resistant, but you can also use pressure-treated lumber.
Some folks try coating the bottom of the post with roofing tar to help keep moisture out (especially right at ground level where most posts eventually break off), but it’s difficult to say if this extends the life of the post or not.
You can also try using posts made of solid heartwood and not a mixture of heartwood and sapwood. Heartwood comes from the interior portions of a tree and is more rot resistant.
Take It Slow
As you backfill the hole, do it slowly, breaking up clumps of soil and removing any small rocks that might cause air pockets around the post. If you backfill too quickly, you may find that the soil is too loose down at the bottom, allowing the post to pivot and rock back and forth when you push on it.
Tamp down regularly as you go, and use a little bit of water when needed. You might also consider backfilling all the way up with gravel, and while this adds extra cost to the project, it does provide good drainage.
For sandy soils or for posts that need to be extra strong, you can backfill with a fast-drying concrete mix and then add water.
However, one potential problem with this is that water might try to seep into the joint between the post and the concrete. Concrete can also be a problem if you ever need to move the fence or replace the post (from frost heaving, for example).
You can do it! Fencing is a big job, but a solid, well-built fence will bring beauty and functionality to your property for years to come.
Sidebar: Safety First
Before you begin any digging project, know where you’re digging. Think through your fencing plan before you start.
Will you be near any buildings or other areas with buried electric, water, phone or gas lines? Plan on calling a utility location service (dial 8-1-1 in the U.S.) well before you’re ready to start your project.
Projects aren’t fun unless they’re safe, so take a few minutes before starting to think through your work process and utilize the proper safety equipment:
- gloves
- safety glasses
- hearing protection
- dust mask (especially if using dry concrete)
- work boots
Learn how to make a stone crib!
Sidebar: Dealing with Rocks
Rocks are often an issue when posthole digging, but more so in some locations than others. If you hit a rock that your auger or diggers can’t remove, try loosening the area around it with your digging bar. With luck you’ll be able to get enough leverage on the rock with your bar to free it up.
If this doesn’t work, you might need to enlarge the posthole by digging down with your shovel and excavating the rock.
If worst comes to worst, you can consider moving the post slightly up or down the fence line. This might be acceptable for electric fencing where the posts are separated by tens of feet.
If the rock is very large and you absolutely must place a post in that spot, consider an aboveground solution such as a stone crib, where the weight of the rocks holds the post upright.
Otherwise, it might be time for a backhoe!
This article originally appeared in the May/June issue of Hobby Farms magazine.
