

Illustration by Tom Kimball |
Project Level: Intermediate to Advanced (This project requires knowledge and understanding of metallurgy and safe, appropriate welding techniques and procedures.)
Time: 8 to 12 hours
When late-spring turns to summer, it’s essential for small-scale cattle producers to provide shaded areas where their livestock can seek respite from the sun’s heat. In cattle, heat stress—which has been shown to cause decreases in feed intake, weight, milk production and fertility—can set in once the ambient temperature climbs above 77 degrees F, depending on other factors, including humidity, wind speed, water access, and the type and amount of vegetation present.
According to the University of Kentucky Cooperative Extension Service factsheet, “Shade Options for Grazing Cattle,” a pasture-based system can further exacerbate heat stress if cattle are grazing tall fescue infected by endophytic fungi. Consumption of these endophytes, which the factsheet’s authors say appear in 95 percent of tall fescue pastures, can cause an increase in cows’ body temperatures.
Not surprisingly, cooler cattle are more productive: A study from the University of Kentucky conducted during peak heat-stress season shows daily, per-head weight gains of 1.25 pounds for cows, 0.41 pounds for calves and 0.89 pounds for steers when shade is available, while University of Missouri researchers found that cattle grazing endophyte-infected fescue gained 0.72 pounds more per day than their unshaded counterparts. Studies have also shown the availability of shade to increase milk production by 10 to 19 percent and to increase rates of conception in cows by almost 20 percent.
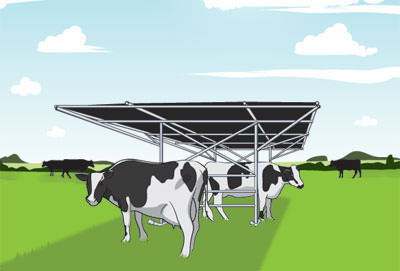
Although cattle typically prefer natural shade sources, if there are no trees in your pasture or if pasture areas shaded by trees are being overgrazed, a portable, manmade structure is a viable alternative. The steps included here, based on plans for a portable cattle shade developed by the University of Missouri Extension, will yield a 20- by 40-foot cattle shade with a 9-foot-wide base designed for easy movement through farm gates. The frame is constructed from welded structural-steel pipe stock, and the structure is covered with mesh shade cloth that blocks 80 percent of the sun’s rays. The structure can shelter 10 to 12 animals.

Materials:
- Horizontal and Diagonal End-support Members
10 10-foot sections 1½-inch structural-steel pipe stock - Support Members
8 12-foot sections 1¼-inch structural-steel pipe stock - Runners
2 22-foot sections structural-steel pipe stock
4 end caps for 2½-inch pipe - Roof Structure
4 40-foot sections 1¼-inch structural-steel pipe stock
5 20-foot sections 1¼-inch structural-steel pipe stock - Supporting Posts
4 10-foot sections 2¼-inch structural-steel pipe stock - Post/Runner Angle Braces
4 2-foot sections 2- by 2- by 1/4-inch angle stock - Angled Supports
8 10-foot sections 1¼-inch structural-steel pipe stock
8 5-foot sections 1¼-inch structural-steel pipe stock - Shade Cover
1 20- by 40-foot sheet shade cloth*
60 grommets indicated for use with shade cloth (optional)
60 12-inch cable ties
*Choose shade cloth that’s manufactured to block 80 percent of the sun’s rays. Some retailers offer custom shade cloth sized to fit your project with preinstalled brass grommets. You can also combine multiple smaller pieces of shade cloth to fit the structure’s dimensions using a sewing machine with a denim needle and heavy-duty thread. (Don’t forget to account for a seam allowance.)
Step 1: Cut support members and supporting posts.
 | Using a chop saw or band saw, cut four 11-foot 8-inch sections and four 11-foot 9-inch sections from 12-foot sections of 1¼-inch structural-steel pipe stock. These pieces will be used as diagonal support members along the sides of the structure. Cut six 8-foot 9½-inch sections from 10-foot sections of 1½-inch structural-steel pipe stock. These pieces will serve as horizontal support members on the ends of the structure. Cut four 9-foot 2¼-inch sections from 10-foot sections of 2½-inch structural steel pipe stock. These pieces will be used as supporting posts at the ends of the structure. |
Step 2: Bend ends of runners.
 | Measure and mark 10¾ inches in from the end of both runners, and add a 30-degree bend at each of the four points. This can be achieved in one of three ways:
|
Step 3: Lay out roof structure.
 | Lay out 40-foot and 20-foot pieces 1¼-inch structural steel designated for roof structure according to the diagram. Arrange two 40-foot lengths of steel 6 feet apart. Measure 8 feet to the right, then situate the second pair. Position the 20-foot lengths of steel at 10-foot intervals. Using a tape measure, find the distance from two opposite (i.e., diagonal) corners. Repeat with the other two corners. Reposition as necessary to achieve the same diagonal measurements. Position the 11-foot 8-inch and 11-foot 9-inch support members that you cut in step 1 according to the diagram. (Working from top to bottom on each side, you’ll use an 11-foot 8-inch member, two 11-foot 9-inch members, and another 11-foot 8-inch member.) Tack-weld all roof components in place. |
Step 4: Position horizontal end-support members.
 | Lay out each pair of supporting posts 9 feet apart. Measure 4 feet 3 inches from the top of the first pair of posts, and position a horizontal end-support member between the two. Position remaining two horizontal end supports at 1-foot 2-inch intervals. Repeat process with second set of supporting posts and horizontal end supports. Use a carpenter’s square to confirm 90-degree measurement of all angles, and tack-weld horizontal end supports in place. |
Step 5: Set supporting posts.
 | Position the supporting posts along what will become the bottom of the roof structure. (Each pair of posts should be centered along the short side of the roof structure.) Tack-weld into place. |
Step 6: Situate and secure runners.
 | Lay out lower runners 9 feet apart. Flip the frame of the structure over onto the runners and situate supporting posts over each of the four 30-degree bends. Tack-weld the posts to the runners. |
Step 7: Position angle braces, angled supports and diagonal end-support members.
 | Situate angle braces, angled supports (7a) and diagonal end-support members (7b) according to the diagram. |
 | Use a carpenter’s square to verify angles, and if necessary, use a chop saw or band saw to trim pieces to desired angle and length. A 4-inch hand grinder can also be used to fine-tune any edges or angles. Tack-weld braces and supports in place. |
Step 8: Weld structure together.
Once you are satisfied with the position of all components, finish welding all metal together.
Step 9: Attach end caps.
 | Attach end caps to runner ends to help keep water out of the structure’s frame. Weld in place if necessary. |
Step 10: Attach shade cloth.
 | If shade cloth does not already contain grommets, attach grommets at 2-foot intervals, beginning at each corner of the cloth. Use cable ties to attach shade cloth securely to the top of the structure. |
Step 11: Site the structure.
If possible, choose a site for the shade at least 50 feet away from buildings or other large obstructions that might impede airflow through the structure. Orient it in a north-south direction to help keep the ground beneath it dry.
If you have a rotational grazing system in place, move the structure with the animals; otherwise, make a point of periodically repositioning the structure to a cleaner, drier section of pasture to manage manure buildup and consequent parasite loads. If moving is not an option, place a high-traffic-area pad underneath to reduce mud.
About the Authors: Brian Craig is an agriculture mechanics teacher at Locust Trace Agri-Science Farm in Lexington, Ky., where he teaches courses on small engines, ag power and ag construction. In 2002, he earned a Bachelor of Science in agricultural education from the University of Kentucky. He grew up on a beef and tobacco farm in Versailles, Ky. Abby Tripp Heverin is former associate editor for Hobby Farms and Hobby Farm Home.
This article originally appeared in the May/June 2013 issue of Hobby Farms magazine.
