It’s a host plant for monarch butterflies. It’s an important nectar source for pollinators. And, growing about 5 feet tall, common milkweed has great paper-making potential, too.
The secret? Stringy fibers sandwiched between the stalks’ outer skin and inner woody cores. The fiber’s strong enough to form attractive, sturdy handmade paper.
Getting Started
I frequently make recycled paper from junk mail, and making milkweed paper follows a similar process. To start, you’ll need several large milkweed stalks as well as a large bucket, crockpot and washing soda. You’ll use these to help break down the raw milkweed fibers.
To make the paper pulp, you’ll also need scissors, an old (but working) blender, and some corn starch. (The corn starch helps your finished paper uptake ink more smoothly.)
Forming your paper sheets requires a papermaking mold (screen), deckle (frame), and a container large enough to accommodate them. You’ll also need a loose sheet of screen mesh and some drying cloths.
Finally, you’ll need two heavy boards and C-clamps or weights for pressing your paper flat as it dries.
Read more: You can recycle junk mail to make your own homemade paper!
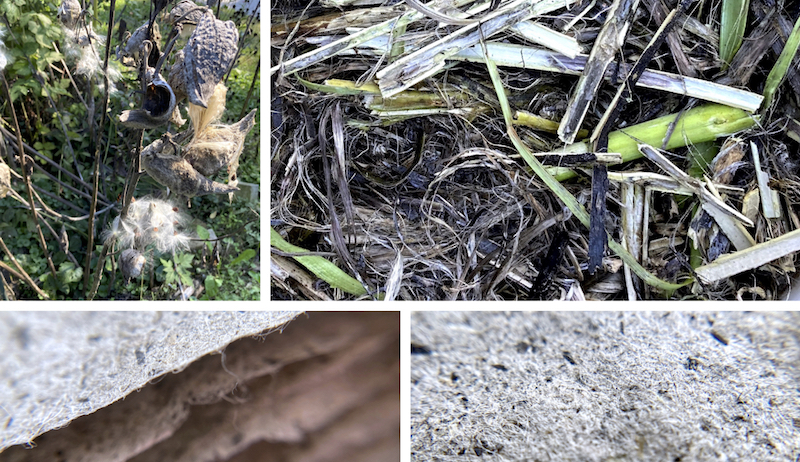
Processing the Fiber
To harvest the milkweed fiber, first remove leaves, flower heads and seed pods from the stalks. Next, break stalks into two or three pieces.
(As you break these, you’ll see some of the long fibers that you’ll be harvesting.)

Susan Brackney
The numbered images (above/below) correspond to the following numbered steps. Steps 1 and 2—Pack the stalk pieces inside your bucket. Cover with hot water. Let soak for several days.
Step 3—Once the stems have softened, you can strip the fiber from between the stalks’ outer skin and inner woody cores. Separate and save as much fiber as possible. (Depending on the size and thickness of your paper sheets, 2 to 3 cups of processed fiber can make roughly six to 12 sheets of paper.)
Step 4—Rinse the fiber well, removing any non-fibrous debris as you go. Place this in the crockpot with the washing soda. (I added one part washing soda per every two parts fiber.) Set the crockpot on high for three to four hours. Stir occasionally and check to see whether the fiber has begun to soften. (If it has, you should more easily be able to tear it apart with your fingers.)
Break It Down
Step 5—Rinse fiber again thoroughly. To break it down further, use scissors to cut it into smaller sections. Place small handfuls of this material in the blender. Add 5 cups of water and a teaspoon of cornstarch. Pulp these ingredients in the blender.
You should end up with a cloudy, opaque liquid. (If you can still see many long fibers in the mixture, keep blending.)
Step 6—Pour a few batches of pulped fiber into the large paper-making container. You want the pulp liquid level to be deep enough that you can easily submerge your mold and deckle. (Don’t have these? You can use a window screen and an empty picture frame to form your paper sheets.)
Agitate the pulp bath with your hand to evenly distribute its contents. Then, holding the mold and deckle together, dip into the container.

Susan Brackney
Step 7—Keeping the mold and deckle together, move them from side to side as you slowly bring them up. (This motion helps to lock the paper’s fibers together.) Allow excess water to drain through the screening.
Steps 8 and 9—Place the mold and deckle upright on a cloth to catch drips. Next, remove the deckle from the top of the mold. Top the wet paper with your loose sheet of screen mesh. Use a cloth to blot excess water through the screen mesh. Now, remove the screen mesh.
Read more: Milkweed is edible, too. Check out this recipe for milkweed bud pasta.
Finishing Touches
Step 10—Lay one of your boards on a flat surface and cover with an absorbent cloth or several layers of rags. Next, place the mold with the just-blotted sheet of paper face down. Blot the back of the mold’s screen with a dry cloth. (This loosens the sheet so you can release it onto the dry surface.)
Step 11—Remove the mold. Make sure the wet sheet is lying flat. Place another dry cloth on top, smoothing out any wrinkles you notice.
Keep sandwiching these sets—dry cloth, new paper sheet, and additional drying cloth—as you go. Once you’ve finished making milkweed paper, top with one more dry cloth and the other board. Apply uniform pressure to your paper-and-cloth sets with weights or C-clamps.
If you like, you can speed their drying by periodically replacing some of the wet cloths in the stack with dry ones. And, once the milkweed paper is dry—or nearly dry—you can smooth its surface with a cool iron.
Step 12—You have finished sheets of milkweed paper!


