


Sometimes summer just isn’t long enough to satisfy the urge to grow all things green. But with a little help from a cold frame, the growing season can be extended by several weeks in both directions.
Even better, with careful crop selection, cold frames enable the gardener to keep winter greens and other vegetables ready for harvest throughout the entire winter season in most regions.
And if that isn’t enough to convince you to dig into cold frames, these little gems can be inexpensive and simple to manage when just a few tips are kept in mind.
How Cold Frames Work
The purpose of cold frames is not to create summer-like conditions conducive to tomatoes and peppers. Sadly, those tasty treats require either a greenhouse or heated high tunnel. (Or you can just wait until summer rolls back around.)
Instead, cold frames shine at prolonging the growing season of hardy crops by limiting the freeze/thaw cycles typical of most winters. Ideal crops include:
- carrots
- green onions
- lettuces
- spinach
- corn salad
- radishes
Through the collection of solar heat via a glass, plastic or other translucent covering, cold frames warm the soil while blocking chilling winds and soaking rains.

These traits work together to keep temperatures inside the cold frame around 10 to 20 degrees Fahrenheit above outside temperatures, depending on materials used.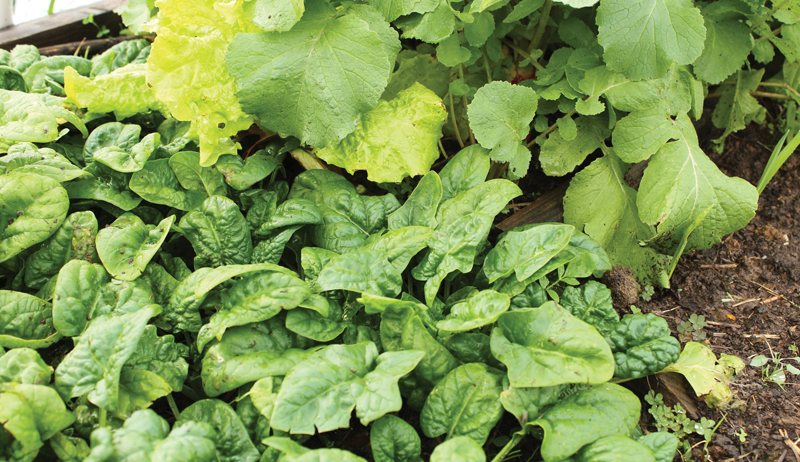
What Grows in the Cold?
Nothing really grows in the cold.
There are, of course, a few exceptions such as mâche and snowmen. But other than that, you can’t grow much of anything when it’s cold outside.
So instead of trying to grow vegetables in the cold, you’ll grow cool-season crops close to harvest size during late summer and early fall before adding the cold frame.
Candidates should be cold-resistant and able to withstand cool, moist soil and include many varieties of:
- lettuce
- spinach
- turnips
- corn salad
- beets
- mustard greens
- scallions
- Swiss chard
- mesclun
Experimentation is key to discovering what works best in your garden.
As an added bonus, the cut-and-come-again crops, such as Swiss chard and leaf lettuces, often reestablish themselves extra early in spring. This can provide another burst of enticing meals before it’s time to start the spring plantings.
Read more: These organic methods will help you control leafminers on your Swiss chard.
Timing is Everything
The trick to a successful cold-frame season is proper timing. Yet, because hardiness zones and individual garden sites contain different climates and microclimates, the exact timing of planting will be a bit of trial and error.
The method I use in my Zone 7 garden any time I plant a new fall/winter crop is simple. Just add together the seed packet’s expected germination time and days to harvest. Then, calculate backward from your first frost date to get the date for the first sowing.
Each week for at least a month, sow a small row to get an idea of what works best for germination and quality of harvest for each cultivar you choose. As you make notes, jot down weather conditions as well, since this dramatically affects the results.
Unlike in summer , this form of succession planting doesn’t provide a maturing harvest supply over multiple weeks, since winter crops basically stop growth once shorter days hit. Rather, its purpose is to help you determine which growth stage you prefer each crop to be at once they go into this winter holding phase.
Then, because plants are basically hibernating, you can harvest all through winter or until it gets too cold.
This form of succession planting also gives a good indication as to which growth stage each cultivar lasts the best and the longest in throughout its winter hibernation. For example, in my garden, most carrot cultivars that do well in the winter need to reach a relatively large baby carrot stage prior to the first heavy frost in order to provide the sweetest carrots possible while still being large enough to handle slightly damper soil than typically used for carrots.
You will develop a sense of timing and preferences for your particular needs over time.
Construction Basics
Cold frames are simple to build. The goal is to create a bottomless box no higher than 12 to 18 inches in back and no lower than 8 inches in front. (Your needs will determine the length and width.)
Typical sizes range anywhere from a 3-by-3-foot cold frame to my personal favorite of 3-by-5-foot. However, it’s not uncommon to find cold frames with lengthier sides and up to 4 feet of depth. So while there’s no hard and fast rule on height and length, try to keep the dimensions on the lower side to best retain heat.
And while many construction plans recommend slanted tops to provide optimal solar heat acquisition, it’s not entirely necessary as long as placement is in full sun with a decent amount of wind protection during those cold, brisk winter winds.
As for materials, use what’s on hand to keep costs down. Scrap untreated lumber, bricks, masonry blocks or hay bales all work great. And only worry about slanting the top if you desire to do so.
To create the light—or lid—you need some type of translucent material to allow the sun’s rays to enter the box. The light may be made from repurposed storm doors or windows, shower doors, salvaged greenhouse panels, Lexan or some other clear material to further increase savings.
If none of these materials are available, use heavy-duty plastic sheeting instead. You can build a frame for the sheeting or simply drape it across the box and secure well with blocks, water jugs or other heavy items to prevent heat escaping.
Key Considerations
When considering which lighting material to use, keep the following in mind:
- durability during heavy snow, ice or hail
- the potential for little children or pets to jump onto the top during play
- the amount of wind and rain/ice/snow the site receives during winter
- ease of acquirement
Another consideration is the typical temperatures during the time you intend to keep crops living in the cold frame.
For instance, if winters are typically mild, you can easily opt for the lighter plastic sheeting for use as your lighting source. But colder, more extreme winters may require more durable storm window-type glass or even Plexiglas.
When I first started with cold frames, I opted for the less expensive greenhouse-type plastic and worked my way through the different options. Finally, I settled on Plexiglas and storm windows due to their durability and length of life.
But each garden and gardener is different, so don’t be afraid to try out a few to see what you like best, especially those options that you can find for free or at the local flea market.
Read more: Here are some additional tips for using cold frames for winter gardening.
Site Selection
Choosing a site couldn’t be easier.
Walk your garden, and select the sunniest spot available. Just keep in mind that during the winter months some areas will receive more or less light than during the summer months, due to the changing of the sun’s position in the sky and trees losing their summer foliage.
If time allows and your patience is strong enough, monitor a few spots during a full fall-to-spring cycle to ensure your chosen location will work well.
Also, check the site’s drainage capabilities. A low place that pools the cold winter rain under the frame will end your winter garden.
You also want to place the frame in an area with wind protection, such as near shrubs or other tall plantings provided they do not block valuable sunlight. However, stacking hay bales or other large items along the windward side of the frame in the event of especially cold and windy days can create temporary wind protection.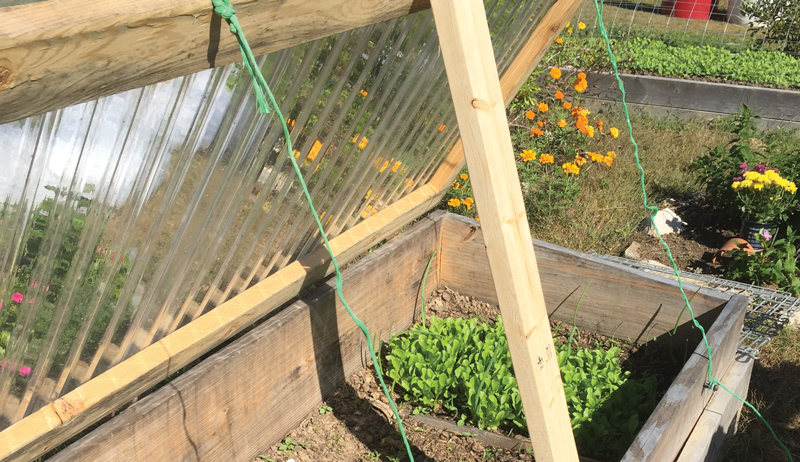
Ventilation Required
One often-overlooked aspect of cold frame usage is the inherent need to ventilate, sometimes every day, despite frigid winter weather. Because you’re growing cool-season crops, you need to keep the internal cold frame temperature on the cooler end of the heat spectrum—most commonly between 45 to 60 degrees — depending on the crop.
So keep a thermometer in the center of the bed and monitor throughout the day until you get a feel for when to vent.
In most cases, outside temps of 20 degrees and higher on a bright, sunny, windless day require venting for at least a few hours, sometimes with only a mere crack in the lid. Warmer weather calls for wider openings with some days, especially those nearing 35 degrees and up, requiring the lid to be fully opened.
You can incrementally prop up the lids with sticks, bricks, scrap lumber, even chains attached to an outside wall or post. Just stay constantly aware of the outside temps and vent as needed to avoid cooking your greens before you get them to the dinner table.
If you’re not keen on keeping constant watch on the cold frame temperatures (or if you’re away from home much of the day), you can install a simple self-ventilating arm that does the ventilation for you. While it is an added expense, they’re not too pricey if you shop around and are simple to install. So don’t let worries over ventilation keep you from trying out a cold frame!
However, you choose to ventilate, with a little patience and practice, knowing when to raise the lid will become second nature.
Read more: These 6 tools will help you keep the temperature just right in a cold frame or greenhouse.
Additional Insulation
On the flip side of ventilation, you may need to occasionally provide additional insulation during extra frigid weather. When temps drop into the single digits or when conditions call for freezing winter winds, ice and/or snow, add extra insulation by placing one or more heavy blankets (or several inches of hay or straw) across the top and sides of the cold frame.
Blankets tend to fair windy weather better than hay and straw, as they don’t blow away as easily.
As for snow, remember that snow acts as an insulation blanket itself. So if all other factors don’t warrant extra insulation, snow may be just what the cold frame needs to withstand a short period of extra cold weather. Just remove any additional insulation or snow when temperatures begin to rise to avoid overheating your tender vegetables inside.
If you’re not quite ready for the end of the gardening season, then you’re a good candidate for cold-frame gardening. Both inexpensive and simple to manage, cold frames extend the season by several weeks. You can get tasty, fresh-from-the-garden meals even during the coldest of winters.
Now you don’t have to put up that trowel for the winter!
This article originally appeared in the September/October 2020 issue of Hobby Farms magazine.
