


Have you ever poured a carton of store-bought broth and wondered, “Why can’t I make this myself?” Well, you can, and your garden holds the key to making flavorful broth all year long.
Vegetable broth is a clear liquid made by extracting the flavor of vegetables and herbs into water and then straining out the solids. While it’s sometimes served on its own, broth often serves as the base for soup, which usually contains pieces of food.
Clive Wanstall, chef and instructor of culinary arts at Lane Community College in Eugene, Oregon, explains it simply: “A soup is generally the finished product that turns up in a bowl.” Stock, a term often used interchangeably with broth, is made in a similar manner to vegetable broth but extracts its flavor from the bones of livestock, fish or fowl.
Hit or Remiss
Almost any combination of vegetables will make a good broth, and your selections might change with the seasons. While you’ll want to use the vegetables at hand, there are some you should almost always strive to incorporate into the mix.
“Mirepoix is the term that we use for a standard ratio of vegetables that are used in a foundation stock, which is 50 percent onion, 25 percent carrot [and] 25 percent celery,” Wanstall explains. These three vegetables are the flavor base of your broth.
The total weight of other vegetables added should not exceed that of the mirepoix.

Brassicas are tricky. “Some of the vegetables, like cauliflower, Brussels sprouts, broccoli—they’re going to be delicate to use and tend to not work well,” Wanstall says. “Cabbage can work well if done carefully. The problem is that these vegetables are very volatile [i.e., their flavor is released quickly]. You can only cook them for a short period of time.”
Vegetables in the brassica family can impart a musty flavor to the broth if cooked too long.
Check out these 11 plants to start in your fall garden.
The best bet is to find a mixture that you enjoy and that maximizes your seasonal harvest. Whatever you decide to use, vegetables may be used in their raw state. But cooking them in some vegetable oil first will extract more flavor.
Both Wanstall and Jason Robinson, sous chef at Heidi Tunnell Catering Company in Creswell, Oregon, recommend browning the vegetables in the oven or on the stovetop. You can also brown a portion of the vegetables, depending on the flavor you want to achieve.
Keep a few ingredients, such as soy sauce, dried mushrooms and tomato paste, in your pantry and refrigerator to add nuance to each batch. Wait to add salt until you actually use the broth in a recipe. That way, you can adjust the seasoning as needed for the dish in which it’s used.
Balancing Act
A good ratio of water to vegetables is 2 to4 cups water for every pound vegetables. Use cold water for the clearest vegetable broth. Impurities from water heaters can cloud the liquid or give it an off-flavor.
For the best results, Robinson suggests dicing or chopping the vegetables. “When you’re making a vegetable stock, cut things small, like 1/2- to 1-inch square … to increase the surface area,” he explains.
“You get better flavor extraction, and you’re not cooking it too long.” Use a food processor for this task if you don’t relish the chore of chopping.
Learn how to grow ramps, a true culinary delicacy.
Eyes on the Prize
Transfer your browned vegetables to a stockpot and add water. A true stockpot, which has a heavier bottom and is usually taller than it is wide, is best for controlling evaporation, Wanstall says.
“The narrower the pot is, the less evaporation takes place,” he explains. “[Food] can often stick to the bottom of the pot, so a thick bottom is important as well as the right size.”
Don’t cover the pot. According to Wanstall, “Covering [it] up does two things: It keeps some of the volatile components in the pot that may lead to discoloration, and … if it’s covered up [you] don’t watch it.”
Bring the water to a simmer for 30 to 45 minutes, tasting as you go.
“The overruling guide here is when it tastes good, go with it,” Robinson says. Delicate herbs, such as thyme or savory, and strongly flavored vegetables, particularly brassicas, might need to be added toward the end of the cooking time to avoid overpowering the broth.
When the broth is done to your liking, remove it from the heat and strain it immediately. Vegetables left in hot water will continue to cook, changing the flavor. For clarity and taste, don’t press the vegetables when straining.
If the broth will not be used immediately, cool it down quickly by immersing the container of strained broth in a sink filled with cold water. Stir often until the pot is cool enough handle. If immersion is not practical, you can also use ice.
“We actually make the soup concentrated with less liquid than it needs, and then use the ice to be part of the cooling process,” Wanstall says. Another option is to simply transfer the hot soup into shallow containers to put directly in the refrigerator.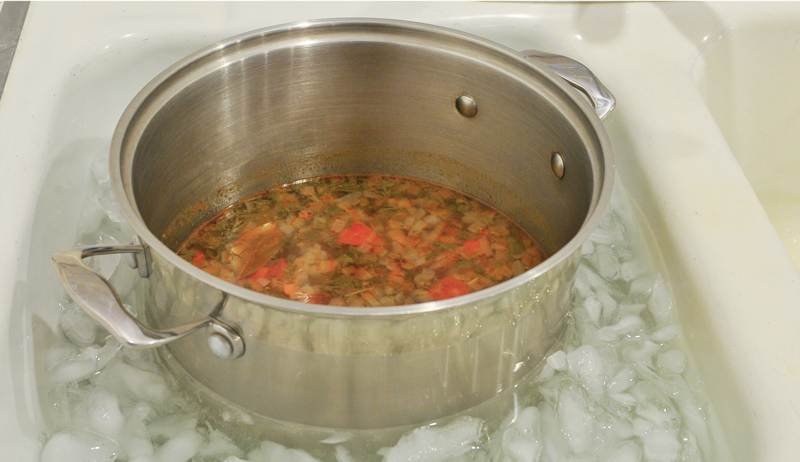
Value in Versatility
You don’t have to follow a recipe when making your broth. Use what you have in the garden and what you like.
“Don’t be afraid to experiment,” Robinson says. If your first effort doesn’t turn out, you can often rescue it by using about a quarter of it in the base liquid for your next batch.
Using parts of vegetables you would otherwise compost is a good way to get the most out of your garden. However, you shouldn’t throw anything and everything into the pot. Use only what is wholesome and clean.
Save the tougher portions of leeks, pea pods, seeds and pulp from winter squash—anything that has good flavor but isn’t something you’d want to eat as-is. Keep scraps in resealable plastic bags in the freezer or refrigerator until you have enough for a full pot.
The next time you need liquid for a recipe, consider using your homemade broth. Use it to make white sauce or gravy or as the liquid in stew or other braised dishes. Vegetable broth can also perk up grains when used in place of water as the cooking liquid, and broth is always recommended for making risotto.
Wanstall offers still more possibilities.
“Mashed potatoes cooked in vegetable stock—oh my gosh, delicious! Add to roasted vegetables to control the cooking. It will keep them from getting dry if they are browning too quickly. Any type of puréed vegetable dish, instead of using milk or cream or butter to augment it, a little broth will smooth out the vegetables, as well.”
For a quick meal, use the broth as a base for soup and add leftover pasta or rice along with vegetables and maybe some cooked shredded chicken or beans. Simmer the soup until heated through, and you’re ready to eat.
Keeping the Magic
If you’re preparing broth in quantity, you’ll need a way to preserve it. Freezing or processing in a pressure canner is your best option.
Freeze
Transfer cooled broth (40 degrees F or lower) to appropriate containers. Use heavy-duty plastic freezer bags, rigid-sided plastic containers or freezer-safe jars, leaving at least 1 inch headspace between the soup and the top of the container.
In order to keep bags flat for stacking, place them on trays until frozen. The trays will also guard against leaky bags. Another option is freezing in ice cube trays and transferring to bags so you can more easily control the amount you need in a recipe.
For the best quality, use frozen broth within one year.
Here are some basic pointers for preserving with a pressure canner.
Pressure Can
Always use a pressure canner to can vegetables and vegetable broth. Low-acid foods cannot be safely canned in a water-bath canner.
If you’re using a dial-gauge pressure canner, be sure to have the gauge tested every year. (Contact your local cooperative extension office for testing locations and dates, or inquire wherever you buy your canning equipment.) Gauges that are 2 or more pounds off should be replaced.
Step 1: Sterilize
Wash jars, lids and rings in hot, soapy water. Drain. Place rack in canner and cover with 2 to 3 inches water. Heat water to 180 degrees F.
Step 2: Fill
If broth has been cooled, skim any fat and reheat it to boil. Fill jars, leaving 1 inch headspace. Wipe jar rim, place lid and screw on ring until finger tight. Place jars in canner, being careful not to tip them.
Step 3: Process
Lock lid in place and turn burner to high. When steam is exiting the open vent or petcock, set timer for 10 minutes. At the end of that time, put the weight on the vent or close the petcock.
(Use the 10-pound weight if you are at or below 1,000 feet of elevation, 15 pounds if you are above that.)
When the dial reads 11 pounds of pressure (at zero to 2,000 feet of elevation), or the weighted gauge begins to rock, set your timer: 30 minutes for pints or 35 minutes for quarts. If you live in an elevation above 2,000 feet, increase the pressure by 1 pound for every 2,000 feet. Maintain this pressure (or slightly above). If the pressure falls below the mark at any time, restart the timer once it returns to the correct reading.
At the end of the processing time, turn off heat and allow pressure to fall to zero naturally. Do not attempt to cool the canner or remove the weight. Once the gauge has returned to zero (or the vent lock has returned to its normal position in canners without gauges), carefully remove the weight or open the petcock.
You can unlock the lid, but do not open the canner. Wait an additional 10 minutes before removing the lid to decrease the risk of getting burned by released steam.
Step 4: Cool
Remove the jars from the canner using a jar lifter. Take care not to tilt the jars or they might not seal properly. Place jars on a folded towel or cooling rack, leaving space between jars. Make sure they are clear of any drafts; do not tighten or remove rings, and leave the jars undisturbed until completely cool.
Step 5: Store
After 12 to 24 hours, check seals. Immediately reprocess, refrigerate or freeze any jars that have not sealed. Remove rings from sealed jars. Wipe jars clean, label and store in a cool, dark place for up to one year.
Once you get in the habit of making vegetable broth, you’ll find your compost buckets don’t fill up as quickly, with more of the vegetable trimmings going into the stockpot. Make homemade broth a permanent and indispensable staple in your kitchen, and you’ll always have the means to enhance your meals.

Sidebar: In Season
Jason Robinson, sous chef at Heidi Tunnell Catering Company in Creswell, Oregon, whose motto is “Let’s try it,” recommends experimenting when it comes to what vegetables to use for broth. Here are some seasonal suggestions:
Spring
- leeks (white and green parts)
- peas (including pods)
- carrots
- green garlic
- spring onions
- leafy greens (small quantities, shorten cooking time)
Summer
- tomatoes
- baby carrots
- green beans
- fresh shell beans
- summer squash
- fennel (use sparingly)
- corn cobs (try roasting first)
- roasted eggplant
Fall
- parsnips
- beets (use sparingly)
- winter squash (especially seeds and pulp)
- leeks
- cooking water from dried beans as liquid
Winter
- potato skins (add toward end of cooking)
- winter squash (especially seeds and pulp)
- root vegetables (red beets will turn broth red; turnips can be too strong)
- mushrooms
- lentils (will thicken and cloud broth)
Recipe: Spring Vegetable Broth
This is a delicately flavored broth, so use strong herbs, such as rosemary and sage, sparingly, if at all. These measurements are approximate. It’s OK if you use a little more or less of a certain ingredient.
Yield: about 7 cups
Ingredients
- 2 T. vegetable oil
- 1 cup finely chopped leeks (white and green parts)
- 1 cup finely chopped yellow onion
- 3 cups chopped bok choy or Chinese cabbage
- 4 cups chopped mild greens (e.g. spinach, romaine lettuce)
- 1/2 cup chopped pea pods or snap peas
- 7 cups cold water
- 1/2 cup chopped, mixed fresh herbs (mostly thyme and parsley)
- pepper to taste
Preparation
In large sauté pan over medium heat, heat oil until shimmering. Add leeks and onions, and sauté until leeks are wilted, about 4 to 5 minutes.
When onions are soft, add bok choy, greens and pea pods, stir, and cook 3 to 4 more minutes or until greens are wilted. Transfer to 6-quart stockpot and add water.
Over medium-high heat, bring water just to simmer. Reduce to low to maintain gentle simmer for 40 minutes. Add herbs and simmer 10 more minutes. Strain broth, taste and adjust seasoning as needed.
Refrigerate for up to three days, freeze or can.
Recipe: Winter Vegetable Broth
Mushrooms add a wonderful earthiness and make this a good alternative to meat stock or addition to meat dishes. I prefer to use golden beets in this soup both for their color and flavor, but you can substitute red beets.
Yield: about 8 cups
Ingredients
- 1⁄4 cup vegetable oil
- 2 cups chopped golden beets
- 2 cups chopped carrots
- 3 cups chopped yellow onions, divided
- 2 cups chopped rutabaga
- 2 cups chopped mushrooms
- 8 cups cold water
- 2 T. dried thyme
- 1 T. peppercorns
- 2 tsp. dried rosemary
- 2 T. soy sauce (optional)
Preparation
In large sauté pan over medium heat, heat oil until shimmering. Add beets, carrots, rutabaga, mushrooms and 11⁄2 cup onions and sauté 10 to 15 minutes until onions are soft.
Transfer vegetables to 6-quart stockpot, along with reserved onions. Add water and peppercorns.
Bring to simmer and hold there for 40 to 45 minutes. Add dried herbs and cook an additional 10 to 15 minutes. Strain broth, discarding solids. Add soy sauce if desired.
Refrigerate for up to three days, freeze or can.
This article appeared in Hobby Farm‘s Best of Hobby Farms Home 2019, a specialty publication produced by the editors and writers of Hobby Farms magazine. You can purchase this volume, Hobby Farms back issues as well as special editions such asBest of Hobby Farms and Living off the Grid by following this link.
