

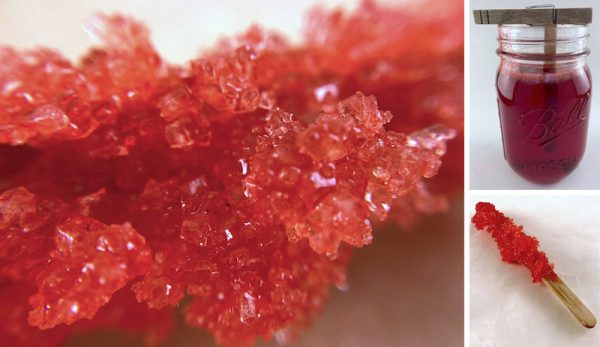
I’d always wanted to try making my own rock candy, but, frankly, I was kind of grossed out at the prospect of leaving several jars of sugary solution sitting around for days and days as I waited for the delectable crystals to form. (I admit, too, that I didn’t want to have to wait so long to get my sugary fix.)
But science—and this guy!—came to my rescue. See, it turns out that you can actually whip up a pretty—and satisfying—batch of rock candy in an afternoon.
Gather Your Supplies
To make super-fast rock candy you’ll need:
- candy thermometer
- stovetop-safe saucepan
- small canning jars (half-pints work well)
- bamboo skewers, wooden craft sticks or a few lengths of string
- clothespins
- 4 cups of refined, white sugar
- a small dish containing a little extra sugar
- 1 cup water (the purer, the better.)
- liquid food coloring (optional)
- liquid flavoring (optional)
Accuracy is very important for this, so make sure your candy thermometer works properly. You can test it by placing it in a pan of water that you bring to a boil. The thermometer reading should be 212 degrees F in boiling water.
Is your measurement off? Account for the over or under by adding or subtracting from future temperature readings accordingly.
Also, when selecting your saucepan, choose one that’s slightly larger than you think you’ll need. (If the pan’s too small, the hot, bubbly mixture just might get away from you!)

You should also make sure that it is very clean. Impurities and debris can affect the formation of your sugar crystals.
As for the last few ingredients in the list, I have found that filtered water works better than water straight out of the tap. Finally, if you want to make rock candy in an assortment of color-and-flavor combinations, you’ll need separate canning jars for each.
Some nice combinations to try include:
- red coloring and cinnamon or cherry flavoring
- yellow coloring and lemon or banana flavoring
- orange coloring with orange or butterscotch flavoring
(You could also make several different flavored varieties, but leave the coloring out to create a “mystery” batch of rock candy!)
Read more: Keep things sweet with this recipe for spiced pumpkin coconut custard.
Getting Started
Mix 1 cup of water and 4 cups of sugar in your saucepan. Put on medium- to medium-high heat and stir constantly. Clip your candy thermometer to the side of your pan, taking care not to let the bottom of the thermometer make contact with the very bottom of the pan.
(As I stir, I periodically slip my spoon under the thermometer’s tip to make sure it is still in proper position.)
Your goal is to heat the sugar solution to 230 degrees F exactly. (Don’t let the mixture exceed this temperature!) As you stir and watch the thermometer, you will likely need to raise or lower your cooking heat. Once the sugar mixture approaches and then reaches the 230-degree mark, it will bubble up and go from opaque to clear.
At this point, you’ve transformed the sugar into a super-saturated solution.
Seed Crystals and Next Steps
Turn off the heat and let the solution drop to 220 degrees F. Dip your bamboo skewers, wooden craft sticks or lengths of string into the solution, then coat them with raw sugar by dipping or rolling them in your small dish of sugar.
These are your seed crystals. When it’s time, you’ll use clothespins to suspend one of these per canning jar.
Once the solution has reached 220 degrees, add optional coloring and flavoring, but don’t dally. (I added 1/2 teaspoon of red to one full batch and was happy with the resulting vibrancy.) How much flavoring you use depends on the potency of the flavor you’ve chosen and how strong you want your finished rock candy to taste.
Next, carefully pour the hot sugar mixture into your containers. Suspend one seed crystal skewer (or string) per jar, and don’t let it touch the jar’s bottom or sides. Leave the jars in place for the next four or five hours.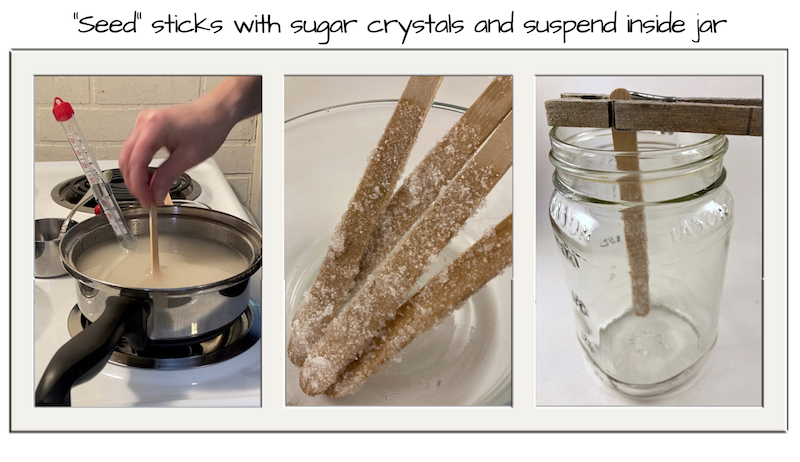
As the liquid cools, the sugar that you forced into solution will come back out again. As it does, new crystals will glom onto the seed crystals you introduced.
To extract your finished product, you may need to break up a few stray crystals on the top or around the edges of your jar. Suspend the rock candy inside an empty container to drip dry, and use hot, soapy water to remove leftover syrup from your jars.
