A classic holiday season is not complete without the smell of fresh pine and a tree covered in sentimental décor. Stitched tree-stump ornaments make a great memento from the tree that can be cherished long after its needles have begun to drop.
This craft is not only fun, but it’s a great way to properly care for a fresh tree. As part of proper care for a freshly cut tree, the National Christmas Tree Association recommends cutting at least a 1/2-inch-thick disk of wood from the base of the trunk before putting it in its stand. I found that it’s quick and easy to get a perfectly clean cut using my miter saw, but any saw should work. Most tree lots will even cut the base for you if ask, but the sooner you can place the tree in water after the cut the better.
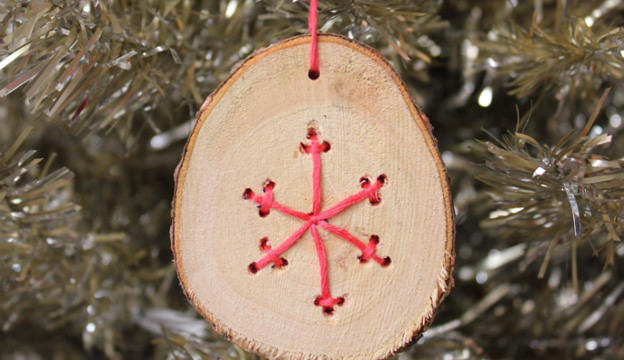
The leftover “tree cookie,” as we call them in our household, can be turned into an ornament, a great annual craft to remember each tree by.

To make an ornament you’ll need:
- Christmas tree trunk slice, about 1/2 to 1 inch thick
- drill and small drill bit
- marker or pencil
- embroidery floss or bakers twine
- needle
- scissors
- small photo (optional)
- craft glue (optional)
Step 1

Use a marker or pencil to mark the holes for drilling a design that you will then stitch into the wood. Any simple shape that uses straight lines will work or click here for a simple snowflake or tree template. Don’t forget to add one extra hole at the top for hanging.
Step 2

Drill holes through the wood disk, and if needed, use a bit of sand paper to smooth out the edges.
Step 3
Cut a long piece of embroidery thread (mine was about 2 feet long), and thread it through the needle.
Step 4


Stitch your design into the disk as if it were a dot-to-dot drawing. For the snowflake design shown here, stitch the three main lines first. Then bring the needle up from the center hole on one side of all three stitches, cross it over them, and run it back down through the same hole. This should center the threads and give the illusion of six stitches. Next, stitch the intersecting lines on each point, finishing by tying off the threads on the back side with the starting thread.
Step 5

Use the leftover thread on the needle to run a loop through the top of the ornament to be used as a hanger.
Step 6


The ornament could be complete here, but I was bothered by the messy look of the back side and decided to cover it up with a photo, further capturing the memories of the season. Take a small photo and trace the wood disk onto it. Cut the photo out, following the traced line but insetting it a bit. Using craft glue, attach the photo directly to the wrong side of the stitching.
Crafting Tip
Make a few extra cuts from the stump and each family member can have their own ornament. When a kid moves out, they’ll have a collection of stitched tree-stump ornaments, perfect for trimming their very own tree.


