
All it takes is one good storm—or just one very windy day—to send tree branches earthward. Those fallen sticks and large limbs can really add up. That goes for any woody shrub trimmings you happen to generate while pruning as well. Before long, you can be left with a truly massive brush pile.
Although lots of people choose to burn their brush, you can extract a lot of value from that old pile of sticks. Here are six ways to put your brush pile to better use.
Biochar Basics
As a soil amendment, biochar can improve soil structure, moisture retention capabilities and overall nutrient availability to plants. And, as it happens, dried limbs and branches—especially those from softwoods—make great feedstock for making biochar.
Whether you dig your own burn pit or use a biochar kiln, any limbs from your brush pile that you intend to include for this specialized burning process (pyrolysis) had better be aged and bone-dry. Ideally, they should be about 3 inches in diameter or smaller, and they should break easily with a loud crack when you bend-test them.
Because it can take up to 100 pounds of brush to make just 10 to 20 pounds of biochar, your best bet is to save up limbs and sticks over several months’ time, sorting them by size as you go. Gardening with Biochar author Jeff Cox recommends making a couple of piles—one for branches between 2 and 3 inches in diameter and another for sticks less than 2 inches around.
Cover these piles with tarps to keep the rain out as you wait for the sorted wood to reach levels of 10 percent moisture or less. At that point, they’ll be ready for their transformation from plain-old yard waste to pyrolyzed prize.
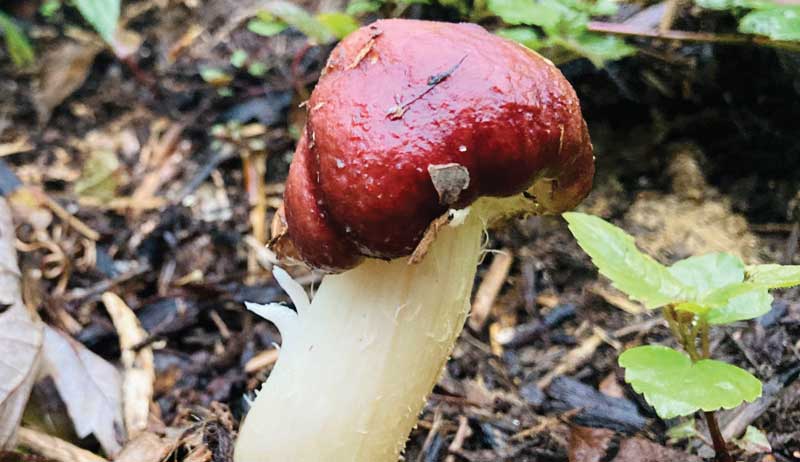
Mushroom Magic
Provided some of the limbs in your brush pile are the right sizes and types of wood, you can use them to grow your own mushrooms. In general, hardwoods such as hickory, chestnut and oak are ideal. You’ll need at least one live, healthy, newly cut tree limb that’s 3 to 8 inches in diameter. You’ll also need to obtain mushroom spawn that’s suitable for the kind of hardwood you have on hand.
For instance, shiitake mushrooms will readily grow on alder, ash, beech, chestnut, hickory and oak, among others. And many types of oyster mushrooms do well on alder, beech, oak and hardwood maples.
Incidentally, any wood you plan to use should always be kept up off the ground. If tree limbs are permitted to make long-term contact with the soil, potentially competing fungi could begin to colonize the wood before you’ve had a chance to introduce your chosen mushroom spawn.
Typically, mushroom spawn is sold in the form of small, inoculated plugs or via bags of inoculated substrate such as hardwood sawdust. (Plug spawn can be slightly more expensive, but it’s a good choice for beginners.) Before you begin inoculating your cut tree limb, separate it into sections that are each about 3 to 4 feet long.
Next, drill a row of 1-inch-deep holes spaced 6 inches apart along the length of each of these limbs. Then, turn each limb and drill a second row of holes starting a couple of inches below those in the first rows. Repeat these steps until you have a staggered series of holes forming a diamond pattern along the length of each limb. (By staggering these holes, you reduce the risk of overcrowding once your mushrooms begin to grow. Harvesting them in this configuration is easier as well.)
Once your holes are drilled, insert the mushroom spawn plugs using a small mallet to tap them into place as needed. After the plugs are in place, seal each hole by brushing on some melted beeswax.
Place the inoculated limbs on a tarp or pallet in a cool, shady spot and water them once a week. It can take six months to a year or more before you see your first flush of mushrooms. Once the limbs begin to produce, however, you may get multiple harvests over many years.
If you don’t have just the right hardwood limbs, you might try growing red wine cap mushrooms instead. These will readily colonize a bed of chipped hard and soft woods. To start, choose a shady garden spot and water the soil well. Next, add a layer of fresh wood chips and water again. Sprinkle red wine cap spawn over the top of this layer and cover with about an inch of wood chips. Continue with this layering process until you’ve run out of spawn. Mulch with one more layer of wood chips, water again, and keep moist. Depending on the time of year and depth of your mushroom bed, you may start to see mushrooms in just a few weeks.
As a rule, early spring is best for most outdoor mushroom projects, but fall also works—if you still have several weeks before the first frost.
Susan Brackney
Hügelkultur Helper
Logs and branches that have been systematically arranged to form a mound have long been the basis for hügelkultur. Translating into English as “hill culture,” hügelkultur enables gardeners to literally rise above poor soil and can be especially useful if you have very heavy clay or rocky soil.
To convert that brush pile into a proper mound garden, start by eliminating any turf or weeds in an area that’s at least 3 feet by 6 feet. (Set the green plant matter you remove aside to be re-included later.)
Next, arrange large logs and branches to form a flat base upon which to build. Follow this with a large layer of smaller branches and sticks. Crisscrossing these can help them stay put. (Be sure to avoid using live limbs from aggressive rooters such as weeping willow or Japanese honeysuckle.)
The next layer includes plant waste such as nitrogen-rich grass clippings, vegetable scraps and the plants you pulled up earlier. (Again, don’t include super-rooting invasive weeds such as English ivy.) Top with a thick layer of aged compost and at least 4 inches of topsoil.
Now, you can plant directly into the mound and subsequently mulch to suppress weeds. The mound itself will hold moisture well while also providing slow-release nutrients to plants. Over time, the wood buried in the bottom of the hügelkultur garden will decompose to add a rich layer of humus.
If you plan to start a more structured raised bed, you can adapt this hügelkultur model accordingly. Within your raised bed’s walls, simply line the bottom with dead limbs and sticks before adding compost and topsoil. The woody debris will improve soil drainage and aeration while also promoting the growth of beneficial fungi and other microorganisms.
Susan Brackney
Mighty Mulch
You can use a gas- or electric-powered chipper/shredder to transform that untidy brush pile into more manageable mulch. That said, though, you shouldn’t spread those fresh wood chips indiscriminately. As just-shredded wood breaks down, it can reduce the nitrogen levels in your soil. What’s more, trees such as black walnut contain germination-inhibiting chemicals that can stymie the growth of plants nearby.
As a result, it’s best to avoid using this material to mulch your annual flower or veggie patches.
Still, fresh wood chips are very well-suited for suppressing weeds along garden paths and walkways. For best results, lay down large sections of plain cardboard first. (Remove any labels and packing tape before placement.) If you like, you can also pin the cardboard in place with metal landscaping anchors.
Next, top with 4 or 5 inches of your fresh wood chips. With rain and foot traffic, the woody material will become more tightly packed. Some weeds eventually may find their way into your paths, but pulling them out from the heavily mulched surface is a snap.
Compost Fix
Whether you already have a compost pile or wish to start one, the materials in your brush pile can come in handy. The right mix of carbon- and nitrogen-rich materials is essential for maintaining a healthy, active compost pile. (In general, you’re shooting for 25 to
30 parts carbon for every one part nitrogen.)
If your existing pile is smelly and slow to break down, you could have too much nitrogen and not enough carbon. Your compost could also be too wet. These conditions are ideal for cool-operating anaerobic bacteria, rather than their aerobic counterparts. To fix the problem and get your compost really cooking again, run small sticks and limbs through a chipper/shredder and mix these in well with your nitrogen-heavy compostables such as kitchen waste and grass clippings.
Just keep in mind that wood chips can contain a whopping 400 parts carbon to one part nitrogen. (As a frame of reference, the carbon-to-nitrogen ratio for most shredded paper is just over 100:1; that of dried leaves is approximately 60:1; and coffee grounds are 20:1.)
By mixing more “brown,” carbon-rich matter in with your “green,” nitrogen-heavy material, you can boost your carbon-to-nitrogen ratio and add much-needed bulk to the compost pile. This, in turn, will improve airflow and make conditions just right for heat-generating aerobic bacteria. As a result, your compost will break down much more quickly than it otherwise might. (It’ll also smell much better in the process!)
If you’re thinking about starting a compost pile or maybe a few additional piles, begin by lining the bottom of any piles-to-be with crisscrossed limbs and sticks from the brush pile. This will help facilitate drainage and airflow. Top with a layer of smaller twigs and dried leaves and then follow with your mixture of nitrogen-rich greens and carbon-rich browns.
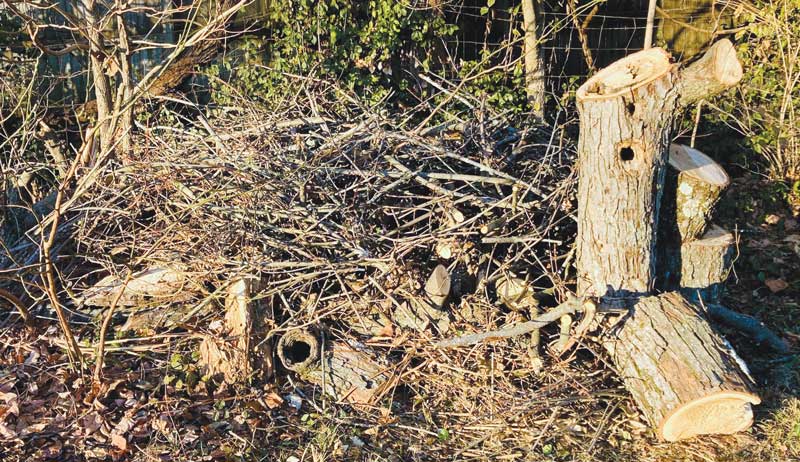
Natural Neighbors
By systematically arranging large limbs and smaller sticks into a structured wildlife habitat, you can support beneficial insects, mammals, and many kinds of birds. To start, remove turf and weeds from the area and cover with cardboard and a layer of dried leaves or other mulch material to suppress future plant growth.

Susan Brackney
Next, position a few large limbs in parallel about 1 to 2 feet apart and add a few more limbs perpendicularly across the top of the first set to form the base. (If you have one, you can use an old pallet as a base instead.) Starting with a solid, slightly elevated base like this facilitates airflow and will help nesting critters to stay dry.
To finish the wildlife habitat, neatly stack the remaining limbs and sticks across the base. Your finished habitat should measure four or five feet across. As animals begin to explore and use the shelter, you should notice your sticks being rearranged to suit their needs. Inhabited structures may take on an igloolike shape, with multiple entry and exit points.
As a finishing touch, you can plant native perennial flowers near the habitat. This acts as a screen and will further attract pollinators and other beneficial insects, too.
This article originally appeared in the Sept./Oct. 2023 issue of Hobby Farms magazine.


