There is nothing better than a charming homesteader scene of a small flock grazing happily in a chicken tractor. A great solution for any smallholding, a chicken tractor has lots of benefits. Not only does it provide poultry with constant access to natural food, but it also controls pests and helps fertilize the soil.
Homesteaders use a chicken tractor to provide their poultry with shelter, forage and exercise. In this article, I’ll teach you how to build a portable, lightweight, predator-proof poultry home that can be dragged around by several people or by one, depending upon the size of the unit.
The chicken tractor includes a covered part for storm protection and a floorless wire enclosure that allows for ventilation and foraging on the ground. It’s basically a moveable yard. Any poultry can use a chicken tractor as long as the height and size are appropriate for their needs.
The use of the chicken tractor gives poultry a chance at fresh greens and a wide variety of insects that they may find on the ground at each new location. It also allows you some control over where your poultry forage and how often they can be moved. Birds using a chicken tractor continuously fertilize the soil as it is moved around. Additionally, they control pest and tick populations.
A chicken tractor is like having your poultry free-range, making their eggs and meat superior in taste and nutrition, but also confined and relatively safe from predators. If you would like your poultry to forage in large pastures that pose serious hawk and other predator threats, a chicken tractor may be for you. Chicken tractors also work well to contain just a few birds in a small backyard.
This model is very fast and simple to make. You can expect to create this wonderful chicken tractor in several hours without being in any way fatigued. This plan is lightweight for easy maneuvering—a few people should be able to move it easily—and it should hold a handful of birds comfortably.
Keep in mind that this is just one type of chicken tractor; you can easily make yours larger, smaller, longer or shorter by making simple adjustments to the measurements. When calculating the size you need, as a rule of thumb, allow 4 square feet per chicken.
The measurements for the tractor given here will accommodate three birds quite easily. If you have a bigger flock, substitute the 36- and 48-inch aluminum angles for 48- and 96-inch aluminum angles (all standard lengths commonly sold in stores) to make the tractor 4-by-8-by-2 feet. This will result in a not very large tractor that will hold a much larger number of chickens.
Materials
The cost of all the materials combined would cost less than 100 bucks, therefore making it much cheaper than any chicken tractor on the market. To get started, you’ll need the following.
- (5) 36-inch aluminum angles
- (4) 48-inch aluminum angles
- (4) 24-inch aluminum angles
- hardware cloth or other fencing
- plastic ties
- wire, thick fishing line or string
- nuts & bolts
- a drill
- 2 waterproof boards
- 1 triangular wooden plank
Read more: Protect your poultry and chicken coop from predators.
Steps 1 to 4: Build A Base
Start by assembling the chicken tractor frame. Lay the 36- and 48-inch aluminum angles to make a rectangular frame 4 feet long and 3 feet wide. Drill holes connecting the four aluminum angles.
Use bolts in the holes drilled earlier to secure the frame. You’ll probably need several pairs of hands to hold the aluminum angles in place while securing the bolts and drilling. Therefore, it’s advised to be extremely careful.

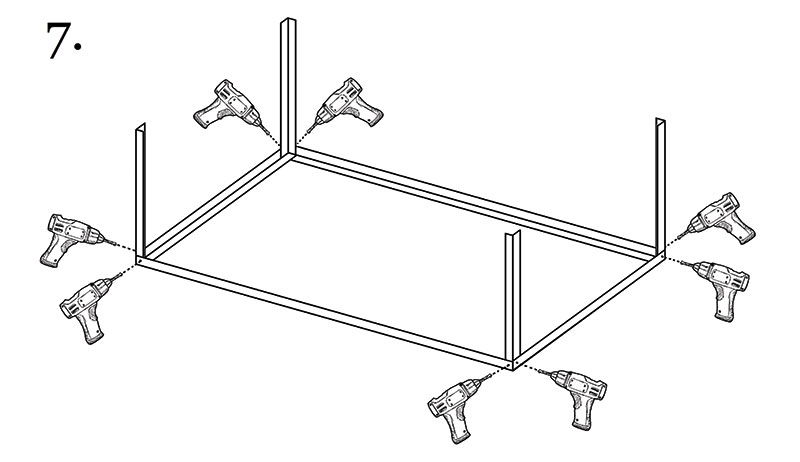
Steps 5 to 7: Add Vertical Angles
Add the 24-inch vertical aluminum angles. Drill holes connecting them inside the four corners of the frame and secure them with bolts. Make sure that you connect them to the inside of the frame.
Steps 8 to 10: Build Another Rectangular Frame
Now make another rectangular frame, similar to step 4, only with a 36-inch aluminum angle in between. Drill holes connecting all the corners and secure them together with bolts.
Try as best as you can to make the frame exactly corresponding by width and length to the one in step 4. You can make it a little wider and longer but never the opposite. This will prevent problems later and make the process much easier.

Steps 11 to 13: Assemble Pieces
Now, assemble the pieces together and secure them with bolts in drilled holes. If you followed steps 8 through 10 correctly, this should be easy. When assembled, you should have a lightweight, sturdy aluminum frame that should resist wear and tear for years to come.

Read more: Consider these things when buying or building your chicken coop.
Steps 14 to 16: Add Fencing
When your frame is ready, add the wire fencing. The type of fencing to use depends on the predators in your area. Use a small mesh for smaller predators such as raccoons, opossums and snakes. More durable fencing will keep out coyotes, wolves and other larger predators.
Here, I used durable small-mesh hardware cloth to keep out raccoons. Using a combination of both durable fencing such as chicken wire and some fine mesh will effectively protect against both.
Cut out two pieces of wire fencing to fit the tractor. Arrange the wire fencing to fit as shown in the illustration. Sew or weave the fencing to fit the frame using wire, thick fishing line or string. For added durability, fasten them with plastic ties. An opening is left on top for the door.

Steps 17 to 20: Add Opening & Roof
To make a door and roof for the chicken tractor, you’ll need a rectangular board a little larger than 2-by-3 foot, two smaller boards 2-foot wide for the roofing, and a 3-foot wide triangular wooden plank to keep it all together. The triangular plank should be thick enough to hold screws securely without splitting.
Any material for the boards will work, provided that they are painted waterproof and reasonably lightweight. I used thin wooden boards, painted with nontoxic paint to make them waterproof.
Drill holes in the larger 2-by-3-foot board as shown in step 18. These will be used to attach the ready “roof-door” to the tractor frame. Now assemble everything together as shown in step 19, and secure with small screws. You can also add peel and stick roofing shingles on top for more durability.

When your roof-door is ready, attach it to the chicken tractor using plastic ties through the drilled holes. It should open and close freely, making a convenient door for the chicken tractor as well as providing some shelter for your flock in case of rain. You can also make a covering of tarp to cover half the tractor in case of severe weather. Finally, simply add a hook-and-eye latch to keep the opening closed tightly.
Now you have a complete, inexpensive, portable, lightweight, predator-proof chicken tractor that will supply your poultry with nutritious, fresh forage as well as greatly fertilize the soil and effectively minimize pests for many years to come; your flock will surely thank you for it.
This article originally appeared in the May/June 2022 issue of Chickens magazine.