
When you grow a garden in the same spot year after year, you’ll soon learn what centuries of farmers and gardeners before you have learned: Nutrients in the soil soon become depleted and need to be replaced. Happily, creating your own fertilizer in a compost bin is a simple, inexpensive way to keep your garden growing year after year—not to mention that it’s an excellent way to freely dispose of organic kitchen scraps. And chicken keepers also have the opportunity to take advantage of this excellent—and free—fertilizer, because you have some of the best ingredients available:
- organic material, such as hay, straw and other bedding
- eggshells
- and, best of all, chicken manure
So why not make your own compost bin and get started? These instructions are for building a simple compost bin, which is suitable for most household compost needs. The smallest size you’ll want to use for a compost bin is 3-by-3-by-3 feet, as shown in this project; if you go smaller, the necessary fermenting action won’t be as effective. You can, however, go larger than this if you have a large supply of composting materials. Fortunately, you can enlarge this basic design to other sizes.
What You’ll Need
Wood Cuts
- 1 piece of 36-by-36-inch, 1/2-inch thick plywood
- 4 36-inch two-by-fours
- 2 33-inch two-by-fours
- 2 32¾-inch two-by-fours
- 10 29-inch two-by-fours
- 2 28⅞-inch two-by-fours
- 3 26-inch two-by-fours
- 3 25¾-inch two-by-fours
- 1 13-by-1½-inch, 3/4-inch thick pine or plywood
Fasteners
- wood glue
- 6-inch screws (box)
- 3½-inch screws (box)
- 1¼-inch screws (box)
- 1-inch nails (box)
- roofing nails (box)
Hardware
- 2 6-inch hinges (for front panel)
- 2 2-inch hinges (for top access door)
- 2 hook-and-eye latches
- 1 extra eye for access door handle
- 4 32-by-35-inch sections of hardware cloth with 1⁄4- or 1/2-inch holes
- 1 vinyl outdoor tablecloth
Tools
- circular saw (A chop saw or radial arm saw can also be used to speed up the work.)
- electric drill
- framing square
- hammer
- jigsaw
- safety googles
- screwdriver
- tape measure
- wire snips
Step 1

Daniel Johnson
First, you need to start building the four sides. The basic design for the four sides of the compost bin is the same, but there are small differences in measurements. In each case, begin by building a square.
For the back panel, use the two 33-inch two-by-fours to create the top and bottom, and two of the 26-inch two-by-fours for the sides.
Because the front panel will function as a door that needs to swing, its measurements are slightly smaller than the back panel. It uses two 32¾-inch two-by-fours for the top and bottom, and two 28⅞-inch two-by-fours for the sides.
The two side panels are identical: Use two of the 36-inch two-by-fours for the top and bottom, and two 29-inch two-by-fours for the sides.
Use wood glue to strengthen the joints, and then use 6-inch screws to secure. Use a framing square throughout the process to ensure that your joints stay square.
Step 2
Daniel Johnson
To continue building the four sides, add three dividers to the interior of each square.
- For the back panel, use three 26-inch two-by-fours.
- For the front panel, use three 25¾-inch two-by-fours.
- For the side panels, use three 29-inch two-by-fours.
To achieve proper divider spacing, place each of them 4⅝ inches apart. Use 6-inch screws to secure.
Step 3

Daniel Johnson
Now, it’s time to attach the hardware cloth. Using wire snips, carefully cut four 32-by-35-inch sections. (We used hardware cloth with 1⁄4-inch openings.)
Then, using roofing nails, fasten each piece of hardware cloth to each of the four panels of the compost bin. This will allow plenty of airflow while still keeping the compost contained and reducing the chances of rodents or other animals entering the bin. The cut edges of hardware cloth will be supersharp, so take care when working with and around it; at a minimum, wear safety glasses.
Step 4

Daniel Johnson
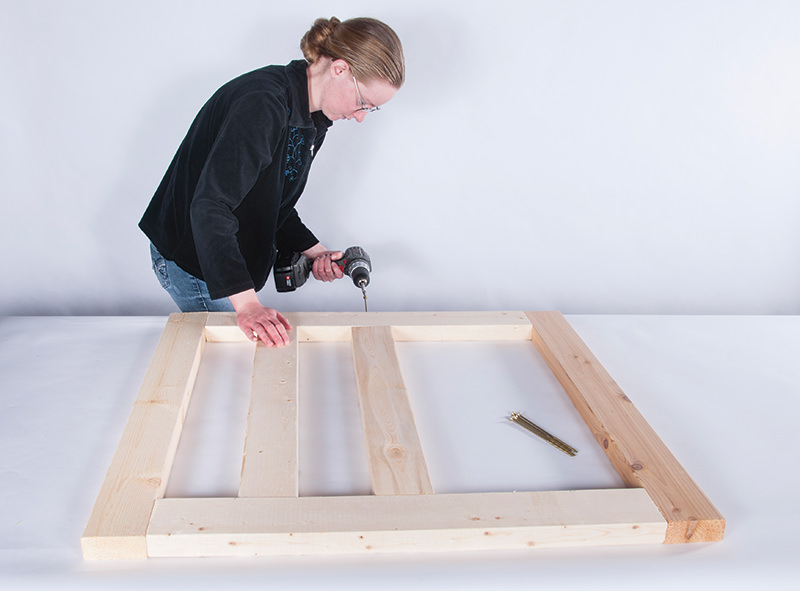
Begin to actually assemble the compost bin: Using 3½-inch screws, attach the back panel to the two side panels. The back panel will actually sit inside the two side panels. Again, using a framing square will help keep everything straight. When you’re finished with this step, you’ll have built a “U” shape.
Step 5

Daniel Johnson
Now, we’ll add the front panel, which will act as a door. Using two 6-inch hinges along with 1¼-inch screws, attach the front panel to one of the side panels. (Because the front panel is slightly smaller than the others, you should have a little bit of play to help make the door swing.) Use a small wood drill bit and power drill to make pilot holes for the two hook-and-eye latches. Screw in these latches in two locations to keep your front panel door shut.
Depending on what type of location you plan to use your compost bin (rough ground, even ground, etc.) you may need to trim—or rip—a small amount off of the front panel’s bottom 323⁄4-inch two-by-fours to help it swing and make sure it doesn’t dig into the ground. Don’t trim off too much, however, or you may invite rodents.
Step 6

Daniel Johnson
Make some modifications to the 36-by-36-inch piece of plywood that will be used as the top of the compost bin. To provide an easy means for adding small amounts of material to the compost bin (coffee grounds, table scraps, eggshells, etc.), you’ll need to cut a small door. You can make the door any size you’d like; for our bin, we went with a 12-by-12-inch opening. Use a circular saw to do most of the work, and a jigsaw to nicely finish the corners.
Attach a small doorstop on the underside of this hole. Use a piece of pine or plywood about 13 by 1½ inches and 3⁄4 inch thick. This could be a scrap piece from another project; the exact dimensions really don’t matter much. Attach it with 1-inch nails.
Attach the access door itself with two 2-inch hinges. Fasten the hinges with screws, but predrill the holes for best results. Then, add a small handle. (We used an extra eye from a hook-and-eye latch.) Finally, place the 36-by-36-inch plywood on the top of the plywood and secure with 11⁄4-inch screws.
Step 7

Daniel Johnson
You will want to find a way to protect the plywood top of your compost bin from the elements. We use a part of a simple vinyl outdoor tablecloth along with stretchable cord as a way to keep excessive moisture off of the top of the compost bin.
If you’re serious about creating compost for your garden, you can build three identical compost bins and then always have compost in three stages: one that you’re currently adding to, one that is in the process of composting and one that is ready to use in the garden.
This article originally appeared in the May/June issue of Chickens.


