With visions of year-round food production, many gardeners stumble upon online resources about the walipini, or pit greenhouse, only to discover they are designed for equatorial geographical locations. If, like me, your romantic visions of year-round fresh greens aren’t stifled by this, then you’ll probably keep searching and discover other options: geodesic domes, heated hoop houses to overcome winter chills or gardening indoors.
Each option has pros and cons of course: large footprints, unreliable warmth, weather-dependent energy costs as well as initial investment.
My solution is what is found here: a winter growing space that is all (and more) of these. It’s part walipini, part traditional greenhouse, with a convertible top for summer growing! Might I add it’s also easy to build, intuitive to use and relatively inexpensive.
Basic Dimensions
- 9-by-16-foot footprint
- 3-foot flat roof extending from back wall
- 8-foot sloped boards for glazing
- 6-foot, 6-inch height overall (This varies with how deep you dig or how tall the stone foundation.)
- 5-foot-tall doorway
My DIY
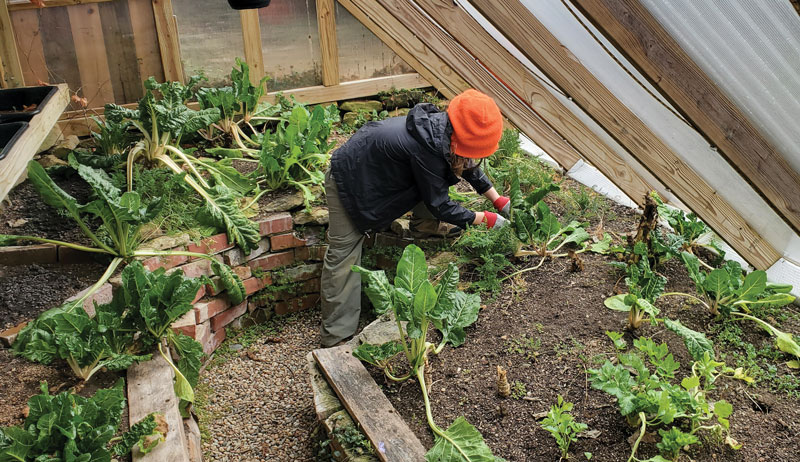
This winter greenhouse is built using a simple 2-by-4 frame, lean-to design. In my case, I took advantage of a privacy fence. This three-sided design makes a world of difference in warmth when compared to a traditional freestanding greenhouse, hoop house or geodesic dome.
If you don’t have an existing fence as I did, do you have a south-facing wall of your house, shed or barn? Whatever you choose for this back wall, it should be covered with bubble insulation. I used Reflectix. (The white one is more pleasing than the shiny tinfoil version.)
Another item for the back wall: extra field stone, which offers thermal mass to store the sun’s warmth.
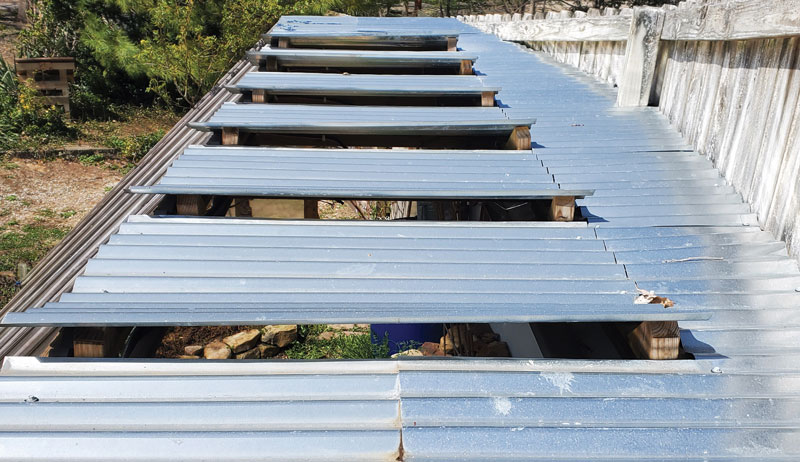
Generally speaking, it’s good to build the roof 3 feet out from the back wall. This will give you working headroom. The roof vents are made by not fully attaching the metal roof panels and are held open with a wooden wedge. Make sure they face away from the prevailing wind so they don’t get damaged.
Other unique features include the following.
- The 3-foot flat roof is slightly slanted so that water runs towards the back wall.
- A seam in the metal roofing allows water to leak inside the greenhouse.
- The internal gutter catches rainwater and sends it down a rain chain to fill the rain barrel.
- The rain barrel provides thermal mass and year-round water, which is especially critical in the winter when spigots and hoses are frozen.
- The 2-by-4 inch frame structure is built on 2-foot center, and the glazing is 4-by-8-foot by 1⁄4-inch-thick poly, double-wall panels.
My greenhouse is 16 feet long, which required four full 4-foot-wide panels along the front. From the photos, you’ll notice that my fence runs uphill and changes direction in the middle. Thus, this flexible design can be adapted to many different spaces, shorter or longer.
The sloped boards are 8-foot long, 2-by-4-inch treated lumber. Notched joints hold the sloped and horizontal roof boards together. On the inside are a few furring strips for hanging potted plants and to run wires for the grow lights.
Furring strips also hold the glazing in place during the cold months and, being attached with screws, can be easily removed during the warm growing season. (Note that some poly panels have an ultraviolet coating on only one side, so take care to remember which side goes up or the poly may degrade.)
Flexible, waterproof 12-volt LED grow light strips (pink and blue) are attached to each of the 8-foot-long sloped boards. For power, these boards are connected via underground cables to a 12-volt battery bank in my home’s basement. Adding more light hours is often more important to many winter-growing plants than adding warmth. So grow lights are a critical part of my design.
Thus, I turn on my lights to extend the “day” by two additional hours each winter evening. This yields measurable growth for my frost-hardy plants and microgreens.
Read more: Here’s why you should consider setting up a greenhouse.
Location, Location, Location
Site selection is all-important for winter greenhouse success. For maximum sunlight exposure in the northern hemisphere, a south-facing design is critical. Some nuanced features to consider for ease of use:
- proximity to a water hose
- composting needs
- how water moves across the site
- access to electricity and how you may route that underground
Of course, sunlight and shade are huge factors. Will shade from trees and/or buildings come into play with winter’s long shadows? Will leafed out trees shade in summer? (This can be a good thing!)
As such, it’s ideal to study the site through all four seasons. Note how much sunlight you get per day.
The best solar-mapping method I have found is to use a digital camera and image editing software. The software needs to allow you to do two things: layer multiple photographs on top of each other and control their opacity.
Simply pick a day in the middle of each season, and take a picture of your site every few hours. This is best done with a tripod from the exact same vantage point.

Using the image editing software, stack the three or four images on top of each other while increasing their opacity to reveal a map of shadows and sunlight. This composite image will show the bright sunny spots without shade, spots receiving partial shade and areas that are always shaded throughout the day.
This will represent a seasonal solar map. Repeat during the other seasons, and you’ll have a good understanding for the year.
If your house is located near your potential greenhouse site, use Google Project Sunroof to see some basic solar data for your house roof, such as how many hours of sunlight per year received and how shady or sunny the site is. This is also great information if, like I did, you intend to install roof-mounted solar panels to fuel grow lights.
Groundwork
Before you build the greenhouse structure, you should do all the groundwork, not only for the foundation but also the interior pathway and grow beds. An important note is that my build is on a hill, so if your build is on perfectly flat ground, it’ll look slightly different.
First, stake off the four corners, and then decide where to put your door. In my location, I positioned the door so that the prevailing wind would blow into the greenhouse. The door hinges are attached to a board on the back wall. As described, this back wall is my privacy fence.
You should start leveling from there.
Next, level out the footprint for the door wall and the long front wall. These should be all on the same level plane. (My greenhouse is built into a hill with the door on the downhill side, which meant less digging for me and a smaller step down into the greenhouse.) If you’re building into a hill, the end opposite of the door doesn’t need to be leveled on the exact same plane as the door because that will be part of the raised garden bed.
I put my greenhouse on a stone foundation, starting with the door wall, which raised the entire structure about 6 inches. If you’re building on level ground, you could essentially set the entire structure onto raised-bed timbers.
Once you have the three walls leveled out, it’s time for the interior layout.
Roughly plan the layout of the growing beds. As you can see in my greenhouse in the photos in this article, I have a narrow walkway with two round areas on each end, allowing room to sit and work, plus space for the rain barrel. The back grow bed, against my privacy fence, is only 12 to 18 inches wide.
Because I am taller than 6 feet, I wanted to retain as much of this back area for walking as possible. The small garden bed on the back wall works as a place for tall plants that enjoy shade, grape vines or microgreen trays.
The larger grow beds are under the sloped glazing. As you ponder their design, consider what materials you might use to build the raised beds since materials can determine the beds’ shape.
Old bricks? They’re good for curved areas. Stones or rocks? Wood? I used a log from a dead tree, and some untreated hardwood boards I had on hand, both of which make for great insect habitat. Before digging, I used a shovel to chop outlines on the ground for my design layout. If you need to “draw” your design on the ground, sprinkling with flour is a good nontoxic option.

Digging down for pathways will help your plants. For one, the dug dirt will provide fill for raised beds. (This is a great time to mix in compost or garden soil!) Most importantly, the lower pathway will draw cold air down into it. This dropping of the cold air will keep your raised plants just a little more protected during cold nights. So digging down 12 to 18 inches would be a good goal.
Other factors to consider including the following. (There may be more for your particular situation.)
- how tall you are and the headroom you need
- if your structure is on the slope of a hill or on level ground
- how much labor you want to do
- your water table
Once you have dug down, build the retaining walls. All of the beds need to have walls, otherwise the dirt will collapse over time onto the floor. Lastly, backfill as needed.
Note: It’s OK if the floor isn’t perfectly level. Because this is convertible and open to the weather during the spring, summer and fall, slanting the floor toward one end allows rainwater to drain away as needed. I slanted my floor so that rainwater would run toward the door wall. (For better drainage, I buried a 2-foot-long piece of black drainage pipe that exits under the wall.)
Finally, cover the floor with something such as pea gravel, which adds extra drainage and keeps things clean and tidy.
A winter greenhouse can be a flexible place to grow food year-round. It can extend the growing season for some plant species. It can enable frost-hardy plants to live indefinitely. And it can overwinter seed-bearing plants for a microgreen system.
More than a greenhouse, this convertible structure can be a vital part of your growing system at all stages of plant life, staying productive no matter what blows outside.
More Information
Winter Gardener Plants
Here are five easy-to-grow crops for the winter greenhouse gardener.
Swiss Chard (Fordhook Giant)
It’s difficult to capture how wonderful it is to sneak out to the garden on a snowy night and cut off some large Swiss chard stalks to sauté. Swiss chard is my favorite cut-and-come-again winter greenhouse plant because it gets large in the fall, improves in flavor in the cold and rejuvenates in early summer with hundreds of easy-to-collect seeds for a microgreen system.
Kale (Delaway)
Gardeners might advise to “Watch out for those white cabbage butterflies that love all brassicas!” That’s not such a downer when you have a winter greenhouse.
Kale, another great cut-and-come-again plant, can, fortunately, overwinter in the winter greenhouse producing a harvest before the hungry caterpillars come around. Kale also produces abundant seeds for microgreens.
Carrots
For many, carrots are difficult to germinate, and they take time to grow. But winter greenhouse soil stays damp, so germinating carrots is easier there. They don’t aggressively grow during cold winters, but the seedlings will grow up quite fast as spring nears.
Overwintering carrots is also a great way of getting abundant seed, which I generously sprinkle all over the greenhouse under the larger plants!
Collard Green (Ole Timey Blue)
Collards are another flavorful plant that will live year after year in a winter greenhouse. Planted late in a rotation, they can also provide for fall and winter eating and a nice spring crop of seeds before the caterpillars come!
Spinach
Keeping spinach from bolting can be difficult, so why not grow it during winter or very early spring when snow still blows?! Bolting spinach in the heat of late spring or summer simply means more seeds for microgreens or the next crop.
This article originally appeared in the September/October 2022 issue of Hobby Farms magazine.


