I’ve always made room in my garden for catnip (even though I’m more of a dog person). Native to Europe, catnip (Nepeta cataria) is extremely hardy and useful. Established plants require little water or attention, and they grow even in poor soil.
Catnip is an edible, herbaceous plant, and I like to add its more tender, young leaves to fresh salads. I also steep crushed, dried catnip leaves and flowers in boiling water to make a calming, before-bed tea. (Before drinking your own catnip concoction, ask your doctor about possible health risks and interactions with any medications you take.)
As for the plant’s other benefits? Long after my other flowers have rolled up their red carpets, catnip perseveres to offer area honeybees and other pollinators much-needed nectar. And, yes, many cats seem to like the stuff, too.
Catnip Caveats
This member of the mint family isn’t always well behaved. In fact, it spreads so readily that it’s considered a nuisance plant—particularly in protected natural areas. You can forage wild catnip growing in fields and along forests—provided it hasn’t been treated with herbicides or insecticides, that is.
To corral the plants you grow, you can keep it in large pots rather than the garden. If you do add it to a garden bed, keep its spread in check by periodically weeding and trimming. Because catnip can attract outdoor cats, avoid placing it near bird feeders, nest boxes or bird baths in order to help reduce bird predation.
Growing Your Own Catnip
There is an old rhyme about the plant that I’ve found to be true:
If you set it, cats will eat it.
If you sow it, cats won’t know it.
When weeding, trimming, harvesting or trying to transplant catnip, it’s easy to stir up and release the plant’s fragrant volatile oils. This, in turn, will probably invite area cats to ravage your plants. If, however, you direct-seed it in an outdoor container or garden bed, cats don’t seem to find it quite as easily.
Ideally, catnip seeds should be exposed to a period of cold before they’re planted. That means placing seed packets in your freezer for a few weeks. Or, if you live in a climate with relatively cold spring temperatures, simply plant seeds outside as early in the season as possible. Once soil temperatures reach 60 to 70 degrees, your seedlings should sprout.
Harvesting and Drying
At maturity, catnip can grow as tall as 3 feet. When you’re ready to harvest, choose a dry day and remove only flowering catnip. Rather than pull what you wish to harvest, leave its roots intact. Instead, cut plant stalks a couple of inches above the soil line.
To dry the catnip, bundle small groups of stalks together and loosely place them upside down in clean paper bags. Hang the bags in a dark, dry place until the plants inside have dried completely. Depending on the temperature of your drying area, this process can take just a couple of weeks to about a month.
Dried catnip is fragile and crumbly. Use your hands to break the leaves and flowers into small bits, discarding the stems as you go. Now, your dried catnip can be brewed for tea or included in homemade cat toys. (See below for one quick project.)

Susan Brackney
Toy to Try
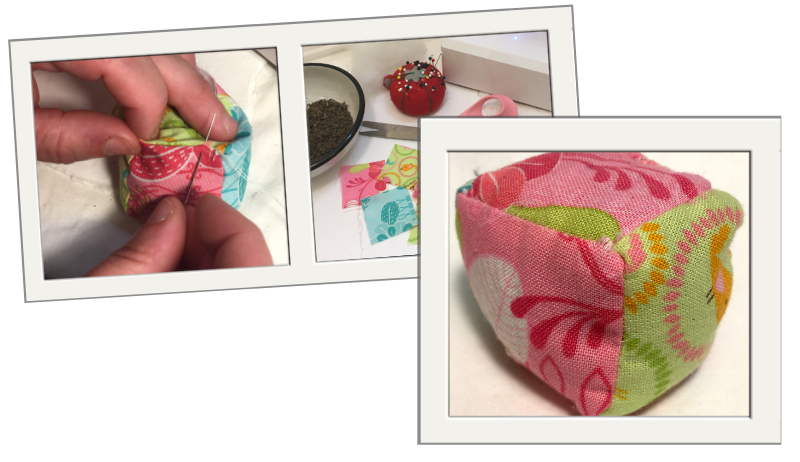
If you have some scrap cloth, scissors, a needle and thread or a sewing machine, some stuffing and dried catnip, you can easily whip up a catnip-stuffed toy. For the cat toy pictured here, you need seven small fabric blocks in a few different designs. (Each of my blocks measured about 2 inches square.)
First, I stitched the blocks together to form a chain of four in one direction. Then, I stitched the remaining two blocks on either side of the second block in the original chain. Next, I formed an inside-out cube and stitched the opposite ends of the original chain to one another. After turning the cloth right-side-out again, I hand-stitched one end closed. As I stitched, I carefully folded under all exposed, ragged edges.
Susan Brackney
To stuff the cat toy, I used a mixture of polyester filling and dried catnip. Once the cube was fully stuffed, I hand-stitched the remaining open end shut, folding exposed, ragged edges as I went along.
Feeling extra ambitious? You could include a small, concealed zipper in one end of the cat toy. This would enable you to refill it with fresh catnip.