

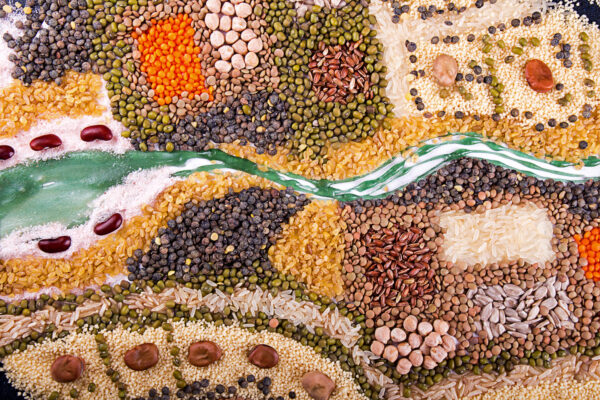
Crop art, also known as “seed art,” is a cherished craft across the United States. At many state fairs and local exhibits, artists create intricate designs using seeds, stems, and other natural plant materials. Commonly used seeds include flax, sorghum, pumpkin, beans, corn, rice, lentils, sunflower, mustard, and peas. Some seeds are crushed to achieve different designs, textures and colors, while the use of paint or dye is generally not allowed. The vibrant artwork is entirely made from natural materials, showcasing the creativity and skill of artists nationwide.
What is Crop Art?
Crop art has a long history in the United States, with many families and artists passing down techniques through generations. Traditionally, designs are created by cutting patterns into wood or other surfaces and carefully adhering seeds to form detailed images. This craft has been celebrated in fairs, exhibitions, and competitions nationwide, allowing artists to showcase their skill and creativity using only natural materials.
On a personal note, my grandma used to make crop art in the late 1960s and sell her pieces. She’d cut out designs from plywood and mimic the designs that her grandma made. Seeds came from the bulk aisle of her local grocery, and she used Elmer’s glue to adhere the seeds to the wood. It was an enjoyable way to spend her time, she told me. No phones or computers back then. She didn’t even have a television.
Materials Needed for Crop Art
Curious about creating your own crop art? Here’s what you’ll need to get started.
Wood or Base Surface – Plywood is traditional, but sturdy cardboard or pre-cut wooden shapes work too.

Glue – My grandma’s used basic Elmer’s craft glue and it’s proven to stand the test of time. But feel free to use a stronger type if you feel so inclined.
Tweezers – Helpful for the smaller details.
Seeds – Visit the bulk aisle at your local grocer or grow them yourself. Select seeds in various colors, shapes and sizes. If you can’t grow enough and you happen to garden or know a gardener, you can collect seeds from them at the end of the season to save money as well. Pet food stores are another great option for buying a variety of seeds in bulk. If you’re looking for something hyper-specific or unique, consider seed stores such as Territorial Seed or Eden Brothers.
NOTE: If using collected seeds from the garden, remember to allow them to thoroughly dry out before crafting with them so that they do not mold. Larger seeds are better for younger children to handle.
Seed Organizer – Egg cartons make great seed organizers.
Finishing Spray – This is an optional step; however, a matte or gloss spray can protect your art and make cleaning easier.
Step-by-Step Crop Art Guide
Choose Your Design
Start by hand-sketching an image or tracing a design onto plywood. Beginners may want to pick simple shapes, while experienced crafters can try intricate patterns. Pre-cut wooden designs are also available at craft stores for convenience.Prepare Your Workspace
Cover your table with a newspaper or a craft mat. Organize your seeds in small containers, egg cartons, or trays so you can easily reach each type and color as you work. Gather tweezers, glue, and any additional tools you might need.Apply the Glue
Use a small brush or glue applicator to carefully cover the area where seeds will be placed. Work in sections to prevent the glue from drying before you add seeds.Place the Seeds
Using tweezers for smaller seeds, carefully place each seed onto the glued area. Start with larger seeds for background or outline sections, then fill in details with smaller seeds. Crush or break seeds if you want to create shading or texture.Layer for Depth
For added texture or dimension, layer seeds lightly on top of each other. Experiment with patterns and colors to create gradients or highlights. Be patient—precision is key for a polished look.Let It Dry
Once your design is complete, allow the glue to dry thoroughly. Drying times vary depending on glue type and the amount used, but a few hours to overnight is usually sufficient.Finishing Touches
Check for any loose seeds and secure them with a tiny dab of glue. If desired, apply a matte or gloss finishing spray to help protect your artwork and make cleaning easier.
Caring For Your Finished Crop Art
Crop art can be kept for display long after the fair is over. Keeping your art in a covered display is the best way to keep dust and debris from settling onto your masterpiece. If you are planning a covered display, it’s best to make the original design to match the dimensions of your display rather than the other way around. If it is kept in the open air, use a feather duster to gently brush away the dust.
Remember that seed art can fade in direct light, so the best choice is to store it away from windows.
Final Thoughts
Crop art is a timeless craft that combines creativity, patience, and natural materials. Whether you’re a beginner or an experienced crafter, creating seed art is a fun way to express your artistic side and connect with a long-standing tradition celebrated across the United States. With the right materials, a bit of patience, and attention to detail, you can produce vibrant, lasting artwork perfect for display in your home, at fairs, or as unique gifts.
This article about crop art was written for Hobby Farms magazine. Click here to subscribe.
