In 2016, my family began what was then the largest project on our farm: a high tunnel measuring nearly 2,100 square feet. We estimated that completing the project would take many months. However, building the structure was only the beginning of finishing the high tunnel.
If you’re new to growing in protected space such as greenhouses and high tunnels, such setups can become your most profitable and productive ground if you manage them well. The first year, using around 600 to 800 square feet of our tunnel, that small space outperformed 3,000 square feet of field space.
Twenty-four bell pepper plants in the tunnel produced more than twice the yield as 48 plants in the field. The potential benefits of protected growing spaces include higher and better yields, less disease and pest pressure, and far greater profit per square foot.
That said, such spaces present distinct challenges, including irrigation. By nature, such a space requires either manual or automated irrigation. The type of irrigation you use in a high tunnel depends on a number of factors, such as:
- What crops do you plan to grow?
- Do you plan basic irrigation or also fertigation (adding nutrients to the irrigation water)?
- Will you use well or city water?
- What water regulations apply to your operation regarding food safety?
Here are some lessons we learned from constructing our high tunnel.
Read more: Here are some reasons to consider getting a greenhouse of your own.
Irrigate Properly
Our first tip: Include irrigation in your high tunnel build and budget. For us, a high tunnel was a big project. We have no heavy equipment and very little flat land on our farm. The best place to site our tunnel happened to have six old concrete footers that needed removal.
The tunnel is a bit larger than our current house and had rocks in the way as well. (We have rocks in the way of everything on our land, the kind of rock that not even a rock breaker can bust).
We got so wrapped up in the tunnel that several related matters, such as irrigation, fell off our radar. Fortunately, the site had a hydrant inside the footprint of the tunnel. While not ideally placed, it meant we had water in the tunnel, which is part of why we didn’t spend too much time thinking about irrigation beyond “We know we have water.”
If you don’t have a water source such as this, include water in your plan. It’s far easier than getting water in after the tunnel is built. Water comes first, and the structure itself, second.
We plan to move the hydrant to a location that lets us make full use of the tunnel. We should have done this earlier when we had equipment on site, so learn at our expense of future hand labor. Getting a machine in there now isn’t an option and would disturb our growing beds and much-improved top layers of soil.

John Moody
Options
A reliable water supply is only one part of irrigating a protected growing space. Our next tip? Know that your crop choice, layout and weed-management approach affect irrigation options.
With our high tunnel, I originally dreamed of creating a highly mixed environment of a dozen crops. The first year, I planted “blocks” of various plants to see how they did compared with field counterparts and for the benefits of diverse plantings.
Unfortunately, this approach made laying irrigation just about impossible. Each block was composed of plantings with different layouts and spacing and water needs—potatoes next to ginger next to peppers next to fennel next to tomatoes.
While the blocks were productive, they required almost daily—and sometimes twice daily—time-consuming hand watering.
The zones are best to run longways. When choosing what to plant in each zone, consider issues of sun and shade that a zone or block might create for adjacent plantings.
I previously wondered why many high tunnel growers plant only a few crops at a time. But after a few years, it makes sense. It radically simplifies management and irrigation.
However you decide to use your high tunnel, a few things will help ensure you avoid certain pitfalls and mistakes.
Go Visit
Find a few successful high tunnel growers in your area and visit them. Honestly, this is probably the most important thing you can do before you build as well as afterward, during layout, design and similar tasks.
Local is best. What works for people in other regions and climates might not work for your operation in your region and climate.
No Limits
Don’t limit yourself to what others in your area are doing. But at the same time take advantage of the wisdom and experience that established growers can share. High tunnel growers are now everywhere, so finding a few to visit within an hour’s drive should be relatively easy.
Book It
Read a few good books on high tunnel growing. While this is a sparse category, I recommend The Greenhouse and Hoophouse Grower’s Handbook: Organic vegetable production using protected culture by Andrew Mefferd and The Year-Round Hoophouse: Polytunnels for all seasons and all climates, by Pam Dawling.
Plan on Paper
Once you know what you want to grow and how, compose some possible layouts, and include all parts and pieces—weed fabric, paths, irrigation. This will force you to see and plan for what’s needed.
Your choice of weed management—mulches, geotextiles, cultivation, flame weeding—will affect your irrigation setup. Plastic irrigation pipe doesn’t play nicely with cultivation or flame weeding. Laying geotextiles requires that you first commit to a particular planting layout and to first lay the appropriate irrigation setup.
Once it’s in place, it’s difficult to change for that growing cycle or season. Living mulches might increase watering needs. Weigh and consider each option for how it will affect your irrigation system.

John Moody
Be Prepared
Our third lesson: Get irrigation operational as soon as you can. Irrigation needs to go in with or before the plants, preferably before. Running irrigation after plants are established is not user-friendly.
Depending on your weed-management approach, your high tunnel management will go something like this:
- Plan crops.
- Purchase weed control and appropriate irrigation for plant and weed-control approach.
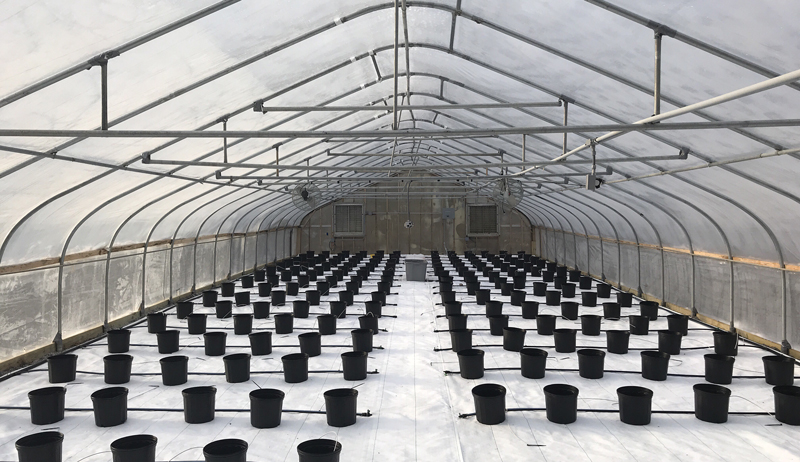
- Set up irrigation at right spacing and intervals.
- Lay weed control measures.
- Plant.
Notice that planting comes last, but it’s the first choice you must make because all other options depend on it. The spacing, types and mix of plants—all this drives what kind of irrigation you employ and how you set it up.
Read more: How can you control pests in the greenhouse? Here are some tips.
System Requirements
The most basic approach to watering plants involves drip tape. It’s nothing more than polytape with spaced slits that allow water to escape. Many other options exist, though, including sprinklers, spikes, tapes and wobblers.
The question becomes: Is it worthwhile to complicate the simplicity of drip tape? Even if you use a bit of extra water with drip tape versus some other method, is that small bit of water savings worth the extra setup, cost and possible complications?
It’s worth figuring out before you spend extra money for a specialty system.
Setting It Up
Setting up and taking down irrigation takes more time than you might expect, but it saves so much time over the growing season you won’t care.
Installing irrigation isn’t difficult. You need no special skills for basic or even intermediate systems. However, it does take time and a number of basic tools, especially a good knife or similar tool to cut pipe and drip tape.
Like many farm tasks, it’s much easier with two sets of hands, so a helper makes it go faster and easier. It’s best to get everything set up during a less busy season—such as late winter or early spring—rather than deferring it to busy late spring.
Also note: Depending on a number of factors, irrigation goes up and down. If you are no-till or just cultivating, sometimes you can get away with rotating crops through beds without having to move or pull all your irrigation.

John Moody
Other Factors
Our farm’s water is very hard, so our irrigation water adds a fair amount of mineral to the soil inside the high tunnel. We factor this irrigation factor into the overall fertility and amendment program for our tunnel.
Also, the hard water can clog certain types of irrigation equipment and build up in the lines. We might eventually switch to rain catchment water if the well water creates too much trouble. Because it’s well water, testing for contamination—especially bacterial—is important.
For some growers, testing might not be enough, and a filtration system (such as an inline UV setup to disinfect) might be necessary. The crop might also determine which setup is best or required—leafy greens and similar raw vegetables or items commonly consumed cooked?
Depending on such issues, the rather simple task of keeping your plants moist might become a bit more complicated.
Sort out all these questions and issues during your original planning stage for the tunnel. They’re easy to miss or otherwise minimize or overlook. While addressing them all might slow you down slightly on the front side, it stands to save you a lot of head, heart and pocketbook ache on the backside of the build.
So take the time for due diligence while you plan your tunnel so you can realize all the benefits that one adds to any farm or homestead as quickly as possible.
This article originally appeared in the July/August 2019 issue of Hobby Farms magazine.