A DIY chick brooder for your new chicks is easy to build. A brooder box must perform the duties that the mother hen would perform for her babies. The chicks are literally under her wings of protection for six to eight weeks. They come out to eat and drink but periodically return for her warmth and quickly return when threatened.
At about 2 months of age, though, the new hatchlings are ready to join the flock. This homemade chick brooder box will do exactly that.
The task is to create an enclosure that is capable of keeping baby chicks secure and warm until they are feathered out to the point that they are independent. It’s still up to the chicken keeper to monitor feed, water and the heat source.
This particular homemade chick brooder, designed for about 10 chicks, will make the task that much easier.
The box isn’t weather-tight, so keep it in your garage. When the chicks become young pullets, move the box into the coop and let the older hens meet the new gals for about a week or 10 days before opening it up to let the groups commingle.
What Materials Are Needed for a DIY Chick Brooder
Building a DIY chick brooder isn’t particularly difficult, but it does require a few tools, some skill and patience, and a bit of time. Here are most of the materials you will need to get started:
- one 4-by-8-foot sheet of oriented strand board (OSB) or plywood. (I like it to be about 3/8 or 7⁄16 inches thick to keep the weight down.)
- five 8-foot-long 2-by-2s (pine or fir, which will be less expensive)
- two 2-by-3-by-8-foot pieces of fir or pine lumber
- ~100 3⁄4-inch deck screws with a Phillips head
- ~25 3⁄4-inch pan-head screws
- a few long screws (2 1/2 or 3 inches)
- ~10-by-2-feet of small-opening poultry netting or 1⁄2-inch wire mesh
- a handful of Sheetrock nails (not more than 13⁄8 inches long)
- wood glue
- one small pair of hinges
- one 8-foot and one 6-foot piece of 1-by-4 (to create the hinged top)
- very thin strips of wood to screw down over the edges of the poultry netting. Use whatever is available in your area. This brooder was made with wood strips that measured 1 ½-inches wide and ¼-inch thick, cut to the length of the netting edge.
Read more: Read these 4 tips for transitioning chicks from a brooder to the coop.
Tools Needed to Build a DIY Chick Brooder
Here are most of the tools that you’ll likely need to build this brooder box.
- a drill motor and bit set
- a circular saw with a wood-cutting blade
- a Philips screwdriver or bit for a power drill
- a tape measure
- a 4-foot straight edge and pencil
- some kind of wire cutters
- some sawhorses or other work surface
- three or more 4-inch C-clamps
- safety glasses
- an awl or other pointed instrument
- a medium-sized claw hammer
You should understand that if you have more efficient power tools or pneumatic staplers, your job will be that much easier. At certain stages, it’s also helpful to have an extra set of hands
Cutting the Board
The diagram below represents a single sheet of Oriented Strand Board (OSB, plywood) measuring 4-by-8 feet. The heavy lines represent the location of saw cuts.
Use OSB that measures about 7⁄16-inch thick to keep the weight to a minimum. You could make the bottom and sides wider, but it makes reaching in and across to catch chicks pretty difficult. As drawn, this will create a brooder that is 10 square feet, which is more than ample for 10 chicks—even more when they only a few days old.

Amonphan Comphanyo;BushAle/Shutterstock
Dispose of the narrow strip that is left over, or use it to create a low front below a strip of poultry netting. All corners will be reinforced with 2-by-2 lumber to provide a surface so screws can be used to make sheets meet securely. Use litter on the bottom of your brooder to a depth that covers these corner pieces.
Once you have your boards cut, use the captioned photos to walk you through the process. Take your time and enjoy this fun little homemade chick brooder plan.
Step-by-Step DIY Chick Brooder Instructions
Step 1: Tools & Materials
Start by laying out what you’re going to need. I like to use the smoother side of the oriented strand board (OSB) sheet for the inside of my brooder.
Use a wet/dry vacuum to clean the finished DIY brooder. If chicks soil or spill water, use a wide putty knife or small dustpan. Remember to keep the smooth side to the inside.
Step 2: Which Side of the Line
Make a mark 24 inches from one end of the OSB (or plywood) and then make a similar mark on the opposite edge. Using a straight edge, make a line completely across the 4-foot width. Using your circular saw, make the cut on the line.
Notice that I am cutting right along the edge of the line, leaving a full 24 inches. Perform this exact same task on the other end of the OSB, but make this cut at a 30-inch line. The piece that is 24-by-48 inches is the back of the brooder, and the 30-inch piece is the bottom.
The DIY brooder will still work if you’re off a little. You just might need to make some simple adjustments.

Bill Graves
Step 3: Add 7/16
After cutting and removing the 24-inch back and 30-inch bottom, cut a 48-inch piece of 2-by-2 lumber and place it along the back edge of the bottom, as shown here. Use about five 3⁄4-inch deck screws along the bottom and five more along the back.
For added strength, add a little wood glue to the joints. Once you have cut a 2-foot section and a second 2 1⁄2-foot section from the 8-foot piece of OSB, you should have a piece a little less than 42-by-48 inches.
(Note: 2-by-2 lumber actually measures 1 1⁄2-by-1 1⁄2. Don’t let that throw you off; suppliers just call it 2-by-2.)
Cut 30 7⁄16 out of the 42-inch piece, and then cut that piece in half down the middle. The idea is to create two pieces that measure 24-by-30 7⁄16. These two pieces will be the side ends of your DIY brooder box.
The sidebar (below) should make this more clear.
You should also notice in this photo that I have already added a piece of 2-by-2 that is about 28 1⁄2 inches directly behind the tape measure. All the corners will have this 2-by-2 or 2-by-3 screw backing.
Read more: Check out this video for 6 tips when starting chicks.
Step 4: Four of Six Sides & Tools
In the image below, it’s easy to see the process. All inside seams are joined with screws and glue. It may be helpful to use C-clamps when tightening the screws, but once the screws are in place, you can loosen the clamps and move on to the next piece.
The corners aren’t put on in any particular order, so simply measure and cut each on as you go. Notice that I put a 2-by-3 across the top of the front span for a bit more support for the top.

Bill Graves
Step 5. Predrilling Close-Up
A small drill bit is used to drill the OSB and 2-by-2 backer. OSB is a rather hard material, but you can use a sharp awl and hammer to start the hole.
Just be careful to apply some pressure from the back if you’re going to hammer on the structure.
Step 6: Apply a Screw
A 3⁄4-inch deck screw is applied to the hole.
Step 7: Ready for Front
At this point, your DIY brooder box is nearly ready for the top and front. The narrow area at the bottom in front can be filled in (see step No. 8), or you can use poultry netting for the entire space.
All eight inside seams now have a 2-by-2 or a 2-by-3 screw backer. At this point, you’ll begin to see how truly rigid the box has become.
Read more: You can hatch chicks for profit with a custom hatching business!
Step 8: Four Sides w/Front Strip
In this slightly elevated view, the narrow remaining strip of OSB has been used to fill in the front bottom. Because my poultry netting is only 24 inches wide, this is a much better option than trying to fill the entire space with wire.
Also, this image shows one spot where two very long screws are needed near the top. The top 2-by-3 on its side is installed to leave about a 12-inch gap.
That will make sense as you finish.

Bill Graves
Step 9: Sheet Rock Nails
I like to pull the wire tight with an awl or Sheetrock nail and/or use a screw. If using a screw, cut one side of the wire and wrap the wire around the screw head before using the screw bit to drive the screw in.
Once you’re happy with how tight the wire is, you can just drive in the nail. Make sure it doesn’t come out the back.
Step 10: Lid Corner
The lid corners were made, braced and hinged. I cut the 1-by-4 on a 45-degree angle and used metal braces with additional wood on the inside. You could also butt-splice the 1-by-4 and then create added strength with the thin strips that cover the wire.
Caution: If you use lid material that is less than 1-by-4, your 24-inch poultry netting will not be wide enough for the top.
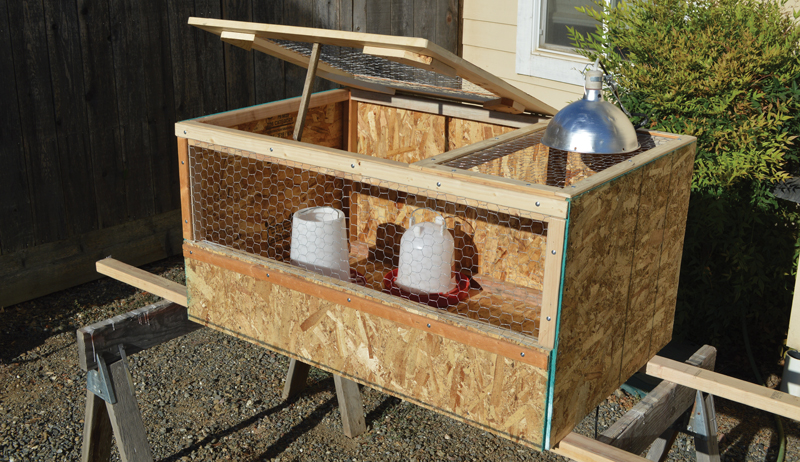
Step 11. Finished
The front and top are complete! The lid can be opened without removing the heat lamp, which is wired in place so it won’t move and become a fire hazard.
The main image for this story also illustrates the thin strips that were used to cover the edges of the poultry netting. I would likely use feeders and watering devices that are slightly smaller to give the chicks a bit more room.
Now your DIY brooder box is ready for some floor litter and baby chicks!
At about two months or even less, you can place the DIY brooder inside your henhouse to introduce the young chicks to the rest of your flock. Chicks won’t need a lamp at that age.
During introductions, put a layer of cardboard on top of the brooder so adult hens can’t hop up and poop through the top. Older hens should accept the new arrivals in a week or 10 days.
This article about building a DIY chick brooder box was written for Hobby Farms and Chickens magazines. Click here to subscribe.