
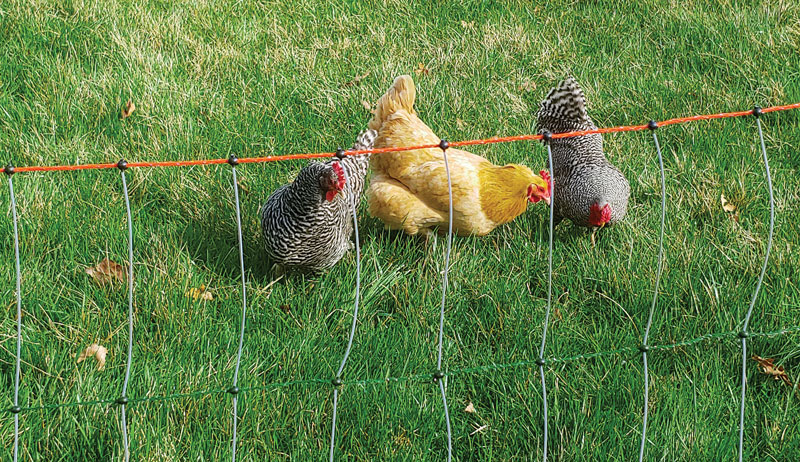
Whether you keep chickens in the city or the country, your primary role as chicken caretaker is to keep your flock safe. This (sometimes difficult) task often means keeping them out of trouble and protecting them from predators. Though there are myriad predator protection methods, one of the most popular methods involves using electric fencing to protect chickens.
For an electric fence to function properly, the solar charger (or “energizer”) must provide voltage that is powerful enough for the shock to jump from the charged wire to the animal’s skin. The shock travels from the energizer, down the fence wire, through the body of the animal, into the ground through the animal’s feet (or hooves), to the grounding rod and back to the energizer. This completes the circuit and shocks the animal, causing its muscles to contract.
How the animal receives the shock depends on three things:
- animal’s bodyweight
- amount of the shock
- length of time it lasts
Electric Advantages
The exact predators your flock faces depends on your geographic location. But, regardless, electric fencing is a popular predator deterrent, and it also helps contain chickens.
These fences can be plugged into an electric outlet to receive their charge. Or you can hook one to a solar charger, commonly used when chicken coops and runs are far from a building or electric box.
An added perk: Electric fencing is generally simple to set up as well as to move, should you wish to rotate your chickens around the farm or yard. Additionally, the cost of a movable electric fence is significantly less than more permanent fencing options.
There are three primary types of electric fencing that can be used with chickens:
Single Strand
Single strand is typically strung about 5 inches off the ground; this type of fencing is generally good predator deterrent
Double Strand
Double Strand is generally placed and 5 and 10 inches off the ground; this type of fencing is generally good for both deterring predators and keeping chickens in one specific area
Netting
Netting, also called poultry fencing, is flexible and easy to install with multiple strands of electrified wire. This type of fencing is helpful for many types of predators (it’s more visibly substantial) as well as for keeping wandering chickens contained.
Sarah E. Coleman
What You’ll Need
Once you’ve decided on the type of electric fencing you’ll use to protect your chickens, you can begin gathering your materials. You will need:
- Fence, either wire, tape or netting that is long enough to enclose the area you wish to use
- Solar charger with enough strength to electrify the length of fence you’re using. The batteries on a solar charger must be completely charged before the charger is asked to power the fence, and it must be in the off position while charging. Be aware that obtaining a full charge can take up to three days; check the model’s manual for details.
- Metal or wooden posts (even when using netting with built-in step-ins, a few posts may be necessary)
- Grounding rods (typically between two and three), which are often made of galvanized steel and should be at least 4-feet long. No matter what material you use, that the same material should be used for the ground rods, wire and clamps
- Grounding wire, properly insulated for the amount of electricity you will be using
- Grounding clamp
- Connectors if using electric wire or tape
- Sledgehammer, posthole digger or T-post pounder
- Voltmeter
Read more: Here are 10 tools you need when installing or repairing an electric fence.
Installation
Solar chargers utilize a panel to collect and convert sunlight to energy, which is stored in a battery. The battery supplies the current to the charger. A wire connects to the fence wire and to the grounding rods, allowing one pulse of electric current per second to travel down the fence.
An electric fence doesn’t need to hook back to itself to work effectively.
To begin, clear the area.
Before installing the fence, it can be helpful to mow a path or drive around the perimeter of where the fence will go. This can help ensure that lines are straight and that no vegetation will touch the wire or netting, which can affect its ability to provide a shock.
Determine the best location for the solar charger.
A crucial part of fence installation is ensuring that the solar charger is placed in an area that is not completely covered in shade; the solar panel should face the sun when it is directly overheard. In the Northern Hemisphere, this is due south.
Lay out the fence posts and fencing near the track.
For poultry netting, this will mean untying the ties that hold the roll together. Then you’ll unclip the metal clips to release the roll.
Install end and gate posts using a sledgehammer, posthole digger or T-post pounder.
If you’re using tape or wire, install corner posts as well. These can be metal stakes or heavier-duty, wooden posts depending on how permanent the fencing is meant to be; if the fencing is permanent, using wooden posts that are at least 6 inches in diameter and placing them at least 3 to 4 feet in the ground will help them endure the added stress in these locations. Additional bracing may be necessary.
Corner posts may also be necessary with poultry netting to prevent it from sagging as it turns the corner. You can tie netting step-ins to these stronger posts with any nonconducting material. If you’re planning on using wooden or metal posts, ensure there is at least 2 inches of space between the netting and the post so the fence can remain electrified.
No matter which type of fence you choose, if you’re using any permanent posts, it’s imperative you contact utility companies to have the lines marked before any fencing begins.
Put up the fence posts if using tape or wire.
Posts are generally spaced about 12 feet apart. But they may need to be closer together if the terrain is especially undulating.
Mount tensioners and insulators for wire and tape on the wood or metal posts.
Installation instructions will vary by brand. If you choose to use more than one strand of tape or wire, start at the top. Work your way down the posts so the wire or tape doesn’t get in your way.
String the wire or tape as tightly as possible.
Multiple tools are available to help tighten both electric wire and tape. If you’re using poultry netting, simply stand it upright and use the step-ins to install it. If you need multiple sections of fence, simply tie the ends together with the provided ties (connect the electric components later).
It’s important to keep the tape, wire or netting from sagging—especially important if there is vegetation in contact with the fence as well. This can affect the amount of electrical output the fencing can produce and potentially endanger your chickens.
Mount the fence charger.
Mount the charger on on a wooden post or wall by placing a screw or nail through the hanger hole. The charger should still be in the off position.

Sarah E. Coleman
Install the grounding rods.
The majority of electric fences need between two and three grounding rods, which act as a large antenna. One rod should be placed within 20 feet of the fence charger. All the rods should be 10 feet apart from each other.
You can install these rods with a sledgehammer or T-post driver. Place them as deeply in the ground as possible, with just a few inches sticking out of the soil on which to clamp the wire.
Hint: Placing the grounding rod at a 45-degree angle is easier than installing it straight up and down if you have rocky soil. Additionally, if the ground is hard and dry, pouring water on the area where you will install the rod can ease installation. Ground rods should not be installed near telephone lines, water lines or utility grounding rods as each of these can pick up stray voltage.
Connect the grounding rods.
Connect them to each other (but not to the fence) using wire and clamps rated for electrical fence use. Most solar fence chargers include wiring harnesses that include this wire.
Attach the negative wire (black) to the end grounding rod closest to the charger and the positive post of the fence charger. Attach the positive wire (red) from the fence charger to the fence.
If you’re using poultry netting, you’ll attach the lead wire from the fence terminal of the energizer to the top clip where the netting begins. Attach the ground wire from the ground terminal of the energizer to the grounding rod.
Connect two rolls of netting together, if using more than one roll.
Always connect the top clip to the top clip and the second clip to the second clip. These will easily clip together. At the end of the netting, attach the clips back to their respective wires (positive clip to positive wire and negative clip to negative wire). Don’t let them simply hang.
Turn the fence charger to the on position.
Read more: Take your chickens off the grid with a solar-powered coop!
Test the fence
To test that the fence is working, select the DC current setting on your voltmeter. Attach the black lead to the grounding rod and the red lead to the electrified portion of the fence. (Note that the specific pieces of fence that are electrified may differ depending on the brand of fence.)
Voltage on a newly installed fence should exceed 3,000 volts. It should never drop below 2,000 volts, or the fence may not keep predators at bay.
It’s important to regularly check fence lines to ensure that no tall grasses or objects come into contact with the fence, which can markedly decrease its shock value or even short out the fence entirely.
Each spring, it can be helpful to turn the fence off and take apart the ground rod connections and scrub them with a wire brush to remove corrosion. Corrosive buildup can also reduce the ability of your electric fencing to conduct a charge and leave your chickens vulnerable to attack.
Sidebar: Choosing Fence Energizer Size
Most electric fence energizers are measured in joules generated. A joule is the international term for a unit of energy (similar to the kilowatt-hour).
A joule equals 1 watt per second, not 1 watt per hour. So the smaller number on fence chargers should not be a turnoff. A solar charger that produces 2 joules of energy can electrify many miles of fence. This shock will prevent predators from visiting your fields.
Remember that the number of joules a company says its energizer creates comes from ideal laboratory conditions, not out in a field surrounded by animals and objects. Check the voltage a fence produces regularly to ensure your flock stays safe. This article originally appeared in the July/August 2021 issue of Chickens magazine.


