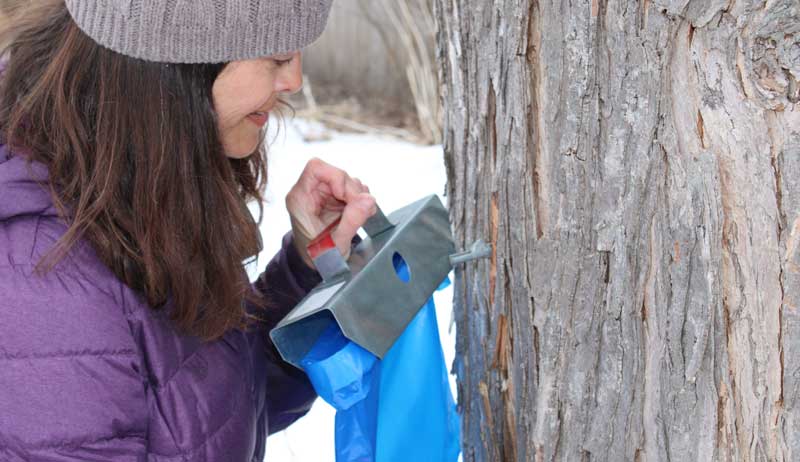
Maple sap can be frozen and melted using an ancient technique based on working with the weather and your own maple trees. My family loves tapping our single silver maple tree. Or I should say we love the process of turning that maple sap into delicious maple syrup and enjoying the end results. We’re able to get 6 to 9 pints each season, depending on the weather.
We tap and collect from early to mid-March. We get a big fire roaring to boil the sap into syrup. This boiling process can take a lot of time—too much to accomplish in a night after work—so we tend to take weekends to boil it down. Which means a lot of sap to deal with all at once!
But years ago, we stumbled across a process of freezing and melting the sap before boiling, and it has stuck with us ever since!
How Maple Sap Freezing Works in Nature
Maple sap flows best when temperatures are below freezing at night and above freezing during the day. A nice sunny day in the upper 30s to 40s with nights in the upper 20s are perfect conditions. This method comes from our local Indigenous people and uses nature’s tendency to freeze at night during the peak of the maple run.
After tapping and collecting sap into buckets, you simply freeze the sap, then let it thaw. You can mimic nature by banking snow around a bucket or by dropping a bucket of sap into a chest freezer overnight.
The sap that thaws and melts first contains most of the sugar. The remaining ice holds very little sugar.
Maple Sap Freeze-and-Melt Process
After sap has frozen, we transfer the frozen sap to a “draining bucket” (another 5-gallon bucket with many holes drilled in the bottom), which fits inside a solid 5-gallon bucket. You can easily raise the draining bucket up on the edges to keep the melted sap separate.
We let it sit at room temperature until the first third has melted and drained through, usually the better part of a day. You can toss the remaining ice chunk. Place the melted and slightly condensed sap back to freeze and repeat the freeze-melt cycle. On the second round of melting, keep the first half that melts.
Tip: I use a wine corkscrew to screw into the frozen sap and lift it out of the bucket!
Typical raw sap contains 1 to 3 percent sugar. After two rounds of “freeze and melt,” the sap will contain between 5 to 16 percent sugar. This means a much shorter boil time.
By using the freeze-and-melt method for two consecutive rounds, you retain around 80 percent of the sugar but reduce the volume of liquid to a mere 20 percent of what you started with. Considering the ratio of sap collected to maple syrup made is generally 40 (sap) to 1 (syrup), it is nice to have a jump start on the concentration process.
Read more: What supplies do you need to tap a maple tree? Here are the basics.
Tips for Better Syrup Results
I love this method because it allows us to collect and hold large amounts of sap, and we can always use a freezer (or the last of snow from shady areas) even as the weather warms. It also helps with those years when the sap flow starts but then stops for longer periods. You can’t let sap sit outside if it is over 40 degrees F for very long. You’ll know your sap has turned if it starts to look cloudy.
Once we have collected the melted sap, we then start the regular boiling process on an open fire. And we still finish the syrup off inside on a stove.
This is a great way to harness the power of nature’s natural cycles and cut down on the overall time (and firewood) needed to boil down sap into sugar.
Maple Sap Freezing FAQ
Can maple sap be frozen before boiling?
Yes. Maple sap can be safely frozen before boiling. Freezing does not harm the sap and can actually make the syrup-making process more efficient by concentrating sugars before boiling.
Why does freezing maple sap increase sugar concentration?
When maple sap freezes, the water forms ice first while the sugar remains in liquid form. As the sap thaws, the first liquid to melt contains the highest sugar concentration, allowing you to separate out lower-sugar ice.
How many times can you freeze and melt maple sap?
Most producers repeat the freeze-and-melt process one or two times. After two rounds, maple sap can reach 5 to 16 percent sugar content while still retaining about 80 percent of the total sugars.
Does freezing maple sap affect syrup flavor?
No. When done properly, freezing maple sap does not negatively affect the flavor of the finished syrup. The syrup retains its natural maple taste because no additives or heat are introduced during freezing.
How long can maple sap be stored frozen?
Maple sap can be stored frozen for several months. This makes freezing especially helpful during unpredictable sap runs or when boiling time is limited.
Freezing and melting maple sap before boiling is a simple, time-tested way to work with nature while making syrup more efficiently. By using cold temperatures to concentrate sugars, you dramatically reduce boiling time, save firewood, and gain flexibility during the short maple season. Whether you’re tapping a single backyard tree or managing multiple buckets of sap, this method helps you make the most of every drop—turning hard-earned maple sap into sweet syrup with less effort and more control.
This article about how to freeze and melt maple sap was written for Hobby Farms magazine. Click here to subscribe.