Plant presses—also known as flower presses—are simple to build. They also happen to make great gifts for gardeners, nature-lovers and crafters. Oh, and they’re essential if you want to save your own botanical specimens.
My plant press came in handy recently when I discovered a few four-leaf clovers and another four-leaf oxalis plant. I carefully plucked the lucky stems, arranged them between sheets of blotter paper, and pressed them for posterity.
The Basics
Now, if you’ve ever pressed a leaf or flower between the pages of a heavy book, you already understand the plant press basics. The book’s covers provide stiffness and weight and its pages absorb moisture. Eventually, fresh plants become flat and dried.
But using books to press plants isn’t ideal. Both book and plants can mildew in the process. And it’s all too easy to forget exactly where you put your specimens.
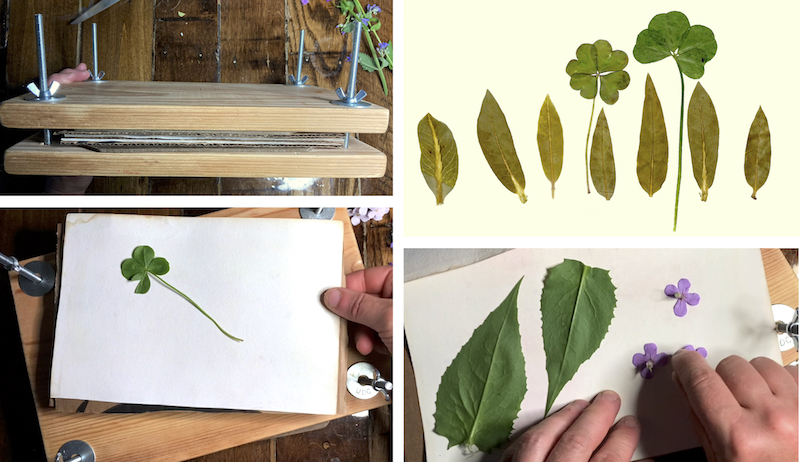
By contrast, dedicated plant presses typically include several sheets of blotter paper and cardboard sandwiched between two thick, wooden boards. Long carriage bolts and nuts hold the contraption together. And by loosening or tightening these, you can control how much flattening pressure you apply.
You can also swap out fresh blotter paper and cardboard in your plant press to help speed the drying process along the way.
Read more: Make your own decorative looms with foraged wildflowers.
Equipment & Materials
Ready to make your own plant press? To start, you’ll need the following tools and materials:
- Saw
- Hand drill or drill press
- Tape measure or ruler
- Pen or pencil
- Scissors and/or utility knife
- Clamp(s)
- Sandpaper or hand sander (optional)
- Wood stain, paint, or shellac (optional)
- Hardwood board
- Hardboard (Masonite)
- Four long carriage bolts
- Four wing nuts
- Eight washers
- Scrap cardboard or foam core
- Blotter paper or smooth, absorbent watercolor paper

Susan Brackney
Step by Step
I like to use reclaimed wood whenever I can. I had an old piece of 3/4-inch hardwood shelving that I cut into two equally sized pieces. (See image Step 1.) My pieces each measured eight by 12 inches.
My reclaimed wood also had some drips of paint and a few dings. I chose to clean up and smooth the surface of both cut boards with a sander. (See image Step 2.) I also rounded all of the corners and edges slightly, but this is optional.
Once you have your two equal boards, measure and mark each corner. I measured 1 inch from the bottom and 1 inch from the side and marked this spot at each corner. (See image Step 3.) These are the marks you’ll use when it’s time to drill pilot holes for your carriage bolts. (See image Step 4.)
In part, the length and size of the carriage bolts you choose depends on the thickness of your lumber. I chose carriage bolts that were 1/4-inch thick and 5 inches long. Also, the drill bit you use should be just slightly larger than width of your carriage bolt.
In my case, I used a 5/8-inch drill bit.
Finishing Touches
When your finished plant press is assembled, you’ll need to be able to move the boards smoothly up and down along the carriage bolts. So, after you’ve drilled one hole in each corner of your two boards, put them together and insert the hardware as a test. (See image Step 5.)
To assemble at each corner, first place a washer over the drilled hole. Then feed the carriage bolt through the washer and through the hole in the first board. Next, feed the bolt through the corresponding hole in the second board. Fit another washer over the end of the bolt, then screw on a wing nut.
Repeat these steps at the three other corners. If your boards don’t move smoothly along the carriage bolts, remove all hardware and carefully drill through the holes again. If you like, you can stain, paint or shellac your plant press boards once you’ve completed these steps.
Next, cut two equally sized pieces of Masonite. (See image Step 6.) These should fit within the space between the carriage bolts. My two Masonite pieces each measured 5 1/2inches by 9 inches.
You’ll also cut your blotter paper sheets and cardboard pieces to the same size as the Masonite sheets. (See image Steps 7 and 8.)
Read more: Flowers as food? Yes! Try these 5 kinds of edible flowers in your garden.
Specimen Setup
The Masonite sheets you cut will help to provide extra support for the plants you want to preserve. When you’re ready to set up the finished plant press, you’ll sandwich each plant specimen between two pieces of blotter paper. Next, you’ll sandwich this blotter paper-specimen combo between two pieces of cardboard.
Stack each of these sets one on top of the next. Now, sandwich this bundle of specimens between the two Masonite sheets.
This final sandwich goes in between the two wooden boards of your plant press. To flatten and dry your specimens, you’ll push these boards together and tighten them down with the wing nuts. As your plants begin to dry out, you may need to give the wing nuts a few more turns to keep the pressure up.
How long your plants will need to remain in the press depends on their thickness, moisture content and more. But, as you experiment with your plant press, you’ll soon get a feel for this.


