If you’ve built a top-notch root cellar, you’ll want to build a top-notch storage system to keep your vegetables fresh and accessible. Because you can’t predict your harvest from year to year, build keep flexibility in mind. These building plans include ventilated shelves, drawers and bins to accommodate different types of produce, but you can customize them to fit your space and needs. Also try this storage system in your pantry, garage or other space.
Materials
Note: Quantities depend on the size of your shelving system and the number of shelves, bins, and/or drawers you include.
- 4-by-8-foot sheets 3/4-inch plywood
- pine 1×2s
- pine 1×3s
- 1/2-inch plywood
- pine 1×10s
- pine 2×2s
- wood glue
- 1¼-inch drywall screws
- L-brackets
- 3d finish nails
- 6d finish nails
Step 1
Rip plywood into 16-inch-wide strips, and cut them to length based on the height of your root cellar. You’ll need two strips for each shelf upright or standard. Apply wood glue to one face of one strip, and position another strip on top. Secure the two together using 1¼-inch drywall screws.
Step 2

Note: The cleats that hold the shelves are 1½ inches wide; the spaces between the cleats are 1¾ inches wide to allow a little wiggle room so the bins and shelves can slide in and out easily.Make a story stick (as shown) to help ensure all the cleats on the standards are spaced equally. Position the top of the story stick flush to the top of a standard, and transfer the tick marks from the story stick to the edge of the panel. Use a drywall or framing square to extend these marks all the way across the panel. Use the story stick on each side of each standard to ensure uniform spacing. Mark all of the standards in the same fashion.
Step 3
Cut the 1×2 cleats to length at 16 inches. Install the cleats to the faces of the standards, using wood glue and 1¼-inch drywall screws. If your cleats tend to split, drill pilot holes for the screws.
Step 4
Secure the standards to the walls, ceiling and floor using L-brackets, screws and concrete anchors as needed. Leave 24 to 28 inches between each pair (ours are 24 inches). The dimensions of the shelves, drawers and bins you’ll build are determined by the spacing of your plywood standards.
Step 5

Note: Create or find a spacer that’s the same thickness as the space between the slats, and use that as a spacing guide; often a 16d nail works well.Create the ventilated shelves by cutting the 1×3 side supports and slats to length, (as pictured); make the slats about 1/4 inch shorter than the distance between pairs of standards. Position the slats atop the two side supports, spacing them about 1/8 inch apart to create gaps for ventilation. Use a framing square or the square edge of a work surface to make sure the supports are square to the slats. Assemble the parts with wood glue and 3d finish nails driven through the slats and into each support.
Step 6

Step 7Build each solid-bottom drawer by cutting a 1/2-inch plywood bottom, as shown. The width of the bottom should be about 1/4 inch narrower than the distance between the standards. Cut oval finger grips along the front edge, using a 1-inch spade bit to create the ends and a jigsaw to create the straight edges. Build the 1×4 drawer box narrow enough so the plywood will extend past the sides and front by 1½ inch, as shown. Use glue and screws to assemble the box frame. Apply glue to the bottom of the frame, lay the plywood on top of it, and fasten through the plywood and into the frame with 6d finish nails.
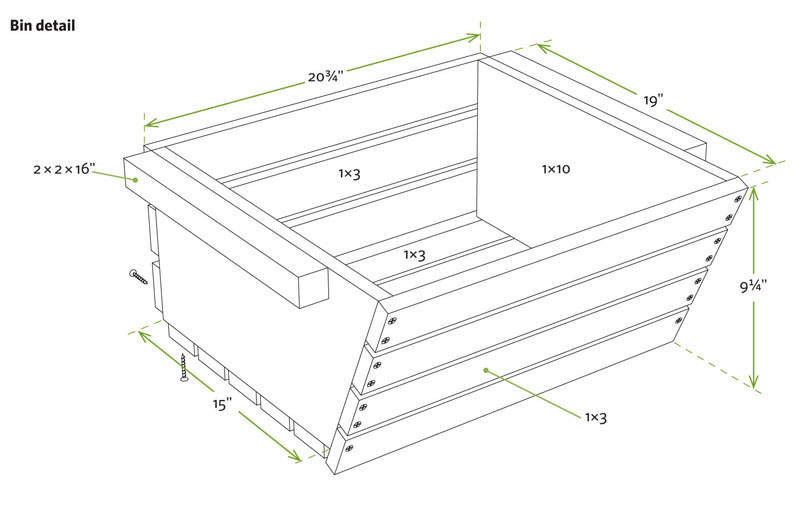
Storing for FreshnessCreate each bin by cutting the 1×10 sides to the length and angle shown in the bin detail shown. Cut the 2×2 runners to length at 16″, and secure them to the sides with glue and screws. Cut the 1×3 slats to length (about 3½” shorter than the distance between standards). Position the two side pieces upside down, and install the bottom, front and back slats with glue and screws, using spacers to gap the slats evenly.

Tom Thulen
Root cellars protect against the three food-spoiling M’s: moisture, mold and mice. Using your root cellar and storage shelves is a learning process. To achieve optimal food preservation, note the first year or two what, when, where and how you stored your produce.
Store only healthy, undamaged vegetables and fruits. Check produce every week, and cull any fruits or vegetables that are spoiling or softening. Also, clean your root cellar prior to harvest season. Scrub out all your containers and let the area dry out for several days before starting to restock it.
Read these other articles about root cellars:
- Why Build a Root Cellar?
- 22 Foods Your Can Store In Root Cellars
- 6 Food-Storage Alternatives to Root Cellars
This article is excerpted The Backyard Homestead Book of Building Projects (Storey Publishing, 2014), by Spike Carlsen. Plan drawings by Bruce Kieffer. Used with permission of Storey Publishing.