My soil contains an astounding amount of clay. As I dig new vegetable patches or perennial flower beds, it’s usually cause for much grumbling. But, lately, I’ve seen my clay-heavy soil in a new light. As it happens, harvesting and processing natural clay is actually pretty fun.
Whether you have your own kids—or you’re just a big kid yourself—you might want to give it a try. Just don’t expect to end up with a perfect set of dinner plates or other finished, food-grade wares.
My natural clay isn’t fancy, and I haven’t fired it in a proper kiln. It is, however, perfect for kneading, modeling and just playing around.
Unearthing Real Clay
The clay from my garden looks reddish-brown, but, depending on its origins, yours may range in color from a darker red to whitish-gray. You can find natural veins of clay along streams or riverbeds—or areas where these once existed.
If you have slow-draining, heavy soil, odds are you’ll find clay in your own backyard.
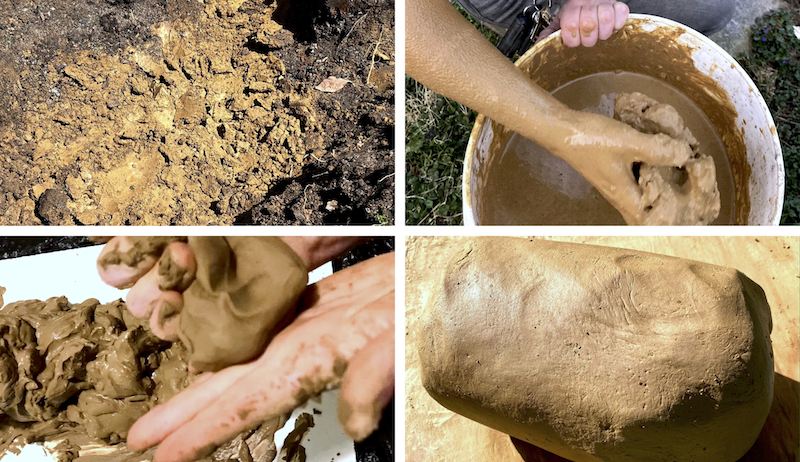
In my case, I only had to dig a foot or two down to find the motherlode. I could plainly see orangey striations of clay set into darker, more crumbly soil.
To make sure it was clay, I pinched off a chunk and rolled it into a ball. It held its shape well.
Next, I added a little bit of water and shaped it into a snake. Again, it behaved like clay should—remaining relatively smooth and pliable as I manipulated it. This is just what you’re after.
Read more: Rainy days got you down? Make all-natural mud paint!
Getting Started
To wet process clay, you’ll need the following supplies:
- two clean, five-gallon buckets
- a large stirring stick
- an old window screen or screen material
- old pillowcase and bit of rope (optional)
- piece(s) of scrap wood
Think you’ve found a good vein of clay? Dig some out and place it in the bottom of one of your five-gallon buckets. Separate and remove any obvious rocks, sticks and similar debris as you go.
Now, fill the bucket with water and mix well. Initially, I used the stirring stick. Later, I used my hands to break up any thick clumps of clay. (This part is every bit as messy as it sounds, so wear old clothes!)
You should be left with a thick clay slurry.
Next, top the second five-gallon bucket with the window screen or screen material. Slowly and carefully pour the clay slurry through the screen and into the bucket. The screen should catch any small stones, twigs, or other impurities.
The Waiting Game
For the next couple of days, allow the bucket of strained clay slurry to sit undisturbed. (I topped mine with a loose-fitting cover to keep mosquitoes, falling leaves and any other debris out.) Eventually, you should notice the clay has fallen out of suspension.
That means you’ll see a layer of clear water floating on top.
Carefully pour off this clear water. Then, let the contents of the bucket settle and separate once again. Pour off more clear water, if you are able.
Finally, you can either wait for most of the remaining moisture to evaporate on its own or pour the contents of the bucket into an old pillowcase. If you go with the pillowcase, use a bit of rope to securely tie it shut.
Next, hang it somewhere warm and dry. In time, the excess liquid will drip off of the bottom of the pillowcase. You’ll be left with a thick, sticky mass of clay.
Read more: Make homemade clay planters for your herb garden.
Final Steps
To help evaporate a little more moisture out of the clay, I spread it out on a few long, flat pieces of scrap wood. I checked on it every few hours to make sure it wasn’t drying out too much.
As soon as the clay seemed workable, I gathered a few handfuls of the stuff and combined them into a ball. Then, I slowly shaped and kneaded it until its moisture content and consistency were just right.
Once you get your clay to this stage, you can store it in an airtight, plastic bag. (If it begins to dry out too much, add just a touch of water to make it workable again.)
Depending on your clay’s degree of purity, you might be able to successfully glaze and fire your own clay creations in a kiln. But finding a commercial kiln you can use on a temporary basis isn’t easy.
And if you do find one? You’d need to create and test fire some clay tile samples to determine your optimal glaze type and firing temperatures first.
Feeling extra-experimental? You could always try pit-firing your finished pieces instead.