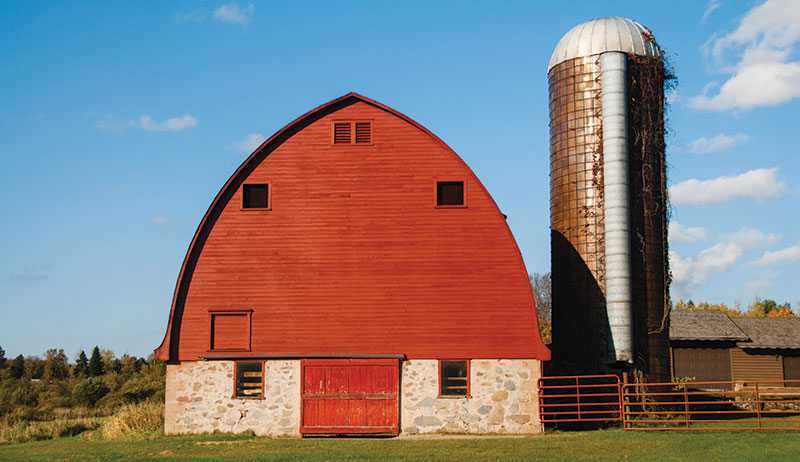
So you’re trying to create the postcard-perfect farm: green fields, well-maintained pond, attractive fencing, an old gray barn with weather-beaten siding … wait, hold on there a minute!
Whether your goal is to turn your farm into a beautiful example of rural living, or you just need to keep that utilitarian building useful for years to come, a new coat of paint can make all the difference. But what tools do you need to complete this job? What prep work needs to be done? Let’s take a look at the process, and before you know it, your old barn will look like new again.
Step 1: Evaluate & Repair

Daniel Johnson
Before you run to the hardware-supply store and purchase multiple gallons of bright-red paint, consider your barn’s actual condition. Assuming that your barn is foundationally sound and satisfactorily square—if not, fixing these problems needs to occur prior to painting—turn your attention to the actual walls you’ll be working on.
Thoroughly evaluate your barn’s siding: Is a coat of paint all that is required to restore the barn to prime condition? Check for any broken or rotting areas of siding that might need replacement, and then make any necessary repairs to ensure that your paint job won’t go to waste on wood that won’t last. Other things to consider replacing before painting include windows, window trim, vents and doors. If they’re all in good shape, continue on!
Step 2: Remove Paint & Prepare

Daniel Johnson
The next step is pressure washing. It’s important to remove all the remaining loose bits of paint, along with any dust, dirt, cobwebs and other debris that might come between your fresh paint and a clean surface for it. If there’s any chance that some of the mist from the pressure washing can get inside the barn, perhaps through a window without glass, cover area first.
Depending on the size of your barn and your ladder skills, you might be able to finish pressure washing and painting by using extension ladders, or you may want choose to speed up the process by borrowing or renting a cherry picker.
After pressure washing, your barn will need ample time to dry before moving on to painting. Areas of particularly thick paint—or spots you can’t hit with the pressure washer—can be tackled with a paint scraper to help get down to the wood.
If you suspect that your barn hasn’t been painted since prior to 1978—the year that lead in paint was banned—then there’s a good chance that you may be dealing with a lead-paint situation. If that’s the case, you’ll need to have a professional remove the paint from the barn and properly dispose of the debris.
Even if you’re removing newer paint, there’s still a possibility that an older coat of lead paint remains underneath. You can test your barn’s old paint with a lead-paint test kit, which are sold at home-supply and big-box stores, but still wear a respirator if you’re at all unsure.
Finally, caulk any cracks or openings around windows, doors and vents to create a good seal.
Step 3: Apply The Paint

Daniel Johnson
Depending on what type of paint you purchase, you can expect 1 gallon to cover approximately 300 square feet of space.
A very large barn can require many gallons. Your paint’s label may suggest a higher number, but aged barn wood will often take more paint than you expect in order to get good coverage, so figure on needing extra.
Latex exterior paint is often recommended by painting professionals for barn applications, although some paints also mix in linseed-based oil for added durability. Many exterior paints are also self-priming, so think of your first coat as the primer coat, and be sure to provide an even surface for the final coat to keep things looking great. If you’re trying to paint weathered wood that you’ve chosen not to replace, an oil-based paint will likely apply better.
You’ll probably need to apply paint by hand for detail work around windows and doors, or for areas of rough wood that you need to really work the paint into. Paint rollers might be helpful, depending on the wood. In many cases, a paint sprayer is essential for getting the job done in a thorough, timely fashion.
Prior to spraying, mask off areas where you don’t want damage from overspray, including windows, doors, vents and roofing. One technique for making sure your paint really gets into the wood is to spray first to get the bulk of the paint applied and then to have someone come along behind you to work the paint into the wood by hand with a brush or roller. Again, these decisions will have to be made on case-by-case bases, depending on the size and height of your barn, the time you have available, and the skills of the painter(s).
Follow your paint manufacturer’s recommendations for thinning, especially for latex-based paints, which are generally thicker than oil-based paints and may need to be thinned slightly to prevent clogging in sprayers.
Once the first coat has dried, apply a second coat, and then stand back and enjoy your “new” barn. Have fun during your painting project, and remember: You’re helping to preserve a little piece of history!
This article originally appeared in the January/February issue of Hobby Farms.