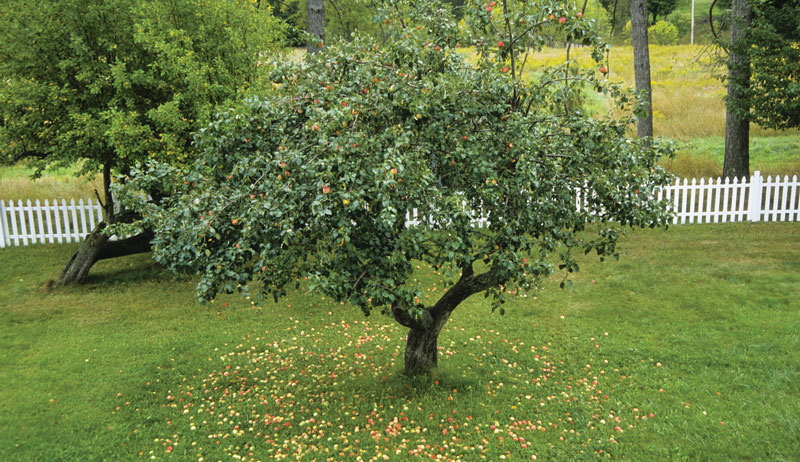
Imagine: You’ve found the perfect farm, a picturesque property packed with all the farming features you’ve dreamed of for years. There’s a cozy farmhouse, a weathered barn, a few small sheds, rolling hayfields … and an old orchard dotted with giant fruit trees!
Does this sound familiar? Mature fruit trees are a common sight on old farms. But age and neglect can prevent these trees from producing fruit the way they should.
Perhaps it’s been years because they were last pruned or fertilized or picked clean of fruit for that matter. Maybe weeds have grown up underneath, and pine trees have grown overhead, choking out and shading the fruit trees.
If you’re fortunate enough to have an old orchard on your farm, a little tender loving care might be all the trees need to turn back the clock and become productive again. The following steps will walk you through the basic process of restoring an old orchard to its former glory.
Take Stock
The first step is to analyze your old orchard and construct a game plan for restoration. Count the number of living trees, and identify the species to figure out the scope of the project.
You might find it difficult to identify the specific named varieties of apples, pears, plums, etc. growing in your orchard. If they’re producing fruit, though, comparing the appearance with older or heirloom varieties known to grow in your region may provide some clues.
The more important goal? Identify the species (an apple here, a pear there) and determine whether you have enough trees for proper blossom pollination. If only one apple tree has survived, and you see that several others have died, you may need to plant replacement trees to ensure fruit production.
Clear Under & Around
A neglected orchard might be overgrown with vegetation, so taming the budding wilderness is a must. Use a riding mower to bring grass and weeds under control or a brush hog, if small trees have taken root.
Clear more carefully around each fruit tree. Use a string trimmer mower or even hand snippers to protect the trunks from damage.
Larger Tasks?
Once the easy work is out of the way, consider whether any larger efforts are needed. Have those spruce trees south of the orchard grown tall enough to shade the fruit trees? Review your orchard at various times of day to see whether the fruit trees receive the minimum 6 to 8 hours of full sun they need for best performance.
If the trees are shaded too much—and if you’re handy with a chainsaw—give them more light by harvesting less desirable trees nearby. Or bring in professionals to handle the cutting and cleanup.
Mind the Windbreaks
Just be wary of cutting down windbreak trees, which may be planted on the west and north edges of the orchard. Windbreaks protect the trees and fruit from heavy winds. This serves to limit damage, conserve water and improve pollination.
If your orchard is unprotected, planting fast-growing windbreak rows a suitable distance to the west and north may improve the health and productivity of your fruit trees.
Read more: These 5 trees make great windbreaks!
Remove Bad Branches
Once the fruit trees are out in the open, you can begin the actual rejuvenation process. Before pruning any healthy growth, focus on removing damaged, diseased and dead branches.
You can do this any time of year. It will go a long way toward improving the overall appearance of each tree.
How to Prune
When removing branches, try to cut as close to the point of origin (without cutting off the branch collar) as possible. Leave a smooth cut (rather than a protruding stub) that will allow the tree to heal.
And for large branches requiring a saw rather than loppers, make a small cut on the underside of the branch before switching to the top of the branch for the rest of the cut. This will prevent the branch from tearing bark away from the tree when it finally falls away.
Required Tools
Pruning loppers, a hand saw and a chainsaw will accomplish much of the work, though you may need a ladder, scaffolding and/or a pole saw to reach higher branches.
Safety comes first. Wear safety glasses and a long-sleeved shirt to avoid scratches. Move slowly and be sure of your footing and balance when handling tools, especially when working from an elevated position.
If in doubt, bring in professionals.

J. Keeler Johnson
Prune Live Branches
Arguably the most critical step in rejuvenating an old fruit tree is pruning healthy branches. The goal is to encourage fresh growth and open up the canopy for improved sun penetration and air circulation.
Left to their own devices, fruit trees tend to produce overcrowded, crisscrossing branches. These shade the lower crown and limit fruit production to the top of the canopy.
Best Time
The best time to prune healthy branches varies somewhat from species to species. Apples and pears should be tackled in late winter, when the trees are still dormant. Prune stone fruit trees after they wake in the spring, around (and even after) blossom time.
The hope in both cases is for the tree to respond with vigorous new growth, jump-starting the process of healing wounds and developing young branches and fruiting wood. Early summer pruning is useful for controlling overly vigorous new growth (including water sprouts; see below). But late summer or autumn pruning risks triggering tender growth that won’t have time to harden off before winter.
Read more: Mow the orchard easier by pruning your apple trees.
A Variable Process
The exact pruning process will vary depending on the type of tree you’re working with, as well as its size, shape and vigor. You’ll come across enough pruning theories to fill a book. And indeed, books and/or online resources are the best way to find detailed and even step-by-step instructions for pruning specific types of trees.
For this article, we’ll aim to overview the process of pruning an overgrown apple tree, which includes the following broad guidelines:
Removing Suckers & Water Sprouts
Removing suckers & water sprouts is perhaps the best place to begin. Suckers sprout up from the roots, while water sprouts grow vertically (often from odd places) on the trunk and branches.
Both are considered detrimental to tree health. They crowd the crown and/or take away energy from more desirable branches.
Cut them off at any time of year.
Open the Crown, Reduce Crisscrossing Branches
Once you’ve removed any obvious problematic growth, you can turn your attention toward opening up the crown & reducing crisscrossing branches. Try to encourage the tree to grow a wide, spreading crown by removing branches that grow inward toward the trunk.
Aim to maintain a symmetrical balance as you proceed, with a roughly equal number of branches on each side of the tree. If two branches try to occupy the same space, remove one so the other can flourish.
Careful Cuts
Trees are good at sealing over pruning wounds with new tissue, especially if you’re cutting small branches close to their points of origin. Bigger wounds naturally take longer for the tree to seal. Make cuts larger than a couple of inches in diameter judiciously, since the tree may require several years to close the wound.
When cutting vertical growth, aim to make sloping cuts whenever possible so moisture will roll off the wound instead of gathering on a flat surface. The use of wound-sealing products is generally discouraged, since they can trap moisture (encouraging decay) and inhibit natural healing.
Two Kinds of Cuts
There are two main pruning cuts you can employ: thinning cuts and heading cuts.
A thinning cut removes the branch at its point of origin, eliminating the branch entirely. A heading cut shortens the branch by cutting it back to one of the lateral buds found at each leaf.
The terminal bud at the end of each branch normally discourages side buds from developing into branches. By removing the terminal bud (as happens with a heading cut), the lateral buds will develop into new branches.
Don’t Go Crazy
In your diligence to open up the crown, it’s important not to prune too much. Advice varies, but for healthy trees (overgrown but not struggling with obvious health issues), you might be able to prune between 15 to 25 percent of the branches in a given year.
But heavy pruning jobs are often reserved for young and vigorous trees.
Older trees are less able to bounce back from the stress of losing so many live branches. So 10 to 15 percent might be a healthier target. And if a tree is clearly struggling—from drought, disease or a lack of key nutrients—you might want to skip pruning entirely. Focus on improving its health first.

Paulette Johnson
Grow out the Bottom
If the tree is taller than you desire, and the lower branches are shaded and unproductive, focus your pruning on the top of the tree while leaving the lower branches largely intact. Allowing more sunlight to reach the lower branches will encourage the growth of new fruiting wood lower in the crown.
Just be aware the top of the tree will try to bounce back with vigorous new growth. Rather than cut back to the desired height in a single season, consider reducing the height gradually over the course of several years.
Maintaining the desired height will also require diligent annual pruning. You may need to prune in both the spring and the summer.
Proper pruning is surely the most imposing aspect of restoring old fruit trees. But it can be highly effective when executed with care and commitment.
Fertilize the Tree
A healthy (but overgrown) fruit tree might not need to be fertilized post-pruning. The root system shouldn’t have difficulty feeding the reduced number of branches.
Fertilizing at this stage might actually be counterproductive, spurning the tree to put on new growth at an overzealous rate that effectively reverses your careful pruning.
But if your old trees are failing to blossom and fruit, or if they show signs of nitrogen deficiency (such as yellowing leaves, small leaves or lackluster growth), feeding them with fertilizer can help them bounce back to peak form. Before applying fertilizers, it never hurts to conduct soil tests and/or tissue samples to determine exactly which nutrients your soil is lacking.
On the other hand, the presence of a mature orchard surely suggests there isn’t anything drastically wrong with your soil. So you may only need a general NPK fertilizer—containing nitrogen, phosphorus and potassium—to feed your trees and give them a boost.
Nitrogen is critical for the vigorous growth of healthy green leaves. Phosphorous contributes to the production of flowers, fruit and roots. And potassium is essential for a wide variety of functions.
Just make sure to check local and state laws regarding the applications of fertilizers before proceeding.
Read more: Do you know how to read the numbers on a fertilizer bag? Check out this video for a quick primer!
How to Fertilize
Fertilizer is best applied in the spring, around blossom time, so the nutrients are available during the tree’s busiest growing season. As with pruning, fertilizing too late in the year can prompt trees to produce tender growth that won’t harden in time for winter.
However, late fall—when the trees enter dormancy—is another option. If your soil doesn’t freeze during the winter, the roots will absorb the fertilizer and put it to good use in the spring.
When fertilizing, carefully read the directions to ensure you use an appropriate amount for the size of each tree. Exact instructions will vary depending on the product used. But the goal is to apply the fertilizer evenly beneath the drip line (the outer edge of the canopy), in a broad ring extending both underneath the crown and beyond the crown.
Granular fertilizers spread across the surface of the soil are effective and simple to apply. But heavy watering immediately afterward is necessary to help the nutrients disperse into the soil. Fertilizing before rainfall is an ideal strategy.
Worth the Effort
Rejuvenating an old orchard is often a multiyear project requiring time, effort and money to achieve. But the rewards—including the satisfaction of restoring an integral part of your farm’s history—can be well worth the investment.
More Information
Time for a New Tree?
As tempting as it might be to rejuvenate every old tree in your orchard, you may find that some aren’t worth the time, effort and expense. In some cases, you might be better off removing the old trees and replacing them with new ones.
The types of trees you have will play a role. Even if the tree is healthy, attempting to reinvigorate it with heavy pruning might not achieve the desired results.

Daniel Johnson
Species Matters
Apple and pear trees are considered the best candidates for restoration. But several stone fruit varieties—such as peaches, nectarines and apricots—aren’t as responsive.
Generally speaking, stone fruit trees are less likely to sprout new growth following the heavy pruning typically needed for taming overgrown trees.
Time for a Health Checkup
Another factor is the health of the tree. Unfortunately, trees don’t live forever, and there’s a difference between a neglected tree and a dying tree.
It’s important to determine whether the tree is suffering from rot. If the trunk and main branches have been hollowed out, the tree is likely near the end of its life. Even if the rot isn’t obvious, you may see mushrooms and other fungal growths sprouting around the base of the tree or on the trunk and branches.
This is a sure sign that disease has taken root and the tree may be fighting a losing battle.
At this point in a tree’s life, pruning is more likely to exacerbate stress than trigger a rebound. The best you can do for a dying tree is nurse it along with fertilizers and consistent watering to keep it productive for as long as possible.
However, if the possibility of the tree breaking and falling presents a safety hazard, you may wish to remove the tree preemptively and plant a healthy replacement.
Keep in mind that disease-inducing fungi can linger in the soil even after the dying tree is gone, so consulting a certified arborist before the tree is removed may be necessary to evaluate the risk to any future trees in the area.
This article originally appeared in the November/December 2022 issue of Hobby Farms magazine.


