A few years back, making rain barrels out of re-purposed 50-gallon pickle barrels was all the rage. While there is nothing wrong with doing that, I was never tempted. I thought they were unattractive and, worse, held too little water.
By summer, a vegetable bed needs about 1 gallon of water per square foot every week. Watering a single 4-by-12-foot vegetable bed would drain a pickle barrel, and then you’re out of water until it rains again — unless you set up a whole series of pickle barrels.
And lining up more of them doesn’t make them less ugly, and it multiplies your cost of connections and the time to install them.
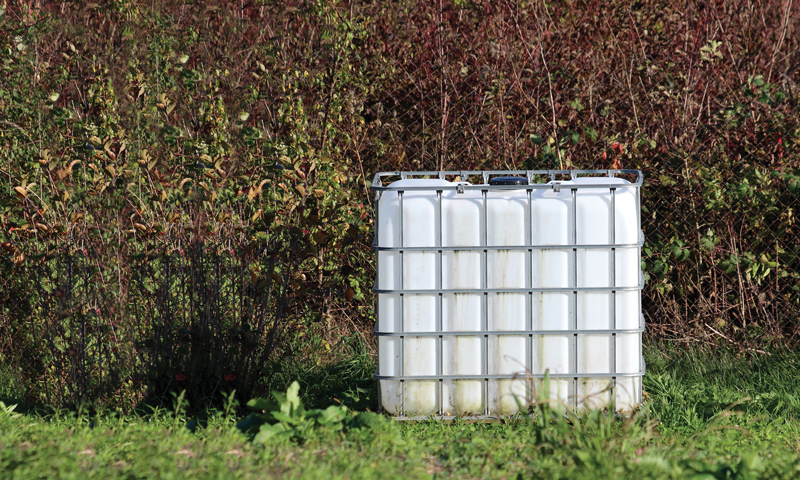
Asking around to see if anyone had a better option led me to IBCs: Intermediate Bulk Containers. You can find them advertised on Craigslist for $75 to $150 apiece (and they are well worth it). I figure that if it holds more gallons than it costs in dollars, you’re getting a good deal.
And an IBC holds 275 gallons—more than five pickle barrels’ worth, but with a smaller footprint and requiring less hardware.
An IBC is a 48-by-48-by-40-inch cube of food-grade plastic mounted on a pallet. It makes me think of the Grateful Dead song “Box of Rain.” An aluminum cage keeps the plastic cube from collapsing. At the top is an 8-inch-wide screw-on lid. Near the bottom is a 2-inch spigot.
The ones I’ve purchased still had the faint scent of the almond oil they originally contained.
To keep algae from growing inside, I slap on a couple coats of dark brown paint made for plastic. Then it looks like a cubic Hershey’s Kiss. Plus, I install them in a way that they can send water uphill to the garden without a pump.
Here are 6 ways to maximize rain water in your garden.
Connect to the Downspout
There are two ways to get rainwater into your barrel: under an existing downspout and not under a downspout.
Under an existing downspout
Cut a hole in the top of the barrel, and drop in a downspout. Use a section of downspout to mark an outline on the top of the barrel. Drill a hole just inside the line. Insert the blade of your jigsaw into the hole.
Cut along the line, and your downspout should fit snugly through the hole. You’ll need to add the same kind of overflow hose near the top of the barrel that any pickle barrel or store-bought rain barrel would have to handle excess rainwater.
Not under a downspout
I recommend using the downspout diverter sold in the Gardener’s Supply catalog. It’s a metal box that fits into the downspout, diverting water into a hose that connects to your rain barrel. Install it correctly (meaning that, even if you’re a man, you read and follow the directions that come with it) and you won’t need to mess with an overflow hose.
When the barrel is full, the rainwater will back up in the hose and go down the downspout. Installing it correctly means that the inlet to the barrel is at the same height or lower than the diverter.
If you want to set up your barrel farther from the downspout than the Gardener’s Supply hose would allow, buy a 3⁄4-inch plastic hose used in Netafim drip irrigation systems. These are often sold at big-box stores.
Just be sure not to use clear plastic hose. Algae will grow in it, making it ugly and clogging it up.

Frank Hyman
Build a Base
Your IBC will come with one pallet. It works best stacked on several more pallets so you can set a bucket under the spigot and send water uphill (more on that later). Get free pallets from feed-and-seed stores, garden centers, HVAC contractors, big-box stores, etc.
If they have “HT” stamped on the side, they have been heat-treated and don’t have chemicals in them. Most pallets that have been treated with chemicals have bright paint slapped on the side and are expensive, so stores send those back for credit.
Unless it’s plastic or metal, remove the pallet from the bottom of the IBC. Add it to your pallet stack.
Once you have all the pallets you need, raise them off the ground by putting a cinder block under each corner. Bricks or scraps of pressure-treated lumber will work fine, too. The main thing is to get the pallet wood on a rot-proof foundation at least 5 inches above the ground so it won’t decompose.
Level up the foundation pieces, then start stacking pallets. Weight and friction will keep the pallets from moving around, so no need to screw them down. Check that the pallets are level or pretty close to it.
Then, wrap the pallets and foundation with some fence wire to keep critters from making a home under your IBC. Extend the fencing as an apron on the ground around the foundation to keep critters from digging their way under the pallets.
Last, use something waterproof and UV-proof as a flat roof to keep the pallets dry: scraps of pond liner, rolled roofing, scraps of metal roofing, etc. Most tarps won’t stand up to the sun’s UV radiation, so don’t go that route.
I had just enough scraps of pressure-treated lattice, so I used them to cover the sides of the pallet stack, to keep critters out and to make it look a little more like a garden feature, but that’s not necessary.
Once your pallet stack has a roof, foundation and critter-proofing, put the empty IBC on top. It should be light enough for one or two people to lift into place. No need to screw it down. Short of a tornado, its weight will keep it in place.
Conserve water by capturing and using rain water on growing plants.
Let Water Flow
Some people unscrew the 2-inch spigot and use lots of PVC adapters to dial down the diameter so that a brass spigot can replace it. I tried that once and found that the adapters seriously constricted the rate of flow.
I also missed having a big spigot that could fill a 5-gallon bucket or a 2-gallon watering can in a matter of seconds. So I keep the 2-inch spigot in place and make a level area under it with bricks where I can set a bucket or watering can and fill it quickly.
To water my garden with a soaker hose, I attach a brass spigot near the bottom of the cube. To do this, I use a drill and a spade bit that cuts the same diameter as the inside diameter of the threads of the spigot. That way the outer edge of the threads will bite into the plastic as I screw it into place.
Just before it’s screwed all the way in, I apply a bead of exterior grade caulk around the threads and then screw it in the last bit. Leave the caulk to cure for 24 hours before moving anything or letting water into the cube.
Send Water Uphill
Here’s the fun part. I had a good site for my IBC, but the garden was uphill from there. Carrying water by hand was out. Installing a pump and routing electricity was expensive, and pumps like to break down anyway.
This was one of those moments where I feel like I learned everything I need to know in middle school science class. I remembered learning that water will run uphill through a hose if the inlet is raised up higher than the outlet. This is the same principle that gets water from a city water tower to your house.
That’s when I realized that if I stacked the pallets just a tiny bit higher than the high point of the garden, gravity would push the water uphill into the garden.
Follow these steps before building your pallet stack and you can do the same:
- Drive a stake into the high point of the garden and wrap twine around its base at ground level.
- Pull the twine to where the IBC would be stationed.
- Hang a pen-sized line level on the twine.
- With the twine pulled tight, adjust it until it reads level.
- Measure the distance the twine is above ground level. (In my case, this was about 35 inches.)
- If the spigot of your IBC is a couple inches above that height, the water in the hose will “think” it’s going downhill, even if the hose lying on the ground is actually running uphill.
Pallets are about 5-inches tall and I had some 6-by-6 scraps for a foundation. In this case, six pallets put the spigot of the box just above the hose outlet at the high point of the garden. The rainwater would flow uphill.
From the barrel to the high point, I would use a garden hose. From there, a soaker hose carried water downhill. (A soaker hose running uphill loses most of its water right away.)

Animaflora PicsStock/Shutterstock
Maintenance
Your super rain barrel should be maintenance-free mostly. Close the spigot when it’s empty so it will refill during rains. Come winter, open the spigot so water doesn’t freeze inside.
Depending on conditions, you may have to touch up the paint periodically to keep algae out of the water. Keep an eye out for critters setting up house in the pallet stack if your fencing isn’t tight enough.
Keep your rain gutters free of leaves in the fall and oak flowers in the spring. (Hopefully you’re doing that already.) And then enjoy tons of free water from your box of rain.
Sidebar: Materials List
Here is the stuff you’ll need to build your own super rain storage unit.
- twine
- line level
- 4-foot level
- blocks of 6-by-6 pressure-treated wood or cinder blocks or bricks
- pallets
- rubber pond liner or metal roofing or rolled roofing
- brass spigot
- spade bit that matches inside diameter of threads of spigot
- exterior grade caulk
- downspout diverter and watertight connection
- spade bit that matches inside diameter of watertight connection
- overflow hose, watertight connection, matching spade bit
- exterior grade paint for plastic