Hog butchering can be a family event that teaches essential skills while also making the process less stressful for the animal. Kate Debord of RG Prime Meats, a slaughterhouse in Bledsoe County, Tennessee, has been butchering the hogs of Sequatchie Valley farmers for about 15 years and shares her tips and best practices with anyone interested in learning more about processing a hog at home.
Before You Begin
Debord recommends familiarizing yourself with the slaughtering process by first viewing YouTube videos and, if the opportunity presents itself, even watching the slaughtering process in person. And, as the process can be time-consuming, she says that it should only be started on a day when you have plenty of time.
Opinions on the necessity of withholding feed, done to lessen the chances of contaminating the carcass with feces and to make gutting easier, before slaughtering vary. Debord doesn’t see this as necessary. Water can and should be offered regardless of your choice.
As you prepare for hog butchering day, you’ll need to make sure you have the following equipment ready and available.
- Firearm—Debord recommends a .22 rifle.
- Multiple sharp boning, skinning and fillet knives plus a knife sharpener. For safety’s sake, always try to work with your knife blade facing away from you.
- Cleaver—For the skull
- Gut hook
- Bell scraper
- Reciprocating saw or hand saw or both
- Propane burner or other heat source capable of heating water to 150 degrees F. You may also choose to heat your water over an open wood fire.
- Thermometers—For checking water and carcass temperature
- 100-gallon scalding tank or barrel—Barrels can be used upright, as is, or cut to fashion into a bath.
- Rope capable of supporting the carcass, chain or meat hook to suspend the carcass. You may also choose to use a gambrel for hanging and dipping.
- Tractor with frontend loader or another type of pully system suitable for a tree or barn rafters to suspend the carcass in the air. The tractor may also be useful in helping you to move the carcass to your processing area.
- Table
- Cooler or refrigerator
- Buckets—These will be used to aid in a pour-over method of scalding should your barrel not be large enough to accommodate the entire hog. You will also need buckets for the inedible parts.
Weather & Location
Because you’ll need to cool the meat to a temperature of 40 degrees F as quickly as possible after slaughtering, the process is best left to days with cooler temperatures.
Next, at-home hog butchering requires a large amount of water for washing down the hog before the actual processing begins, during the processing itself and for cleanup afterward. Position yourself near a water source.
Your processing setup can be as simple as a barrel of water positioned on pallets over a fire in a clean, grassy area, for sanitation and ease of cleanup. Debord, however, recommends a concrete pad if one is available. She says that you’ll also need plenty of space to move around.
axentevlad/Adobe Stock
Step by Step
So that your water has ample opportunity to heat, you’ll need to begin the process of heating it even before you dispatch or kill your hog. To accommodate the hog and water, your drum or barrel for skinning the carcass should not be completely full.
Thoughts vary on whether or not hogs should be separated before killing the hog you intend to process, but both are acceptable methods. Regardless, Debord recommends shooting directly between the eyes. Immediately afterward, the carotid artery should be cut allowing the hog to bleed out. It’s important to complete this step while the heart is still beating.
This process can take several minutes. When movement ceases, check for any remaining signs of consciousness.
At this stage, the carcass can be suspended off the ground to help expedite the bleeding-out process. When preparing to suspend, position a rope or chain around the hocks and behind the dewclaws. Alternatively, you can use a knife to make a slit through the skin and the tendon in the hock (being careful not to sever it), running your rope, chain or another device through rather than around.
Regardless, you should test your work to make certain that your carcass doesn’t fall.
Once the carcass has bled out, you’re ready to scald it by lowering it into your now fully heated water inside a barrel or drum. Using a tractor for suspension during the bleed-out process as well as for lowering (and later raising) the carcass into and out of your hot water used for scraping can make the process easier. But a pully system also works well.
A water temperature of 150 degrees F ensures the ease of hair removal during the scraping process, as does keeping the carcass moving to ensure that all parts are being accessed by the hot water. After a few minutes, you should notice that the hair portion should easily begin to come off. This indicates that the carcass is ready to be removed from the water and scraped in the direction of the hair growth. You may find a bell scraper useful here as it pulls the hair out rather than just scraping it off.
If, due to cooling, the hair becomes difficult to scrape or remove, you can apply more hot water to reheat it. Debord says that a torch can be used to burn off any hair that did not come off during the scraping process. The carcass should be rinsed once the process is complete.
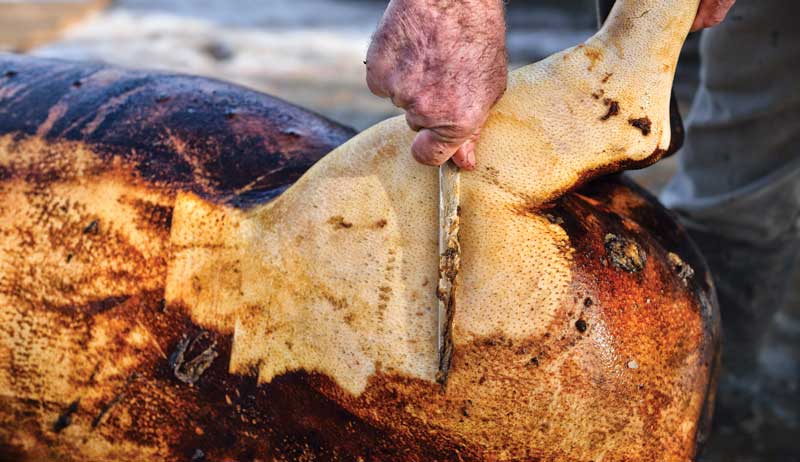
Debord prefers the process of skinning to scalding but when doing so recommends staying as close to the hide as possible to save all your bacon. Generally, the process of skinning is started by peeling off the skin between the hind legs and then moving to the anal cavity, and finally continuing to the center of the hog where the skin should then be opened down the middle.
If the hog was male, the penis is removed as part of the skinning process. It’s recommended that you thoroughly review a YouTube video to ensure that this process is done correctly, as failing to do so could lead to contaminating your meat with urine.
During skinning, use a sharp knife to cut between the skin and the fat until all the skin is removed. Be sure to change out dull knives for sharp ones throughout the process.
Once skinned, you can sever the head at its base with your reciprocating saw or hand saw. You may also find it useful to use a cleaver here. While your saw will be used to sever bone, you should use a sharp knife to sever the windpipe and esophagus. The feet can also be removed at this time.
After your carcass is skinned, you are ready to gut it. You should begin the process by making an incision between the two hind legs and working straight down, first in a narrow strip then slowly widening it.
Begin by cutting around the anus. Provide ample clearance around it to ensure that you don’t puncture it. You should also make sure that you’re cutting alongside rather than into the ham. At this stage, the tail can be removed.
Once you have removed the anus you can begin the process of opening the body cavity. During the process, avoid puncturing the intestines and the bladder with your knife or gut hook. Instead, use your clean hands for organ removal, pulling down and out of the carcass. While you may need to use a knife to loosen connective tissue, you must be careful not to cut into organs such as the intestines or the stomach.
As you near completion, you’ll see the diaphragm muscle that separates the digestive organs from the heart and lungs. By following the esophagus through the diaphragm, you’ll be able to separate it from the trachea, which will allow you to easily remove the remaining digestive organs. These can then be placed into one of your buckets.
Next, use one of your knives to sever the connective tissue of the diaphragm. Then, follow the vein that runs alongside the backbone cutting between the vein and the backbone toward what was the head of the carcass. You can then loosen the connective tissue necessary to remove the heart, lungs and trachea at one time.
Now you are ready to halve the carcass. Start by cutting between the hind legs, then split the sternum leaving the neck intact to hold the two halves together.
When finished, Debord says to spray the carcass down from top to bottom with 100-degree F water. It is now ready to be cooled to a temperature of 40 degrees F for 24 hours. This process should be started as quickly as possible. If you have refrigeration space, the carcass can be cooled in its entirety. If not, place the carcass on a table and cut it into the primal cuts of the shoulder, loin, belly and legs.
For sanitation, pieces should be wrapped in plastic during the cooling process. After 24 hours, the hog carcass will be ready for further butchering into cuts.
Finally, you are ready for cleanup, including the disposal of any parts of the hog you don’t intend to use. Debord says that while the hog butchering process is time-consuming, it isn’t terribly difficult to learn. When you’re finished you can look back on your day with a sense of pride and accomplishment.
More Information
Lard & Organs
The fat lining the abdominal cavity is used in making lard. If you wish to use it, your hand, rather than a knife, is the better choice to separate the fat from the muscle. Afterward, you can set it aside in one of your buckets for later processing.
Depending upon your needs, many hog organs can also be safely processed during butchering, including the liver, heart and kidneys. These, too, can be set aside into one of your buckets for later use.
Choosing Your Hog
Kate Debord of RG Prime Meats, a slaughterhouse in Bledsoe County, Tennessee, recommends a barrow (castrated male hog) or a sow rather than a boar for butchering as, in her opinion, boars tend to produce tougher meat.
For slaughtering she also prefers breeds such as Berkshires, Durocs and Yorkshire since, unlike some other breeds, these tend to produce more meat than fat. She says that the ideal live weight for a slaughter hog is 250 to 300 pounds.
Processing
Decide beforehand how you’ll ultimately want to your hog butchering to go once the initial processing is complete. Ask yourself whether you want mostly sausage, pulled pork, cuts or some combination of these. For example, for sausage, you’ll need a grinder, bags and seasoning. Kate Debord of RG Prime Meats recommends vacuum sealing for your cuts.
This article originally appeared in the Sept./Oct. 2023 issue of Hobby Farms magazine.