If you’ve ever started a garden from scratch or grown any type of crop on your farm you’ve probably discovered something that countless other farmers have encountered in the centuries before you: Rocks can be a nuisance!
Not only the thousands of small, fist-sized stones you find in your fields or garden soil but also boulders that are heavy enough to leave you asking, “How will I move that?”
In situations like these, we’re so quick to turn to modern machines that we sometimes overlook other simple and effective techniques. Obviously, farmers have had to deal with stones for centuries.
If you need proof, just explore the property lines and field edges of older homesteads. You’ll find miles of rock piles. So how did they move those rocks without modern machinery?
Stone Boat
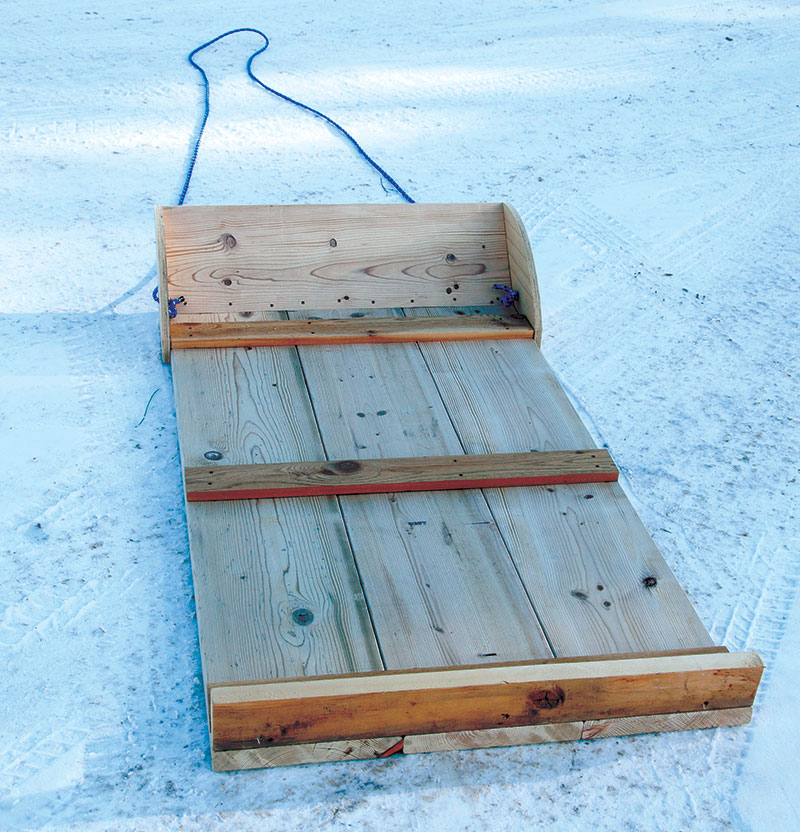
One way is to make use of a stone boat.
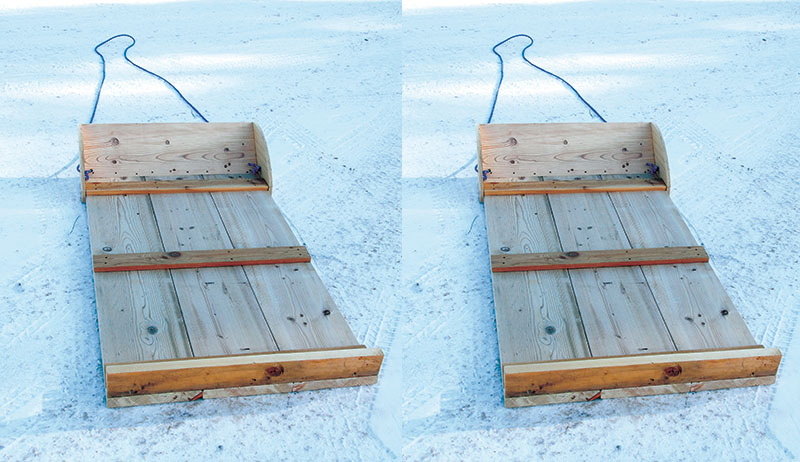
A stone boat—sometimes called a stone drag—is essentially a type of low sled used to move heavy loads such as boulders, piles of rocks and large tree stumps without having to lift them.
Pulled by draft animals in the past, stone boats work well with ATVs, UTVs, compact tractors or garden tractors. Some folks even continue to put their draft horses to work with this tool.
Stone boats are appealing in their simplicity and usefulness. In many cases, they are quick and easy to set up, load, transport and dump. They might be old-fashioned, but they can save you time today. In addition, they’re interesting.
The instructions provided in this article are just one potential plan for a stone boat. It can easily be modified to your needs by making the stone boat longer or wider.
The flat toboggan-style version illustrated here is beneficial for moving large rocks and stumps, as these can be rolled onto the boat with no lifting required. However, if you’d like the stone boat to carry a load of smaller rocks, you can add simple low sides.
Some people prefer to add simple runners to the bottom of the sled for easier towing. But this raises the height of the stone boat, making it more difficult to roll stones onto the deck.
Keep in mind that you can’t back up a stone boat once it’s loaded. Plan your route before loading.
Naturally, using a stone boat might cause some wear and tear on the surface of the ground. But in most cases, you’ll use the stone boat in situations where this isn’t a concern, such as in uncleared fields.
The photos in this article show a snowy scene, because we built ours during the winter in preparation of spring work. So let’s get started on yours.
Materials
You’ll need the following lumber and tools before you get started on your stone boat.
Cut List
- (3) 5-foot 2-by-12s
- (1) 33 3/4-inch 2-by-12
- (1) 33 3/4-inch 2-by-4
- (3) 33 3/4-inch 1-by-2s
- (2) 15-by-11-inch (approx.),
- 1⁄2- or 3⁄4-inch thick plywood
Tools List
- circular saw
- table saw (optional)
- electric drill
- jig saw
- square
Step 1: Create Base
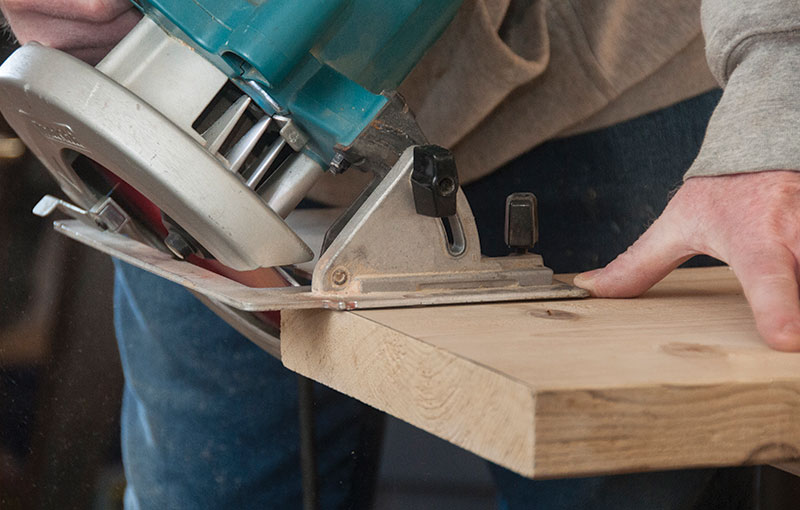
The base of the stone boat is made of three 5-foot 2-by-12s laid out side by side. To help make the boat easier to drag, we’ll start by modifying the “front” ends of these three 2-by-12s.

Using a circular saw (or table saw), trim a 45-degree angle off of the “short” ends, as shown in the photos above.
Step 2: Create Front

The single 33 3/4-inch 2-by-12 is used on the front of the stone boat and helps it slide more easily, but it needs to be modified as well. Again, trim a 45-degree angle, but this time do it across the “long” end of the 33 3/4-inch 2-by-12. Because this edge of the board will be rounded somewhat, it might help to draw a guide line set in at about one-eighth of an inch to help make the cut. Set this piece aside for the moment.
Step 3: Fasten Base Together

Use the three 33 3/4-inch 1-by-2s to join together the three 5-foot 2-by-12s into a base for the stone boat. Place one of the 1-by-2s a distance of 11⁄2 inches in from the back (nontrimmed) end of the stone boat.

Place another 1-by-2 a distance of 33⁄4-inches in from the front (trimmed) end of the stone boat. Attach the third 1-by-2 in the center of the stone boat, at a distance of 21 inches from each of the other 1-by-2s.
Use a square to help you get everything straight, and then fasten with 11⁄2-inch screws.
Step 4: Add Tailgate

For additional strength, and to help prevent loads from slipping off the back of the stone boat, add a simple 33 3/4-inch 2-by-4 to the back.

Fasten this with 31⁄2-inch screws. You might want to flip the stone boat over for this step, as we did.
Step 5: Attach Front 2-by-12

Next, we’ll add the single 33 3⁄4-inch 2-by-12 to the front of the stone boat, positioned as shown in the photos.


Attach it with a combination of 11⁄2-inch screws on the top and 31⁄2-inch screws from underneath.
Step 6: Fasten Plywood Braces

To add support to the angled front of the stone boat, a brace of some sort is preferable. This could be as simple as a set of 1-by-1s fastened between the top of the front board to the stone boat’s base, or you can make the brace stronger—and better looking—by using two small sections of plywood.

For our stone boat, we used two pieces of three-quarter-inch plywood, approximately 15 by 11 inches, and then used a circular saw and jigsaw to refine the shape into something that conforms well with the shape of the stone boat.
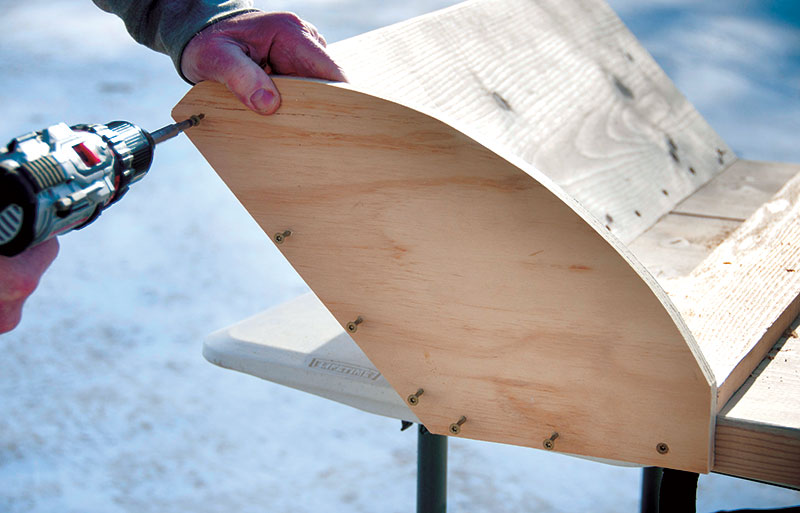
You can make the shape of the plywood less elaborate if you’d prefer. Either way, these braces add strength to the boat.
Step 7: Add Tow Option
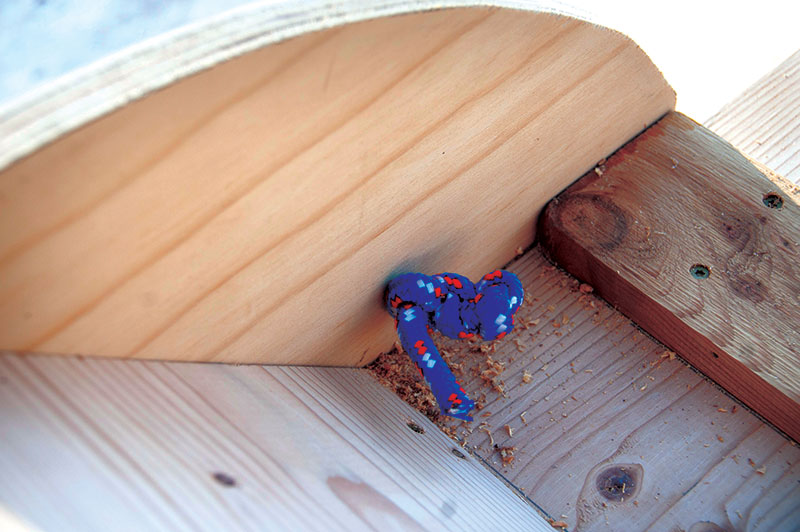
There are multiple ways you can tow your stone boat. Adding a pair of eye bolts can make it usable with a chain, or you can simply drill a pair of holes to add a tow rope, as we did here. Drill two holes, just large enough for the diameter of your chosen rope, through each of the plywood braces, then knot the ends of the rope to secure.

If you’d like a simple tool for moving heavy objects without having to lift them, then perhaps a stone boat is something you need to build for your farm. Have some fun building yours, and remember to exercise caution and care when using tools and working around heavy loads.
This story originally appeared in the May/June 2018 issue of Hobby Farms.


