
A milk crate garden is such a clever way to grow a productive garden in a small space. Instead of growing vegetables, herbs and flowers in expensive flower pots, grow them in stackable, repurposed, plastic milk crates. You can often find these crates on Craig’s List or freecycle.org, or at garage sales, thrift shops and other inexpensive (or free!) sources.
But, my favorite thing about growing in milk crates is all the design possibilities it opens. You can stack the planted crates on their outer edges, checkerboard-style, to make a living wall of containers. If you fill the stacked crates with vine crops, like cucumbers, squash and melons, they’ll tumble down your milk crate “wall” and provide a delicious – and beautiful! – crop of veggies.
Another option is, rather than planting the crops in the open top of each crate, they can also be planted through holes poked through the sides of the crates. You can even make hanging planters out of milk crates by attaching chains with s-hooks to the top edge of the crate and hanging it from a ceiling hook, plant hanger, or shepard’s hook. In other words, with a milk crate garden, your imagination is the only limit!
How to Build a Milk Crate Garden
Materials Needed
Plastic milk crates
Roll of burlap fabric
Enough 50/50 potting soil and compost blend to fill all of the milk crates
Plants
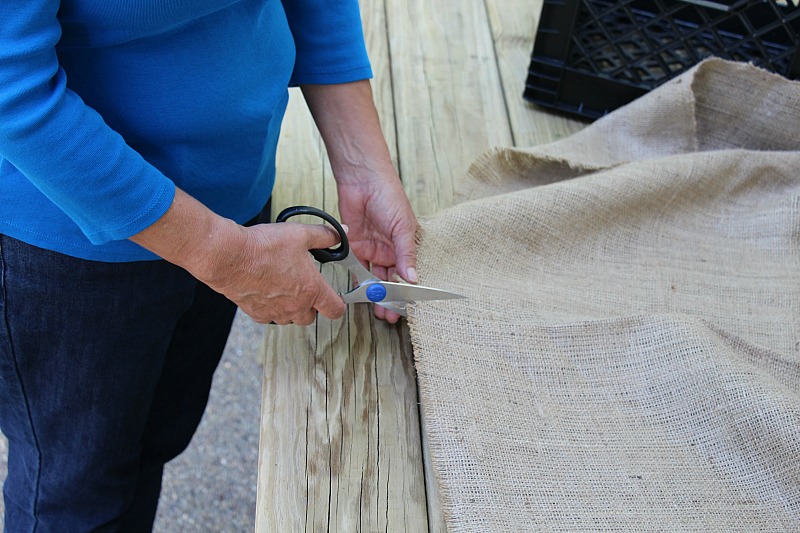
Step 1: Cut the Burlap
Jessica Walliser
Cut a large piece of burlap from the roll. It should be twice the size of the inside of the milk crate. Natural burlap will last one or two seasons, while synthetic burlap will last much longer but may not look quite as nice. For added interest, use patterned or printed burlap from a fabric store.
Step 2: Put the Burlap in the Crate

Jessica Walliser
Tuck the burlap down into the bottom of the crate, pushing it into each of the four corners. Pull the top edges of the fabric out over the edge of the crate. The corners of the fabric don’t need to be perfectly aligned with the corners of the crate.
Step 3: Fill With Soil Blend

Jessica Walliser
Fill the burlap with the blend of potting soil and compost to within one inch of the top of the milk crates. There’s no need to cut drainage holes in the burlap prior to filling the crates with the soil blend because excess irrigation water will easily drain through the porous burlap.
Step 4: Plant

Jessica Walliser
Choose a single specimen plant for each crate. Peppers, small tomatoes, cabbage, zucchini, tomatillos and other crops all do quite well in a milk crate garden. But, since each crate only holds a few gallons of soil, do not overstuff them. If you’d like, you can also add one or two filler flowers or herbs to each crate.

Jessica Walliser
Caring for Your Milk Crate Garden
- Because the burlap will wick moisture away from the soil, you’ll have to be diligent about watering your milk crate garden regularly. The plants growing in the crates will be more thirsty than those grown in ceramic or plastic pots.
- Fertilize your milk crate garden twice per month with an organic, liquid fertilizer such as compost tea, fish emulsion, or liquid sea weed.
- Keep the vegetable plants growing in your crates regularly harvested. Pick beans, peppers, eggplants, cucumbers and other vegetables at the peak of their ripeness and the plants will continue to produce for weeks to come.
- At the end of the growing season, there’s no need to empty and store your milk crates for the winter, though doing so will prolong the life of the plastic. Come spring, you may have to replace any worn burlap before refilling the crates with fresh potting soil and new plants.


