Last spring, as I prepared to give a presentation, I received a text message from my wife: “Freezing temperatures and snow forecast for tonight.” If our farm were in northeast Ohio, New York or Michigan, that would not be a surprise. But we live in Kentucky. Some years, I have enjoyed fresh green beans and new potatoes by the beginning of May. But this year, we had snow. The entire growing season was no different. August brought sub-60-degree nighttime temperatures, and many days were in the 70s.
The end result: Warm-season starts were stunted and small, while cool-season crops quickly bolted and were mostly a bust, with only the high tunnel saving our warm-season crops from the excess precipitation and unseasonable cold. It was a tough year to grow food no matter the day, week or month.
What helped us survive such a sorry growing season? Extending it by starting plants. For ease and reliability, start your plants elsewhere than in the field long before you could normally get them going in the ground. Many plants have two to four weeks of slow growing before they need much root or other space. This slow-growth period is nature’s invitation to game the growing system, starting the plants in a controlled environment and then moving them into their homes once the weather is cooperative.
Over the years, we have done this many ways, so we offer observations and input along with the benefits and drawback on several of them. Let’s dive into the simple yet not-so-simple world of plant starts.
Commonality
I’ll discuss what plant starts have in common before addressing how approaches diverge. They all involve starting plants from two to six weeks before they normally go into the ground. This is generally done in a potting/seed-starting type mix, either homemade or purchased.
Depending on location, as well as how early or what plants you start, you might need to offer supplemental light to prevent the starts from becoming leggy. This is a condition where a plant’s stem gets extremely long, as the plant desperately looks for sufficient light to sustain its growth. Leggy plants generally won’t recover once in the ground.
Usually, once a seed germinates, it produces two starter leaves, called cotyledons. A few days to a week later, it produces its first true leaf. This often lets you identify the type of plant in case you forgot to label them.
For another week or so, the plant grows relatively slowly. But once you have four or so true leaves, the plant grows aggressively if given sufficient water, light, nutrition and space. Space is a resource plants need; insufficient space—below as well as above ground—hinders your plants.
All seed starting approaches require adequate nutrition. It’s best to provide this via the mixture you use to fill your starting setup. If something is wrong with your medium, you must provide additional nutrients via a foliar feed or by adding it to the watering mixture. Some growers even customize their starting medium based on different types of plants; we have generally found this unnecessary. Our base-starting medium is low cost and plant flexible, containing sifted, high rotted wood chip compost and worm castings that we make on our homestead, along with coconut coir. We test our composts every one to two years and track the inputs to ensure it contains ample amounts of everything our plants need.
These things are what the various approaches have in common. But how do they differ?
Plastic Plant Start Containers
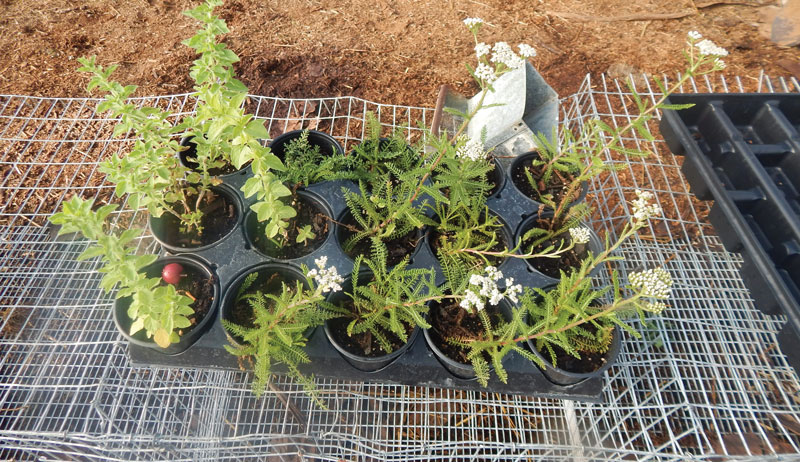
The most common way to start seeds is with plastic containers. Until recently, most were made for single use, though sometimes growers could successfully reuse them. More recently, some companies now offer rigid, reusable, heavy-duty plant starting trays. These are a significant step up in quality and price from the typical plastic plant-starting supplies.
One of the main benefits of plastic starting equipment is the variety and versatility of the options. From large fruit and nut tree pots down to 144s—trays with 144 small plastic spots for flowers, brassicas and other plants that don’t need much space—you can find everything you might want or need. Plastic starting equipment is also relatively inexpensive, especially if you can use it more than once. Some growers sanitize it before a second use to reduce the risk of spreading disease or other problems to the next batch of seedlings.
Plastic plant start containers have some drawbacks, the first being the plastic itself. Some people dislike using a non-renewable resource for a single or, at best, few-time use. The second drawback is root binding. As roots spread, they begin to fill the space in the starting medium. If roots hit something that they can’t penetrate, they change direction to continue growing. Thus, an impermeable container creates the perfect environment for creating root-bound plants.
Root bound plants don’t grow as well, are more susceptible to disease and face more transplant failures. This seems easy to avoid: Get your plants in the ground before they become root bound. But sometimes issues such as weather, work or illness delays putting plants into the ground. Root binding can happen in just a week or so. Star-shaped pots work well to alleviate this problem. For these two reasons, many growers opt for nonplastic approaches to plant starts.
Soil Blocks
Imagine making freestanding plant-starting blocks out of growing medium. Welcome to soil blocks, originally envisioned and introduced by well-known grower Eliot Coleman. Soil blocks are the ultimate DIY approach to seed starting. All you need is a soil blocking tool and a recipe—along with the ingredients.
A soil blocker generally pays for itself compared with purchasing plastic or biodegradable pots in a single season or two. That said, most growers need several sizes of soil blocker because they start plants in a variety of sizes based on the plants’ needs. So the initial investment to get all the necessary soil blockers can be quite high, especially the stand-up models that are easiest for larger scale production.
Unlike plastic, there is no root-binding issue with soil blocks because roots naturally “air trim.” Also, soil blockers allow rehoming of plants that get too large for the original block. This helps if you need to delay transplanting for a few weeks and the plant gets too large for its current container.
With the right soil-blocking tool, you can make a bigger block and put the existing block (and plant) into it. Some growers use this to conserve space in the early season when their plant-starting space is full. As quick-to-transplant crops go into the ground, plants not ready for the field can then be reblocked
for continued controlled environment growth.
Soil blocking is somewhat labor intensive. This is its main drawback. If you do a lot of plant starts, upgrading to the stand-up versions is prudent, albeit expensive. Another drawback is block integrity. If something is wrong with any of your main ingredients, or you mess up proportions, the blocks might crumble. If you are selling plant starts, blocks might not be as popular or user-friendly or attractive to consumers. Soil blocks often fall apart during watering.
Biodegradable Pots
For those wanting to avoid plastic but not go the full DIY route, there are biodegradable pots, sometimes referred to as bio pots. You’ll find three main types on the market—coir, cow and peat—though others are available. All three help build soil while providing some nutrition to plants. All three help prevent root binding because, if kept adequately moist, roots can penetrate the pots and air prune until transplanted. All reduce transplant stress and shock that comes with removing plants from a plastic medium.
Moisture presents a possible drawback with these pots: early decomposition. If the pots are kept too moist or conditions are too humid, the pots might start to break down and fall apart before you get them into the ground. So, take care to not over water or too tightly pack the pots. Also, when placing them into the ground, any pot material that sits above the soil line should be trimmed off so that it doesn’t wick moisture away from the young, vulnerable plant. Also, many growers still use plastic liners, which they fill with the bio pots to make care and handling easier. This approach minimizes but does not eliminate plastic.
The number of styles and sizes of bio pots has increased dramatically, at least in some media. The pots are pretty self-explanatory. Coco or coir pots are made from shredded, desalinated coconut husk. Peat pots are made from peat. Cow pots are made from cow manure (not cows, so no need to worry about your pots mooing at you early in the morning).
While the types are similar, their performance varies in important ways. Also, in our experience, not all pots from all vendors are the same. So before you purchase large quantities, ask for samples. Here are brief thoughts on the three major types.
Coir
These are generally the most durable. Coir is a byproduct of the coconut industry, so such pots turn a large waste stream into a valuable product. Coir is one of the few inputs we purchase—mainly for use in our worm-composting operation.
Cow Pots
Because the manure used to make these pots might come from conventional animals, some growers avoid this medium. These are moderately durable, so for very long or slow-growing starts, you might want to go with a different option.
Peat Pots
Made from the same stuff as the bagged soil amendment, peat pots tend to be the least durable option among the three. Also, peat is generally considered a nonrenewable or very slow to renew resource, so some avoid peat pots because of environmental concerns. Peat pots also tend to receive more reports of mold and fungus problems than coir and cow.
Other Options
Other seed starting options exist, including DIY (egg cartons, toilet paper tubs and more) and purchasable. New types of bio pots are emerging, so evaluate each one on its own. Again, request samples before purchasing a large amount of any type of bio pot.
If you are certified organic or a similar certification, don’t assume that the pots are approved. Check with the manufacturer and your certifier, as the inks and glues on some of the items might disqualify them for organic use.
We use a variety of plant-starting methods, depending on many factors. Are the plants for sale or personal use? What plant is involved? Is the plant more easily stressed or shocked by handling? How much labor is needed? Labor is crucial. You don’t want to miss planting dates and windows because your approach to plant starts overwhelms your ability to get them done.
We prefer soil blocks when possible, but for plant starts we sell, cow or coir pots have many benefits. The additional cost is generally recouped, because our customer base prefers bio pots to plastic, so we can charge an additional 25 cents to recover the expense.
This story originally appeared in the January/February 2019 issue of Hobby Farms magazine.