Raised beds offer many benefits, such as maximized growing space, improved drainage and a longer growing season. Though a simple technique, raised beds can increase the health and productivity of any garden and offer a perfect solution for problems with limited space, poor or rocky soils, and persistent weeds.
The higher soil level makes them easier to maintain, while the loose soil resulting from less foot traffic and the nutrient-rich growing medium used in raised beds help support healthier, more vigorous plants with a better root system. This makes building raised beds a very important task for any starting gardener.
The question, though, is: How does one start? From choosing materials to construction and design, this article will explain all you’ll need to know about building the ideal raised beds for your gardens.
Site Selecting & Planning
Before constructing a raised bed and choosing materials, carefully select and plan a site for your garden. Generally, any sunny spot will suffice for placing a raised bed. Most flowers and vegetables require at least six hours of sunlight daily.
If necessary, remove lower limbs on nearby trees for additional sunlight.
Also Read: 7 Coop Bedding Materials & How to Choose the Right One
Choose a location that is most convenient for you. Being able to easily visit and monitor the raised beds daily will ensure well-watered and healthy plants. Choosing an easily visible site is ideal. Make sure there is also an accessible and convenient water source nearby.
Plan the beds to be 3 to 4 feet wide to be easily worked from either side. If one side isn’t accessible because of a wall or fence, stay under 2 1⁄2 feet, which will ensure you can reach the farthest plants.
You can make the beds as long as you desire. However, if you intend to use wood as a building material, aiming for multiples of four (4, 8 or 12 feet) would be most convenient. The pathways between beds should also be wide enough for easy access. For comfortable planting, watering and harvesting from the paths, plan for 3- to 4-foot walkways.
The height of the beds is also important, and 12- to 18-inch-tall beds will allow for lots of root growth for a wide range of vegetables. If you are planning on growing only greens,
6 inches tall is enough. Locate beds so they receive maximum sunlight and don’t shade each other. Also, line the beds north-south or east-west rather than on a diagonal.
Material No. 1: Wood
Wood is probably the most popular and commonly used material for raised beds. And there certainly is a reason for it. Wood is readily accessible and easy to work with. Using wooden boards, almost anyone can quite simply make an excellent raised-bed garden. It’s also naturally beautiful and can be a very affordable material for raised beds.
If you live in a dry climate, wood might be a great choice as it’ll most likely last much longer in your garden. The downside of wood is that it won’t last forever. All wooden raised beds will eventually rot and have to be replaced. Sometimes, this is even desired if you lease the land or don’t want to make a permanent alteration to your garden.
Don’t use pressure-treated wood because of toxicity issues. Instead, buy naturally rot-resistant wood such as cedar or redwood. These woods, which include black locust, black walnut, cypress, Osage orange, red cedar, redwood and white oak, have natural oils in them which resist insects and decay and can make them last up to 25 years or even more.
You should try to find the darker, denser heartwood of these woods for true rot-resistance.
The downfall of these wood types is that they could be very expensive. So, if you would like to start raised beds without the investment, untreated pine, spruce or fir can be better options. These woods are cheap, easier to work with and will make a nice bed that will last for three to five years.
The dimensions of the wood are also an important factor. When buying wood, choose the thickest and widest lumber you can afford. Thicker lumber will be less likely to bow or crack under the pressure of the soil. Two-inch-thick boards, though more costly, will last much longer than 1-inch-thick boards. The same applies to the width of the lumber.
Raised beds are more prone to rot in the seams between the boards. By using wider lumber, the resulting raised bed will have fewer seams and will resist rot longer.

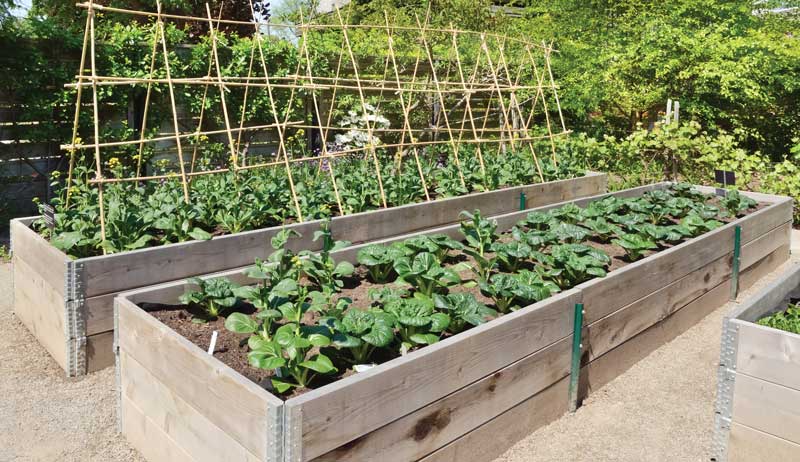
wood raised garden beds
At a Glance: Wood
Many gardeners use wood for their raised bed frames. This material has many advantages.
PROS
- can be very affordable
- when untreated, is very safe and nontoxic
- easy to work with
- naturally attractive
CONS
- isn’t permanent and will eventually have to be replaced
- can be expensive
Tip
An interesting idea is to buy green or unseasoned lumber. If you don’t mind the visual appeal, the rough edges of unseasoned lumber resist rotting better and are much cheaper.
Building Advice
Measure and mark the length of the walls and cut the boards. Drill pilot holes slightly thinner than the screws you’ll be using. Assemble the boards using screws. (Nails won’t hold over time.)
One end of each board should overlap the end of the next. You can add corner posts for extra strength. For longer and taller beds, add more posts along the walls to support the extra pressure of the soil. When ready, continue to treat or fill the bed with soil.
Natural Wood Treatment
Though commercially treated wood isn’t recommended due to toxicity issues, numerous other natural ways exist in which you can treat wood to extend the life of your raised bed. Linseed oil and tung oil are popular options. Make sure you buy them raw without any toxic additives that are commonly added to wood treatments. Other interesting ideas to try are beeswax mixed with oil and milk paint.
Milk paint is a great nontoxic alternative to latex paint that was used for thousands of years before paint was available commercially. Barns painted red with milk paint can still be seen standing today as proof of its durability.
Milk paint can be bought or made at home from simple ingredients. It’s a great way to safely increase the life of your raised beds and can be used to add a wide range of colors. After applying milk paint, you can add a layer of linseed oil or another sealer for additional beauty and durability.
Also Read: These 5 rot-resistant woods are great for raised beds!
Material No. 2: Concrete Blocks
Cheap and long-lasting, concrete blocks can be a great material for building raised beds. They can simply be stacked for a quick and simple raised bed that will last a lifetime. The process can be completed in an afternoon, though it’s important to note that it’ll be a lot of exercise.
When building raised beds this way, you can always restack the blocks to change, move or simply take away your raised beds anytime. On the other hand, some gardeners prefer to use mortar when building with concrete blocks.
These beds will take a little longer to build, though the effort can be worth it.
When using mortar, the beds can be made at any height, and you can paint, plaster and create a wide range of decorative finishes. For example, they can be clad on the outside with flat pieces of stone for a beautiful appearance for a fraction of the cost of a real stone raised bed.
Don’t confuse concrete blocks and cinder blocks when building raised beds. Cinder blocks are lighter and contain fly ash, a byproduct of burning coal, which can leach heavy metals into the soil. Concrete blocks on the other hand are much heavier and made from a mixture of sand, stone and Portland cement, all of which are known to be safe. The problem is that the two are similar and can sometimes be used interchangeably.
To make sure that the concrete blocks you use don’t contain any fly ash, contact the manufacturer, or even better, buy the blocks right from the concrete company. Don’t use old blocks for your garden as you can’t be completely sure what’s in them.
For safety’s sake, some people use concrete block sealer to paint the blocks or line a protective layer between the blocks and the soil.

Michael Feldman
At a Glance: Concrete Blocks
This material is also popular for some but has a few drawbacks.
PROS
- cheap
- simple to stack
- can be used to build raised beds in many shapes
- very long lasting
- when built without mortar can easily be restacked to change, move or remove the raised beds anytime
- warm the soil in cold climates, increasing the growing season
CONS
- though simple, building can be an exercise
- heats up in warm climates
- may contain toxic fly ash
Tip
An interesting idea is to make concrete blocks yourself. You can make a mold or get one online. The benefit is that you can control what goes into the mixture and can make ideally shaped blocks to best fit your needs.
Building Advice
Use marking paint, chalk or string to plan and mark out the space for your raised bed. Concrete blocks come in uniform sizes, so it’s easy to calculate how many blocks you’ll need. Dig and level out the surface of the ground or add a layer of sand or gravel.
Lay the blocks with the holes facing up. One layer will be deep enough for growing greens. Add a second layer if you are planning on growing root crops and other deep-rooted vegetables.
Wear gloves and good shoes to protect your hands and feet. If you are planning on more than one layer high, stack them like bricks, with the joints between the blocks on the second layer sitting on the middle of the blocks in the first layer. When ready, fill the holes in the blocks with soil or dirt for added stability. For even more strength, pound rebar into the holes in each corner of the raised bed.
Lay out the bottom of the raised bed with several layers of newspaper or cardboard. Your raised bed is ready to be filled with soil.
Note
Concrete blocks, like all masonry materials, will heat up under the sun and warm the soil throughout the day. This is very beneficial for those in cold climates and will effectively increase the growing season and allow them to grow more warm-loving crops.
On the other hand, those in the south may have problems in the midsummer heat.
Also Read: A raised bed high tunnel can help you extend your garden’s harvest!
Material No. 3: Straw Bales
If you want a quick, temporary raised bed garden and don’t want to bother with materials, straw bales can be a great choice. They are cheap and easily accessible and will make an excellent raised bed for a season or two. Just lay the bales end to end and you have a great raised bed ready to be filled with soil.
The straw will slowly decompose, adding additional nutrients to the soil. After one or two growing seasons, it can be used as mulch or added to compost. A new bed can be started the same way.
Unfortunately, not all straw is good for your garden. Some straw may contain the leftovers of herbicides that have been used on the crop. Try to source straw from farmers that don’t use these herbicides.
Since tracking the straw bales to the grower is not always possible, there is a simple test to determine the presence of these toxic chemicals.
Cut some of the straw into small pieces and mix them into a potting mix. Use the potting mix to plant several containers of legumes. Then plant several containers of legumes with the same potting mix but without the straw. As the legumes sprout and grow, observe the difference between the two groups. If the legumes in the containers with the straw are stunted or misshapen, then the straw bale most likely has herbicides.
On the other hand, if the two groups both look the same and healthy, the straw is probably safe to use. Of course, this is only probably, and it’s best to try to get straw from an organic grower. You can look on your state’s department of agriculture website for a list of organic farmers, the crops they grow and how to contact them.
Don’t confuse straw and hay when making raised-bed gardens. Straw is cheaper and makes a great raised bed material. On the other hand, hay breaks down much more quickly and contains seeds that will germinate and be a constant weed problem. Hay also more likely contains herbicides that may harm your plants.
At a Glance: Straw Bales
This material doesn’t last but can be used in your compost heap after the season.
PROS
- cheap
- fast and easy to make
- adds nutrients to the soil
CONS
- will last only one or two years
- can contain herbicides
- contain a few seeds which will sprout and be a weed problem
- can be heavy
Building Advice
Use straw bales tightly bound with twine to form the frame of your raised bed. It’s best to work on a dry day as the bales will be heavier when moist.
Place the bales in the desired shape, usually a square or rectangle, and fill the inside with a growing mix. To make the beds last longer and reduce weeds, place several layers of newspaper or cardboard on the ground before placing down the bales.
Tip
An interesting idea to try is straw bale gardening. A new technique, straw bale gardening uses a curing process to turn the center of a straw bale into a nutrient-rich growing medium. The result is a neat bed complete with a growing medium perfect for growing many flowers and vegetables.
This article originally appeared in the January/February 2023 issue of Hobby Farms magazine.