
Farming is a year-round exercise that requires constant attention and effort to keep things running smoothly. From building a new tool shed to clearing a field for planting, there are always plenty of complicated and time-consuming projects that demand our attention.That’s why it’s nice to occasionally tackle a simpler project you can complete in just a few hours with a minimum of effort. Building raised garden beds is just such a project.
Raised garden beds offer lots of advantages. They make it easy to control the quality of the soil in the bed and keep weeds at bay. They can also help protect your plants against pests.
Of course, some raised garden beds can be quite elaborate and complex to construct, but building a basic raised bed requires a bare minimum of parts and supplies. If you seek a fun project that can be completed in less than a day by anyone with rudimentary construction skills, this is the project for you.
A Note About Treated Lumber
When it comes to building raised garden beds, people frequently ask whether it’s OK to use pressure-treated lumber in the construction. While pressure-treated lumber offers resistance to rot and decay, which makes it appealing for outdoor construction projects, such treatments use chemicals that can gradually leach into the soil and end up in the food you grow.
Much attention has been focused on arsenic, which is used in the chromated copper arsenate treatment, though such CCA-treated lumber is no longer available for purchase by general consumers. However, other types of treated lumber, with copper as a key component, are still widely used.
While research suggests that health hazards from treated wood are minimal, there are instances in which excessive levels of arsenic, copper and other metals can build up in soils and be taken up by plants, particularly if the soil is lacking in phosphorus or is acidic. This applies especially to root vegetables such as potatoes and carrots, because the roots of many plants are more likely to absorb and contain metals. On the other hand, plants such as lettuce and spinach can have higher concentrations of metals in their edible leaves, so concerns don’t apply exclusively to root vegetables.
The easiest solution is to simply avoid treated lumber in the construction of garden beds. Instead, you can use wood that is naturally rot-resistant, such as cedar or locust. While beds constructed from untreated lumber won’t last as long as beds made from treated lumber, I’ve built garden beds out of pine that have lasted for years, and the peace of mind and simplicity that untreated lumber provides can be a worthwhile trade-off for its shorter lifespan.
Materials List
Tools
- electric drill
- circular saw
- tape measure
- framing square
- staple gun
- safety glasses
- gloves
Lumber
- (3) 8-foot 2-by-12s
- (3) 8-foot 2-by-2s
Hardware
- (20) 3 1/2-inch screws
- (1) 4-by-8-foot piece of hardware cloth
- numerous 1/2-inch staples
- (3) hinges (optional)
DIY Guide
Time Required: two to three hours
Difficulty Level: easy
The following instructions guide you through building a 4-by-8-foot garden bed measuring 11¼ inches tall, an ideal height for raised beds. This article also details the construction of a hardware cloth cover you can place over the bed and optionally attach with hinges to help keep pests—such as birds and squirrels—out of the bed while letting sunlight and water filter through. That said, this cover is suitable only for use with low-growing plants such as lettuce and strawberries or for protecting young seedlings.
Step 1

Daniel Johnson
To prepare the long sides of the bed, take two of the 8-foot 2-by-12s and trim off any excess so each one is exactly 96 inches (8 feet) long.
To prepare the short sides of the bed, take the third 8-foot 2-by-12 and trim it down to 90 inches. Then cut this piece in half to form a pair of 45-inch 2-by-12s.
To prepare the long sides of the frame for the hardware cloth cover, take two of the 8-foot 2-by-2s and trim any excess so each one is exactly 96 inches (8 feet) long.
To prepare the short sides of the frame for the hardware cloth cover, take the third 8-foot 2-by-2 and trim it to 90 inches. Then cut this piece in half to form a pair of 45-inch 2-by-2s.
Step 2

Daniel Johnson
Now we can assemble the bed itself. Take the two 8-foot 2-by-12s and place them parallel to each other with 45 inches between them. Within this gap, insert the two 45-inch 2-by-12s so that they can be attached to the inner edges of the 8-foot 2-by-12s.
Step 3

Daniel Johnson
Working with one corner at a time, use the framing square to ensure that the alignments of the 8-foot and the 45-inch 2-by-12s are square.

Daniel Johnson
Use three 3 1⁄2-inch screws to secure the boards together at each corner. Use a total of 12 screws.

Daniel Johnson
Step 4
Now that the bed is complete, we can construct the hardware cloth frame.

Daniel Johnson
Take the two 8-foot 2-by-2s and place them parallel to each other with 45 inches between them. Within this gap, insert the two 45-inch 2-by-2s so that they can be attached to the inner edges of the 8-foot 2-by-2s.
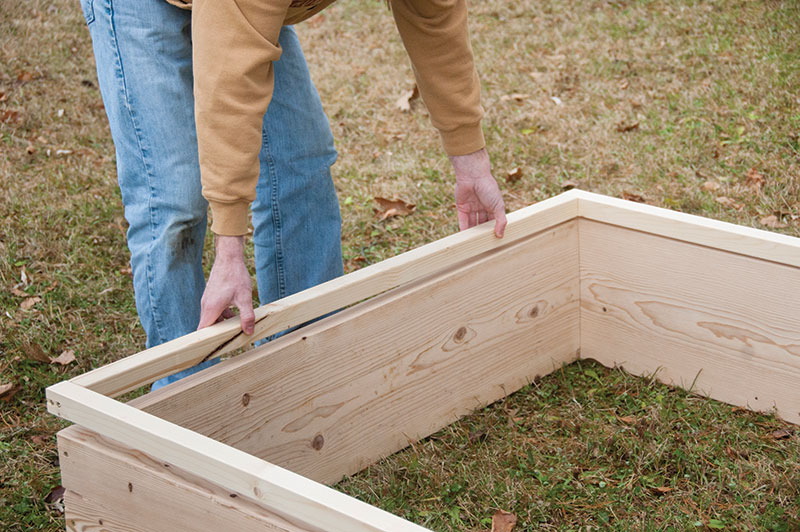
Daniel Johnson
Use the framing square to ensure that the corners are aligned properly, then use one or two 3 1⁄2-inch screws to secure the connection at each corner. Place the hardware cloth frame on top of the garden bed frame.
Step 5

Daniel Johnson
Wearing safety glasses and gloves, carefully roll out the 4-by-8-foot hardware cloth and lay it across the top of the 2-by-2 frame. Use the staple gun to staple one end—the short end might be easiest—securely in place.
Step 6
Now that one end of the hardware cloth is attached, stretch the cloth tightly across the frame and staple the opposite end in place. You may now staple down the other two sides and fine-tune the job by trimming any sharp points or excess hardware cloth.
Step 7 (Optional)
If you’re particularly concerned about pests infiltrating your garden bed and want to add some security, use two or three hinges to attach the hardware cloth cover to the bed, ensuring that it can’t get inadvertently knocked out of alignment by curious critters. A hook-and-eye latch and a handle are other amenities you can add if you desire.
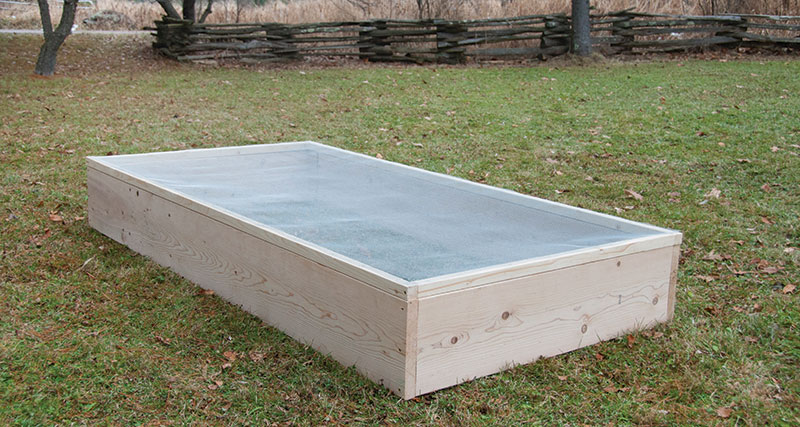
Daniel Johnson
Congratulations! The raised garden bed project is complete. Find a friend to help carry your new raised garden bed to the perfect spot (if you didn’t build it there to begin with), and fill it with quality soil. Now start planting and have fun.
This story originally appeared in the March/April 2018 issue of Hobby Farms.


