Consuming too many highly processed foods (such as white bread) has been blamed for an increased incidence of diabetes, heart disease, stroke and cancers. Conversely, unrefined foods have been documented as being beneficial for our health. Knowing this, we set out to make a great, homemade, 100-percent whole-wheat bread.
We quickly learned that can be tricky. If you’re not careful, the result is a dense, unappealing brick. But when done correctly, you get light, deliciously nutty, whole-wheat bread that’s good for you!
Read on to learn how to produce a wonderful loaf every time.
The Ingredients
Because the ingredients for bread are so basic, everything used should be fresh and of the highest quality. The following components are what you’ll need to create terrific bread.
Wheat
Wheat is the most important ingredient, of course. For 100-percent whole-wheat bread, wheat with high gluten and protein (at least 14 percent) content is necessary. Hard red or white (spring or winter) wheat typically has sufficient gluten and protein content. (See “Wheat Berries” below for sources.)
For comparison, all-purpose, whole-wheat flour has about 12 percent protein, while pastry flour has about 7 percent.
Once you’ve located the right wheat, it’s critical that it’s fresh. Whole-grain wheat berries can be stored almost indefinitely at room temperature, but as soon as you grind them into flour, they quickly go rancid. Whole-wheat flour (with no added preservatives) will only keep for about a month at room temperature.
As a result, it can be difficult to get from a store.
Yeast
Yeast has three major functions when baking bread. It makes the dough rise, gain strength and develop flavor. When flour, water and yeast are mixed, the yeast consumes the sugar in the flour and produces a liquid that releases carbon dioxide bubbles into the dough.
If the dough has a strong, elastic gluten structure, it’ll trap the released bubbles and the dough will rise. In addition, this reaction produces flavor in the bread.
It’s essential that the yeast used in bread baking is fresh so that it can drive the reaction described previously. Dry active yeast is used in this recipe because it’s commonly available and reliable. Refrigerated dry active yeast kept in an airtight container will maintain its potency for several months, so be sure to buy it from a refrigerated case.
Water
Water for making bread shouldn’t be very hard or soft. Hard water will inhibit the yeast reaction, whereas soft or distilled water makes a dough that generally doesn’t rise well. Good drinking water typically works well for making bread.
Salt
Salt, like yeast, has three functions in making bread. It adds flavor, strengthens the gluten and regulates yeast growth. Bread made without salt generally tastes flavorless, rises too quickly and has a crumbly texture. For this recipe, kosher salt works well.
Sweeteners
Sweeteners aren’t required for good whole-wheat bread because enough sugar is present in the flour to feed the yeast. However, a sweetener can improve the bread’s flavor and texture.
Honey, molasses, granulated sugar or brown sugar can all be used, but we like honey. Honey can vary tremendously from jar to jar, though, so consider that when choosing it. We prefer to use raw (unpasteurized), lightly colored, local honey.
Fat
Fat, like sweeteners, isn’t absolutely necessary for good bread. But a little bit of oil or butter improves shelf life, flavor and texture. You can use either good-quality butter or olive oil, but make sure that it’s fresh, too.
Read more: Ancient grains and sourdough fuel the farm at Blue Truck Bread.
The Recipe
This recipe makes two, standard-size, 100-percent whole-wheat loaves.
- 2 teaspoons dry active yeast (1⁄4 ounce)
- 1⁄2 cup warm water (approximately 105 to 115 degrees Fahrenheit)
- 6 cups whole wheat bread flour
- 2 1⁄2 teaspoons kosher salt
- 2 1⁄4 cups lukewarm water
- 2 tablespoons honey
- 2 tablespoons olive oil or butter
Step 1: Milling
(If you’re using preground flour, skip this step.)
If you find a good source for fresh, whole-wheat flour, then you don’t need to invest in a mill to grind it yourself. However, if you’re committed to making your own whole-grain products, then a mill might make sense.
Whole-wheat kernels are a lot cheaper than whole-wheat flour, and freshly milled wheat tastes better. We like the hard white spring wheat “Prairie Gold” kernels and buy them in 50-pound bags.
There are many bread mills available for grinding flour, from hand-crank models to electric. We use an electric Nutrimill and have been quite happy with it. It wasn’t inexpensive, but it’s convenient, easy to clean and has been running well for years.
If you’re considering buying a mill, avoid one that overheats the flour while grinding. That will negatively impact bread quality.
It’s best to grind only as much flour as you plan to use since freshly ground whole grains go rancid quickly. About 3 1⁄2 cups of wheat berries should produce approximately 6 cups of flour for this recipe. Whatever type of mill you choose, set the speed and coarseness of grind so that you get a very finely ground, light brown flour.
Step 2: Mixing
Place the flour in a large bowl, mix in the salt and make a well in the middle of the mixture. Dissolve the honey in the 2 1⁄4 cups of water, and add the butter (shaved into small slivers) or oil. Dissolve the yeast in the 1⁄2 cup of warm water, making sure it dissolves completely.
Pour both liquid mixtures into the well in the flour. Combine the ingredients slowly to make a smooth batter. After combining, wait a few minutes to ensure the dough has completely absorbed the liquids.
Now, evaluate the dough to determine whether it’s too stiff or watery. Remove the dough from the bowl, and feel it to decide whether it needs more water or flour.
It should be sticky and wet, but not waterlogged. It also shouldn’t be too stiff, or it’ll turn into bricks. If more flour or water is needed, return the dough to the bowl, add 3 or so tablespoons of flour or water (flour if too watery, water if too stiff), mix well and reevaluate.
Proceed with the next step when the consistency seems perfect.
Step 3: Kneading
To create a great whole-wheat bread, we’ve found that you must knead the dough to develop the gluten structure. We accomplish this using an electric Bosch mixer set to knead for 15 to 20 minutes. (That’s about 600 manual kneading strokes.)
Like a flour mill, an electric mixer to knead bread dough isn’t inexpensive or required. However, an electric mixer makes it much more convenient to make bread. We’ve used the mixer to create so many loaves that it’s turned into an excellent investment.

After adequate kneading, the dough will become very smooth. When gently pulled, it should stretch without tearing. It will lose most of its wetness and become a uniform beige color.
Step 4: Rising
The next step is the first rising. Shape the dough into a round and place it into a clean, ungreased container with the seam side down. The dough may double or triple in volume during rising, so your container needs to be big enough for the dough to rise without constriction.
The container also needs a cover to keep the dough from drying out. (We used a 6-quart plastic container with a lid.) An ideal temperature for rising is about 80 degrees F, which typically means letting the dough rise in the warmest, nondrafty spot you can find.
After about 1 1⁄2 hour, the dough should have risen substantially. To determine whether the dough has risen sufficiently, do a finger-poke test. Poke the dough with your moistened finger. The resulting hole shouldn’t fill in at all. If the hole fills in some, the dough needs to rise a little longer.
When the first rise is complete, carefully flatten the risen dough using moist hands. Then, gently remove it from the container using a rubber spatula and fold the dough to form a small, firm ball again. Place it back into the container, and put the cover back on for the second rising.
It should take about half as long as the first, and testing for completion is the same.
After the second rise is complete, dust your working surface (preferably a nonstick mat) lightly with flour and use the rubber spatula to gently remove the dough from the container onto the dusted surface (topside down). Then (again with moist hands) gently flatten the dough into a circle about 1 inch thick. At this point, divide the dough in half. The two halves will become your two loaves.

For each dough half, fold the edges of the dough inward. Then invert the dough ball to form another ball.
Cover the dough balls with a damp cloth, and allow them to rest for approximately 10 minutes. While the dough is resting, it’s a good time to grease two 8–by- 4-inch loaf pans in preparation for baking.
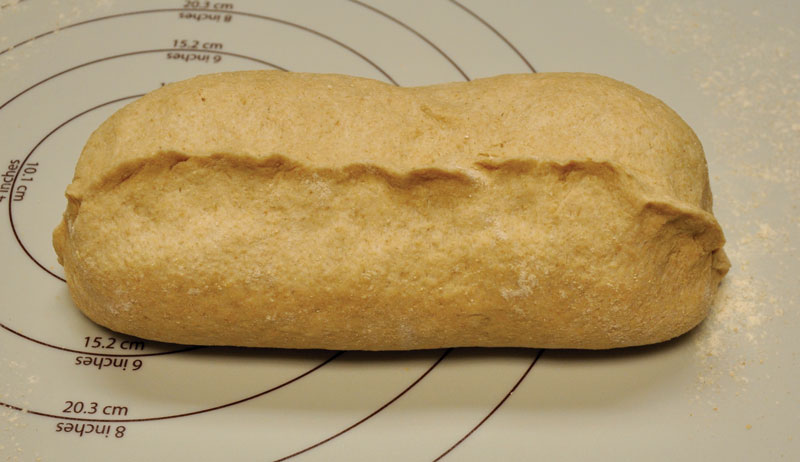
Step 5: Shaping
Now, the dough needs to be shaped into loaves without tearing any of the gluten that’s been developing. To do this, dust your working surface again lightly with flour, put the dough on the working surface, and gently press it into a 1-inch-thick circle.
After that, fold the dough over but not quite in half, making a “smiley” face.
Next, fold the pieces in from the sides. Here you’re trying to make the length of the dough about 2⁄3 of the length of your loaf pan.
Then, gently roll the dough in upon itself. Now, press the resulting seam together. Then seal the seam together. And place the loaf seam side down in the greased loaf pan.
Step 6: Final Rising
The final rising occurs in the loaf pans and should take about 30 to 45 minutes. It’s important to keep the surfaces of the loaves moist, so it’s a good idea to cover the loaves again with a damp cloth.
While the dough is rising, preheat your oven to 425 degrees. The dough is ready for baking when the indentation from the finger poke test fills in slowly. At this point, you don’t want it to remain unfilled (as in the previous risings) because the dough should continue rising slightly in the heat of the oven.
If all the bread-making steps worked properly, the loaves should rise prettily and arch over the top of the pans after the final rise.
Once the dough is ready for the oven, place the loaves on the oven rack near the center. Bake for 10 minutes, then turn the oven
temperature down to 325 degrees. Bake for 45 to 60 minutes more or until the bread tests done with a toothpick.
It may seem like all the kneading, rising and shaping is a lot of work, but the result is glorious, nutty-tasting, 100-percent whole-wheat bread loaves. There really isn’t anything much better than fresh, homemade whole-wheat bread!
More Information
Wheat Berries
You can find hard white or red wheat berries at the following online sources.
This article originally appeared in the July/August 2022 issue of Hobby Farms magazine.