Made with little more than oils, fats, water and lye, properly crafted old-fashioned lye soap is nourishing and gentle on the skin. While a few different ways to create this gentle soap exist, the easy-to-master cold-process method uses ingredients readily available at most big-box stores.
To get started, gather some basic equipment, hit the baking aisle, swing by the cleaning department, then head back home to make your first batch of all-natural soap.
Equipment
Soapmaking is like any other venture. It can be as simple or as complex as you wish to make it. For the first several batches, however, keep things simple, gradually acquiring skills and equipment as needed.
With the exception of the scale and stick blender, don’t invest heavily in equipment, as many of these items can be found on the cheap at garage sales or thrift shops. Just don’t use your good kitchen stash, because items used in soapmaking should be dedicated to soapmaking only and never reused for food production.
What you’ll need:
- digital thermometer
- freezer paper or trash bags to line mold
- gallon-sized pitcher with pour spout
- kitchen scale measuring in ounces, pounds and/or grams
- large stainless steal or enameled stock pot
- latex gloves
- long-handled mixing spoon
- old blanket/towels
- old clothes
- paper towels/old rags
- rubber spatula
- safety goggles (Yes, really: Caustic lye is painful and damaging if it gets in the eyes.)
- smaller plastic/glass containers
- soap mold
- stick blender (This is optional, but it really speeds up the process and ensures lye/oils mix properly.)
- vinegar
- workspace covering—newspapers, paper bags or plastic table cover
Ingredients
To make soap, you need three things: oils/fats, lye and water. While the science is geekishly interesting and something you’ll likely wish to look into, we’re doing simple, so I’ll stick to the basics.
Oils and fats are combined with a lye-water solution, which in turn saponifies—or turns into soap. Each oil or fat contributes certain characteristics. Some, such as lard and palm, contribute hardness, while castor oil produces a creamy lather.
Others perform double-duty as is the case with coconut, which creates a hard bar and produces good suds. And oils such as olive and sunflower are selected primarily for their moisturizing qualities.
All of these oils and fats—with the exception of castor oil—are the same ones located in the baking section of most grocery stores.
Lye and distilled water, on the other hand, do nothing more than turn all those oils and fats into soap. For lye, select sodium hydroxide (NaOH) and not potassium hydroxide (KOH), which is intended for liquid soap production. Most hardware and several big-box stores carry lye—not Drano!—in the cleaning aisle.
While not necessary, you can include essential or fragrance oils to your recipe. Essential oils (EOs) are the oils collected from various plants, while fragrance oils (FOs) are man-made concoctions. Many suppliers, particularly of FOs, will provide guidelines as to how much to include in various-sized recipes.
These are all fun to experiment with and make the soapmaking journey even more exciting.
Breaking the Mold
You can order ready-made soap molds of any size, shape and cost online. However, shoeboxes, cake/loaf pans or any other container with rigid sides will do.
The key to determining if a potential mold will accommodate a given recipe is to do a little math. If you see that the recipe is too large or small for your mold, recalculate the recipe to fit the mold.
Don’t rush out to buy or build a mold just to fit a recipe.
Here’s an example using a mold with the inside dimensions of 10-by-4-by-4 inches and the recipe included in this article.
Step 1
Plug the mold’s dimensions into this formula:
Mold Length x Mold Width x Soap Bar Height x .40 = ounces of oils the mold can hold
Example: 10 inches x 4 inches x 3 inches x .40 = 48 ounces of total oil weights
Step 2
Compute the recipe’s oils’ combined weight in ounces.
Example: 13.57 + 22.29 + 13.57 = 49.43
Based on these two steps, my mold’s capacity is quite close to the recipe, so I can use the recipe as is. However, it’s unlikely that your mold will match my dimensions, so let’s assume your measurements and the recipe don’t match up.
Step 3
Calculate the percentage of each oil in the recipe: coconut oil: 27.45 percent; olive oil: 45.10 percent; palm/lard oil: 27.45 percent.
Step 4
Now, go to a lye calculator (such as the one at www.brambleberry.com or www.summerbeemeadow.com), and insert the recipe’s ingredients as listed.
Step 5
Look to the bottom of either site and locate the button for resizing your recipe. One allows you to simply change the total oil weight to your mold’s capacity while the other has you input your mold’s dimensions. Both will compute the new recipe accurately, although you may see a variance in the amount of lye/water suggested.
As long as the oil percentages for the new recipe are the same as the original, you know you computed correctly and can proceed with the newly converted recipe using your selected mold.
Baking-Aisle Soap Recipe
Now that you know the truth about lye soap, it’s time to make some! Note: Use weighted measurements only.
Ingredients
- 16.39 ounces distilled water
- 7.02 ounces lye
- 13.57 ounces coconut oil (76 degree)
- 13.57 ounces palm oil or lard
- 22.29 ounces olive oil
Preparation
Cover workspace with paper or plastic to protect counters. Gather all equipment and ingredients. Line mold with freezer paper or trash bag.
Measure additives such as essential oils or fragrance oils, oatmeal, honey, etc. and set aside. (See “Variations,” below.)
Don goggles and gloves.
Place container on scale and hit “tare.” Measure distilled water, remove from scale and pour into a 1-gallon pitcher.
Place dry container on scale and hit “tare.” Carefully measure lye. Remove from scale and very slowly add to water in gallon pitcher while carefully stirring. I like to do this near a window with a fan blowing to my back to push the fumes outside.
The lye solution will reach approximately 200 degrees Fahrenheit. Set bowl aside out of reach of children or pets to cool to 90 to 105 degrees.
In a separate bowl, measure each liquid oil. Set aside.
Measure each solid fat, and add to stockpot. Over medium heat, melt solids. Once melted, add liquid oils. Stir to incorporate. Remove oils from heat. Allow to cool to 90 to 105 degrees.
Once oils and lye solution are both in the same temperature range, don goggles and gloves again.
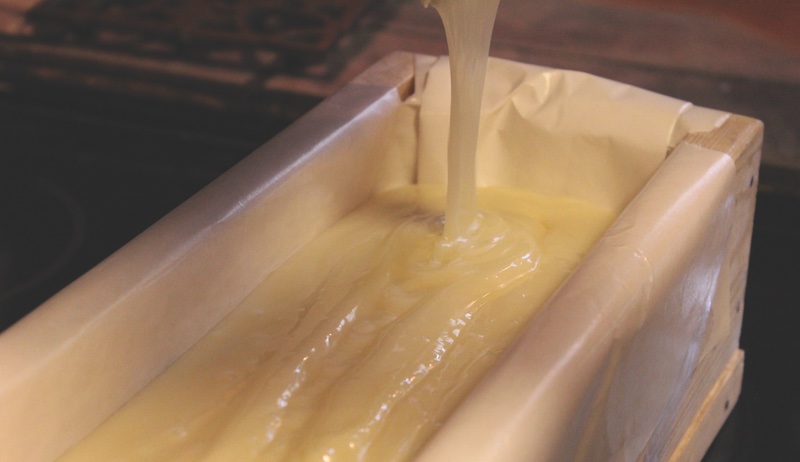
Slowly drizzle lye solution into oils, carefully stirring with heavy-duty spatula until all lye solution has been mixed with the oils. If using a stick blender, gently set blender into oils and give short bursts throughout the pan until you see the solution begin to thicken.
If hand-stirring, begin with short, gentle strokes to keep solution moving, increasing speed and force as solution thickens. Scrape sides of pot periodically to incorporate all oils and lye together.
Eventually, the solution will “trace,” resembling a fairly thin pudding. To check for trace, take your spatula or stick blender and drizzle a small amount of liquid across the top of the solution. If the drizzle immediately settles back into the pot, you’ve not reached trace. Continue stirring/blending.
If, however, the drizzle leaves a faint “trace” of the pattern you made before sinking back into the solution, you have reached trace.
Kristi Cook
Post-Trace
Once you reach trace, it’s time to add nutrients. Add herbals first, then EO/FO, stirring between each addition.
Quickly, but carefully, pour solution into mold. Wrap mold with an old blanket or towels and allow to rest for 24 hours. At the end of 24 hours, remove covers and check hardness of soap. If soap feels hard enough to release from the mold, do so. Otherwise, allow to harden another 24 hours or longer uncovered.
Once soap is removed, slice into bars and place in a well-ventilated location to cure for three to four weeks which allows the saponification process to complete. Don’t be tempted to use bars early, as lye will still be present and can cause irritation.
Once curing is complete, take a bath and enjoy!
When taking that first step toward soapmaking, do be warned. Once you experience the goodness of all natural soaps, you’ll become addicted as you discover new ways to make your soaps your own creations.
Read more: You can use pig lard to make high-quality soap.
Variations
Once you’ve mastered the basic recipe, try some fun and interesting variations.
Oatmeal & Honey
- 1⁄4 cup finely ground oatmeal
- 1 tablespoon warm honey
Lavender
- 1⁄4 cup lavender flowers
Patchouli Musk
- 1 to 3 teaspoons patchouli essential oil
Sidebar: Safety First
Lye is highly caustic and should be handled with care.
- Store out of reach of children.
- Ensure children and pets are out of the working area.
- Provide plenty of ventilation by utilizing windows and fans.
- Never breathe the fumes. This can lead to respiratory distress.
Dial 911 immediately if you experience breathing difficulties.
Should lye come in contact with skin, apply vinegar and/or copious amounts of water to neutralize the burning. The good news about lye soap is that once saponification is complete, no lye remains in the finished product, provided the soap was created and cured properly.
This article originally appeared in the January/February 2021 issue of Hobby Farms magazine.