Sugaring holds a warm place in my heart. My first foray into making maple syrup was when I was 14, working as a volunteer at a historic farm. I drove the farm’s draft horse and sled into the woods to collect sap from tin buckets that hung on the ancient sugar maples.
I had never tasted anything as good as the syrup that came out of the farm’s vintage sugar shed, but I think the experience of making that syrup was far memorable. So when my husband and I purchased our farm 12 years ago, we decided to try our hand at sugaring. We only had 15 maple trees to tap, but they yielded enough syrup to make it worthwhile.
Michelle Visser is the author of Sweet Maple: Backyard Sugarmaking from Tap to Table. Along with her husband and four daughters, she makes syrup on their homestead in New England. She and I agreed that turning sap to syrup is a kind of alchemy.
“I thought my husband was crazy when he tapped our first tree,” Visser says. “I hated maple syrup at the time, but I thought the process of sap to syrup would be a good science lesson for my daughters. The second year we got it right, and we ended up with the light-colored early syrup that is so delicious.”
Anyone can start sugaring. You don’t need a forest full of mature sugar maple trees. A sugar bush (or orchard) can be as simple as a few trees around your house or scattered throughout a small patch of woods (as in my case).
Or it could be more expansive, spread across many acres (as is the case with Visser). You can also get permission to use trees for sugaring from your neighbors or in a local park.
Learn about 5 uses for maple syrup beyond the breakfast table.
The Sap Run
In the Maple Belt (the hardwood forests that stretch through the Midwest, Canada and New England), sugaring time usually runs from late February to early April, or when the nighttime temperatures are below freezing and the daytime temperatures are above freezing.
This freeze and thaw creates pressure, which allows sap to flow. But you don’t have to live in the Maple Belt to be a sugarmaker. If your area has a freeze and thaw, you’ll have a sap run.
Although the sugar maple has the highest sugar content, any maple tree will produce sap for syrup. There are also four alternative trees that you can tap: birch, walnut, sycamore and sweet gum.
And of the 30 sugar sap trees Visser mentions in her book, at least one grows in every state, even Hawaii with its palm tree flower.
“All it takes is knowing the right weather conditions,” she says. “A major change in weather can be enough.” For example, in the Pacific Northwest, a rapid fluctuation in high and low fronts will cause sap to flow.
It’s worth tapping a tree even if all you’re going to do is drink the sap. Sap is delicious and loaded with polyphenols, antioxidants, vitamins and minerals.
“You might not have enough sap to make syrup,” Visser says. “But during the season you’ll have really good water to drink with a tint of maple flavor.”
Studio Light and Shade/Shutterstock
Tap Tips
Trees facing the warm afternoon sun tend to produce sooner than trees living deeper into the forest, although it’s difficult to predict which tree will do best, no matter its location. Some trees will give one year and then not at all the next.
In our sugar bush, we have a tree called the “Old Lady.” She’s the grand dame of our woods and large enough to accommodate three taps. Last year, she kept most of her sap to herself while the younger trees gave generously.
There’s also a debate as to whether you should tap on the south or north side of the tree. No one has come to any conclusion, so feel free to try either or both ways.
To tap your tree, use a 5⁄16-inch bit, and drill a hole 1 1⁄2 to 2 inches deep, 36 inches above the ground (4 inches away and a few inches above any previous holes). Use one smooth, slightly upward motion to make a perfectly round taphole. (Less-than-round holes can leak.)
Visser says in a healthy tree, the wood shavings should be light colored. Darker wood shavings mean the hole will be unproductive. In this case, move to another section of the tree and try again.
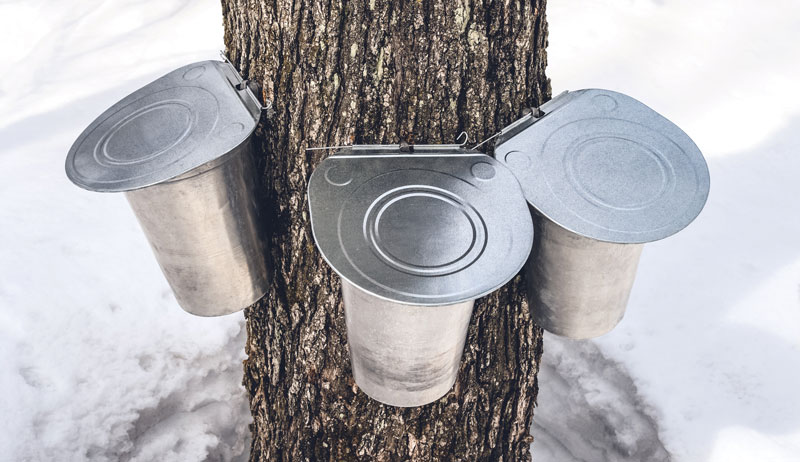
Use a stiff wire to fish out any sawdust lingering in the taphole. To seat the spile (also called taps or spouts) correctly, Visser says to gently tap it in with a light hammer until you hear a change in pitch.
You can place multiple spiles on trees depending on the diameter of the trunk. Do not tap trees less than 10 inches in diameter. Doing so can rob the tree of its essential carbohydrates. The ratio is as follows:
- one tap for trees 10 to 17 inches in diameter
- two taps for trees 18 to 24 inches in diameter
- three taps for trees 25 inches and up
At the end of the season, remove the tap. Do not plug the taphole. Leave it open and let the tree heal itself.
Read about Beyers Maple Farm, where two Marine veterans sell maple syrup and more.
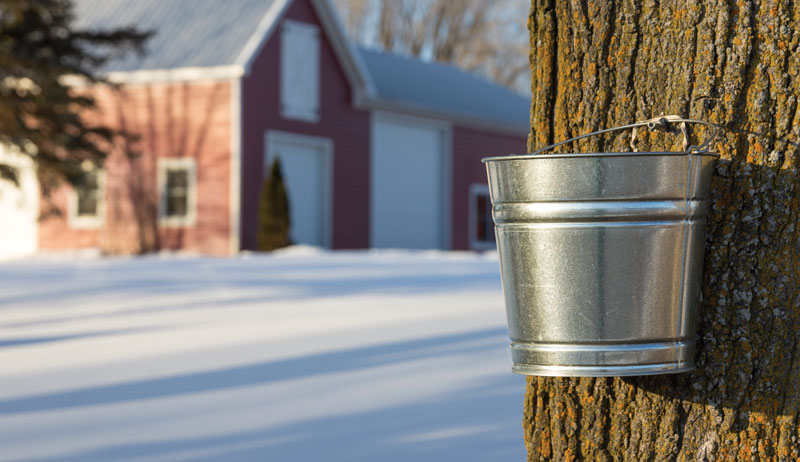
A Sap Gathering
How you collect sap depends upon your sugar bush. My trees are in a flat patch of woods close to my house, so I use simple 2-inch homemade spiles, cut from bamboo canes and wrapped with electrical tape, and milk jugs.
I cut a small “X” on one side of the jug and hook it over the tap. I run a string through the handle and tie it around the tree to secure it in place.
Visser has hundreds of trees over rocky, hilly land, so such a system doesn’t work for her. She uses 5⁄16-inch tubing that leads into a 5-gallon food-safe bucket that sits on the ground.
Forty gallons yields 1 gallon of syrup, so a 5-gallon bucket should give you around two cups of syrup. Generally speaking, two to four maple trees through the season will yield up to 4 quarts of syrup. Five good trees should yield a gallon.
In my sugar bush, I have days where very little sap is flowing. So I collect it in a 5-gallon beverage jug or lidded bucket until I have enough to boil down.
Visser says as long as you keep the sap cold—setting the bucket in the snow will suffice—it will keep for a week or so, and then you can boil it all at once. If your sap has grown cloudy, throw it away. This is a sign that bacteria has gotten into the sap.
Making the Syrup
How you boil the sap also depends upon how much you’re collecting.
Visser renders a great deal of sap over the season, so she uses a 16-gallon pot set over a propane-powered stove outside her house, finishing the syrup inside. Because I only boil a few gallons of sap at a time, I do our entire process in my kitchen using a three-pan method.
First I fill a 5-gallon canning kettle to the brim. When the sap evaporates halfway I pour it into a large stockpot. When the sap turns amber and starts to thicken, I move it into a saucepan and finish the syrup there.
(Tip: Make sure to line your burners with foil as boiled-over syrup or burnt-on steam is difficult to clean.)
Turning sap to syrup can take 12 hours to two days (depending on the amount of sap you’re boiling and your setup), so Visser says it’s fine to let the sap simmer down on its own.
But she warns to stay close as the sap begins to turn into syrup. “You’re ready to take the pan off the heat when the syrup gets to 219 degrees.”
Too many minerals in the sap, called niter or sugar sand, can cause sediment and a gritty-textured syrup. “The amount of niter depends on the year and the tree,” says Visser. “Some years will be particularly bad for niter, but no one really knows why.”
All is not lost, however. The niter will settle on the bottom and you can syphon the syrup out. Visser uses niter in her baking in a one-sugar-to-one-niter ratio with no difference in taste.
To cut down on niter, filter your sap halfway through cooking (or when the sap starts to turn amber) and then again when your syrup is finished using food-approved filters. These can be purchased through a maple syrup equipment vendor. (See “Sap Sources,” below.)
Visser says keeping syrup hot as you’re filtering is a challenge because cooling syrup will clog up a filter. Keeping the syrup warm inside an insulated coffee urn will keep it at the proper temperature for filtering.
The spot is helpful for accurate pouring, as well.
Storing Your Syrup
Maple syrup keeps well. You can store it in the fridge and use it throughout the year. If any mold develops, skim it off and bring the syrup up to 190 degrees. Then pour it into a fresh bottle.
You can also bottle your syrup to make it shelf stable. Here’s how:
- Syrup should be between 190 to 200 degrees for successful bottling.
- Prepare your lids by soaking them in a pan of boiling water for 10 minutes.
- Fill sanitized jars all the way to the top (no head space needed) with hot syrup.
- Carefully remove the lids and place them on top of the jars. Secure with rings if using canning jars.
- Lay the bottles on their sides and jars upside down in order to further sanitize the lids.
Sugaring is possibly the easiest gardening you’ll ever do. There’s no weeding, no planting if you already have trees, and the season only lasts a few weeks.
A few inexpensive supplies are all you need to get started with sugaring. But most of all, there’s something so wonderful about looking at a maple tree from your kitchen window in the deepest winter, and knowing that soon you’ll have your first taste of spring.
Sidebar: Sap Sources
• Sweet Maple: Backyard Sugarmaking from Tap to Table by Michelle Visser (Lyons Press, 2019). Visit Visser at www.soulyrested.com.
• For further info on home sugaring, read PennState Exention’s “Maple Syrup Production for the Beginner.”
• For home sugaring equipment, visit www.tapmytrees.com and www.smokylakemaple.com.
This article originally appeared in the January/February 2020 issue of Hobby Farms magazine.