By John Ivanko and Lisa Kivirist
In this article … |
With many creative ways to build practical buildings with straw bale, no two structures are the same.
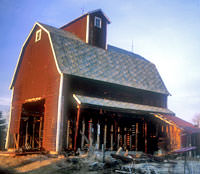
Of the two barns on our hobby farm, the granary had been a distant cousin to our dairy barn. Every winter, siding or roof shingles would fly off like Frisbees during windy days.
Still, we’re drawn to old barn buildings, eager to preserve them.
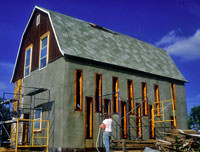
We gave our granary new life by transforming it into a two-story, super energy-efficient greenhouse–insulated with straw bales.
We’re cultivating Wisconsin-grown tropical plants on the second floor while using the lower level for shade-tolerant, cool temperature plants.
The Authors Start Their Greenhouse
Retrofitting the existing granary, we re-used the roof system, timber framed walls and existing concrete foundation. Since the building faced south, we added doors and glazing to the east, west and south (often using reclaimed materials), and skylights along the steep, south-facing roof.
Creating a 1,200-square-foot structure requiring a nominal heating cost was made possible by leveraging the insulating properties of straw bales.
Interest in and construction with straw bales has skyrocketed recently, but straw-bale construction has been around since the early 1900s, when compressed straw-bale technology first emerged in the Great Plains. With many creative ways to build practical buildings using straw bale, no two structures are the same.
Based on local knowledge, materials, needs and budget, straw-bale buildings involve a community of helpers attracted to the materials, camaraderie and sense of accomplishment achieved after a day of stacking bales or plastering. It’s a modern-day revival of the barn raising.
As described in more detail in Rural Renaissance (written by John and Lisa), we heat our granary greenhouse using both an active solar thermal system consisting of ten 4-foot by 10-foot collectors and a modified oil furnace that burns homemade biodiesel, processed with locally sourced, waste fryer oil.
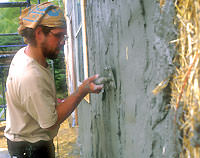
 Interior of the strawbale greenhouse with shade tolerant plants (and a papaya).  Adding scratches to scratch coat for Inn Serendipity greenhouse. |


In traditional greenhouses, as much as 45 percent of the annual operation costs are associated with heating; successfully growing with little or no heating cost means more profit per vegetable or fruit crop sold, or, in our case, served up in breakfasts for our Inn Serendipity Bed & Breakfast guests.
Building with straw bales means that with a little help, even the most inexperienced homeowner can build a house or other functional structure out of straw bales while rekindling a connection to the environment and gaining the satisfaction of building something yourself.
Additionally, the organic nature of this medium offers both aesthetics and energy efficiency, with R-values ranging from R-35 to R-50. Straw-bale walls are remarkably strong, provide better fire resistance, help alleviate sick building syndrome usually associated with offices and use a renewable resource that’s often an agricultural waste product.
Types of Straw Bale Construction
The two main types of straw-bale construction are post-and-beam infill and load bearing.
With post-and-beam infill construction, like the one we used on the granary, straw bales are inserted between supporting studs and other framing that supports the roof.
Load-bearing construction, more often challenged by zoning and commercial codes, means that the roof and windows are supported by the straw-bale walls.
Six Main Steps in Straw Bale Construction
There are six main steps in straw-bale construction:
- Pouring the foundation, framing and adding the roof.
Although probably the most skill-intensive parts of the entire process, these aspects need not be particularly complex. For load-bearing construction, only the foundation needs to be done at this stage. Depending on the type of plaster selected, roof overhang is often important to protect and shield the plaster from the weather. - Stacking bales.
With an enthusiastic crowd of helpers, it’s amazing how fast a wall or building can go up. Bales are stacked in various methods or sandwiched between timber framing, sometimes requiring pins made from metal rebar to prevent bales from shifting.Additional detail work needs to be completed prior to the stacking of bales in places where moisture might possibly enter the wall; for example, where the straw bales meet the foundation, rigid foam and a layer of tar is applied before setting the bales. [For our building, we used about 400 straw bales with wheat-based straw, harvested about four miles from our farm.]
- Adding lath.
Lath, which in straw-bale construction often means chicken-wire netting, is added to interior and exterior walls to allow plaster to adhere more readily. - Stitching.
Stitching involves using polytwine to stitch up the walls, thus compressing the loose straw and connecting the lath (and other elements) together. - Plastering.
Often the most messy, fulfilling and fun, plaster is usually applied in three layers of varying thickness to cover the bales and create a smooth–but often undulating–wall surface.The first thick coat is called the “scratch coat.” This coat is usually scored, or scratched, to allow the second coat (the “brown” coat) to adhere.
The brown coat smoothes out the surface and fills in any major depressions.
The final “finish coat” goes on very thin, can be colored and is often followed by a sponging technique to create texture.
Specific recipes for each tend to depend on the purpose, structure and climate. Plaster can either be earthen based (mud, sand and lime) or Portland-cement based (sand and lime) and usually applied by hand with a hawk and trowel by lots of helpers. Because our greenhouse used the existing roof system lacking much of an overhang, we opted for a more costly and more durable cement-lime plaster on the outside and less expensive earthen plaster on the inside.
To help bounce the sunlight inside the greenhouse, we painted the plaster white.
- Finishing the carpentry work.
Adding windows, doors and vents and, in the case of load-bearing construction, the roof, make up this final stage.
Most straw-bale buildings feature a “truth window,” usually a transparent viewing window where no stucco has been applied to a section of the wall. Besides the truth window, various design elements can also be incorporated into the walls: light tubes made from wine bottles, tile mosaics, intricate wall sculptures and recessed cubbyholes.
Since there’s little food value in the straw, there’s a greater likelihood of getting mice in your farmhouse kitchen than a straw-bale building; plus, the rodents would need to gnaw through as much as two inches of plaster just to get to the bales.
Many people remain convinced of fire hazards associated with straw-bale construction despite the fact that as much as two inches of fireproof mud, sand and cement completely surround the bales, making it practically impossible to ignite them. Straw-bale buildings are healthier and safer than most conventionally constructed buildings.
In terms of cost, straw-bale buildings end up about the same per square foot as conventional buildings. Savings, however, come in reduced energy needs when operating the structure.
Our greenhouse, filled with papaya, and a banana and lime bush, costs about $600 a year to heat, the cost of which mostly results from our processing of biodiesel. Electricity for lighting and the furnace blowers is produced on site with a 10 kW Bergey wind turbine and solar electric system. Plus, it’s not a bad place to pass the Wisconsin winters.
About the Authors
Lisa Kivirist and John Ivanko are co-authors of ECOpreneuring, Rural Renaissance and Edible Earth. Drawing inspiration from their hobby farm, each book captures a slice of their journey to live and operate their Inn Serendipity business more sustainably.
Straw-bale Building Resources International Strawbale Registry The Last Straw |