
Lacto-fermentation is a nutritious and low-energy way to preserve the harvest. Fermentation adds probiotics and taste to vegetables while preserving the vitamin content, making it far healthier than canning or freezing. In this article, I’ll share my recommendations for getting the tastiest and most reliable ferments.
Salt Choices
For best results, use a finely ground unrefined salt without additives. Himalayan salt, Celtic Sea Salt and Redmond Real Salt are good choices. If you can’t find any of these salts, choose an ordinary sea salt or rock salt. Make sure that “salt” is the only ingredient, though, and there aren’t any anticaking agents, iodine or other additives.
Most fermenting recipes call for unrefined salt, which has a higher amount of trace minerals and less sodium. If you are using a refined salt such as generic sea salt or rock salt, reduce the amount of salt to 3⁄4 teaspoon for every teaspoon of salt in the recipe.
Salt Amount
Most self-brining ferments such as sauerkraut call for between 2 and 3 percent of the vegetable weight in unrefined salt. While 2 percent is good if you prefer less salt and are going to use your ferment quickly or store it in the fridge, 3 percent can be a better choice if you’re fermenting in hot weather. It’s also better if you’ll be storing your ferment for many months in a root cellar or unheated room.
To get the correct weight, weigh the cabbage once the cores and outer leaves are removed.
For every pound of vegetables, use 1 tablespoon of salt for 2 percent or 1 1/2 tablespoons for 3 percent. For vegetables in a brine, such as pickles, around 3 percent salt is usually best, although peppers do best at 3 1/2 to 5 percent. To make a 3 percent fermenting brine, use 3 tablespoons salt for every quart of water.

Kate Downham
Choose the Correct Container
The ideal container for fermentation is something that allows gases to escape but doesn’t allow oxygen in. This can range from Fido jars to airlock fermenting lids on canning jars, through to European-style fermenting crocks with water-sealing lids. If all you have are regular canning jars, you can still ferment in them by “burping” the jar once a day during the active bubbly stage of fermentation by carefully lifting the lid slightly to allow excess gas to escape while minimizing the amount of air being allowed in.
For best results, no matter which container you are using, make sure you put enough vegetables in it so that it’s filled almost to the top but not too close. Excess air in the jar can cause the same problems as having a jar open to the air. I fill my jars up to where the jar starts to taper inward toward the lid.
Once the bubbling phase of the ferment is over within a couple of weeks, you can pack your ferments into smaller jars or change the airlock lids into regular lids.
Keep Things Clean
Follow rules of food hygiene when fermenting, such as having clean surfaces and clean hands. Before fermenting, make sure your jars are very clean, and if they’ve previously been used for kombucha or other yeasty ferments (or if you just want to be extra careful), heat sterilize them with very hot water, a dishwasher or in an oven at 230 degrees F until all surfaces are very hot.
Once you’ve opened your jar, always use a clean spoon for serving it, and don’t leave it open for any longer than you must. If you don’t go through your ferments very quickly, you can decant them from your larger fermenting jar into smaller jars that you will go through within a month.
Fermentation Stages
Within one day to one week of making your ferment, the bubbly active phase will begin. Some ferments are more active than others. For very active ferments, you’ll see bubbles coming up the jar, and through the airlock if you’re using one. This stage is best done at between 60 and 80 degrees F. Higher temperatures will mean much faster fermentation, and temperatures lower than 50 degrees F may struggle.
The bubbling will die down after a few days, but the fermentation is not over then. If you continue to ferment your vegetables in cool room temperature or cellar conditions of 46 to 60 degrees F, they’ll continue to develop more probiotics and flavor, with the highest amount of probiotics found at around six weeks.
Kate Downham
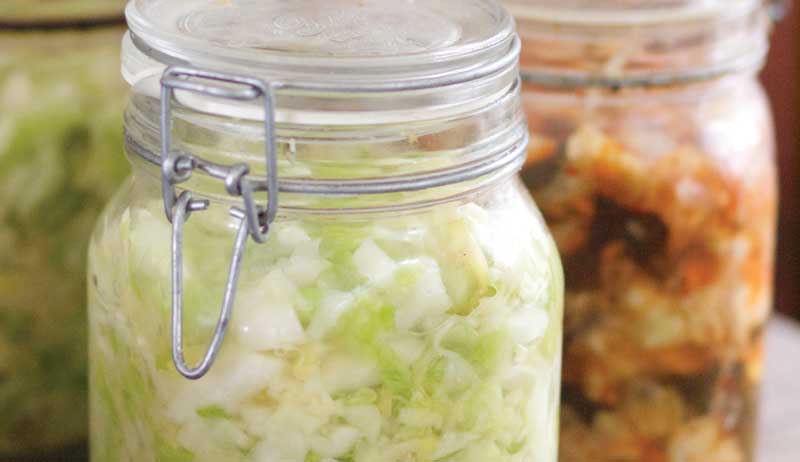
Sauerkraut Suggestions
For basic sauerkraut recipes (and variations), use the following guidelines.
For every quart jar:
- 2 pounds cabbage (weighed after cores and outer leaves removed)
- 2 to 3 tablespoons finely ground unrefined salt without additives
- optional tablespoon whey or sauerkraut juice
Finely shred the cabbage with a knife, mix it in a large bowl with the salt and optional whey, mix well with your hands to allow the salt to cover all the cabbage pieces. Leave it to sit for at least 15 minutes to allow the salt to draw out moisture, then use your hands to squash up the cabbage, squeezing it to form more brine.
Taste, and add extra salt if it needs it. It should taste well-seasoned or slightly too salty (the sourness from fermenting will balance that out later). If there’s no saltiness to it, add more.
Pack into a fermenting jar, pressing down with each layer to help the brine rise to the top.
Place the jar on a towel or a tray to catch drips and keep at warm room temperature for a few days. Within one to three days in warm weather, the kraut should expand and bubble, and after a week or two, it’ll settle down. Once it’s settled down, move to larder or root cellar conditions, and keep for up to a year.
Variations
- Salad-in-a-jar Kraut: Add a medium grated carrot, a few green onions and an optional handful of dried seaweed.
- Caraway Kraut: Mix through a tablespoon of caraway seeds.
- Apple & Caraway Kraut: This is great made with red cabbage. Mix through a finely sliced small apple and a tablespoon of caraway seeds.
- Fermented Turnip or Daikon: Replace all or some of the cabbage with grated or very finely sliced turnip or daikon radish. This ferment is excellent with some ginger or caraway seeds added.
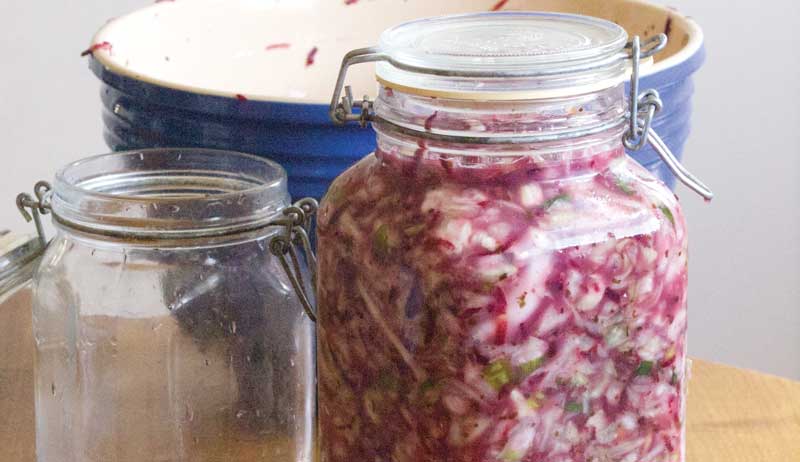
Whole Fermented Vegetables in Brine
This is my favorite way to preserve small tomatoes and can be used for any single vegetable or a combination of vegetables. Cucumber pickles can be a bit tricky to get right, so follow my instructions for the best fermented pickles.
Ingredients:
- vegetables of your choice
- filtered water
- optional whey or sauerkraut juice
- unrefined salt without additives
- herbs or spices of your choice (around 1 tablespoon of spices of a handful of herbs for every quart jar)
For fermented whole cucumbers: Trim the blossom end (or both ends) off the cucumbers. (The blossom end contains enzymes that make the cucumbers go mushy.) Add your choice of tannin-containing plants to each quart jar—either half a teaspoon of black tea leaves, 2 or 3 bay leaves, or a leaf from an oak tree or horseradish. The tannins in this will help keep the cucumbers crispy.
If your cucumbers are large, pierce the skins with a fork a few times to help the brine get into them. Pack into fermenting jars, filling only up to the shoulders, then follow the directions below for the brine.
Add a tablespoon of mustard seeds to each jar, along with extra flavorings if you like, such as a handful of fresh dill flowers or leaves, a teaspoon of red pepper flakes and/or a clove of garlic.
For all other vegetables: Leave whole or cut into pieces. Add your choice of spices and herbs, and tannin-containing leaves (see cucumber instructions) if you wish, and pack it all into jars or a fermenting crock. Fill only to the ‘shoulders’ of the jar.
For the brine: Mix 1 quart water with 3 to 5 tablespoons of unrefined salt and an optional 2 tablespoons of whey or sauerkraut juice.
For short-term fermenting, 3 tablespoons of salt to each quart of water is fine. For fermenting in hot weather or for serious food preservation, 4 or 5 tablespoons can be a good idea.
Pour the brine over the vegetables, leaving at least 1 inch of headspace. If the veggies are floating above the level of the brine, use a fermenting weight, or press them down with a cabbage leaf and weigh it all down with a heat-sterilized rock. Make sure that the cabbage leaf is completely below the brine, too. If vegetables float above the brine level, then they may get mold or yeasts that will prevent them from preserving well.
Place the jars on a towel or a tray to catch drips and keep at warm room temperature for a few days. Depending on your choice of vegetables, you may notice bubbling, or it may not be very active. After a week, or once the bubbling has settled down, move to larder or root cellar conditions, or refrigerate. Vegetables to ferment in brine include: turnips, carrots, whole cabbages, radishes, beetroot, cauliflower, broccoli, cucumber, zucchini, green beans, sweet corn, tomatoes, peppers, onion and fresh herbs.
Other additions include fresh herbs (alone or in combination)—such as dill (flowers or leaves), parsley, oregano, thyme or cilantro—and spices (alone or in combination) such as mustard seeds, caraway seeds, fennel seeds, coriander seeds, cumin seeds and red pepper flakes.
Home-fermented foods are packed with probiotics that help to balance the gut microbiome, boost immunity and improve digestion. Regular consumption of fermented foods has also been linked to reduced inflammation and a lower risk of chronic diseases.
So what’s keeping you? Start fermenting your harvest today!
Kate Downham
More Information
Fresh Is Best
The fresher the vegetables are that you begin with, the better they’ll taste and contain more natural moisture to make their own brine. Ferments can be made with stored vegetables, too, but I find the reliability and taste of using fresh vegetables make it worthwhile to start fermenting shortly after harvest.
Wild Fermentation vs. Starter Cultures
Wild fermentation is using the natural bacteria on the vegetables to create their own probiotic cultures. This can often have excellent results, especially when using very fresh vegetables.
When using older vegetables, or if you’ve previously had trouble with wild fermentation, it can be helpful to use a starter, such as a couple of tablespoons of whey or brine from a successful batch of sauerkraut.
To make whey, strain some natural yogurt though cheesecloth, pour off any milky stuff that collects on the top, and the clear yellow liquid underneath can be used to add helpful bacteria to kick start your fermentations.
Brine Levels
Self-brining vegetables, when pressed in the jar, should ideally be covered with brine. If enough brine doesn’t form on its own for self-brining vegetables, make a little brine of your own by combining 1/4 teaspoon salt with 1/2 cup of water and a splash of optional whey.
This article originally appeared in the Sept./Oct. 2023 issue of Hobby Farms magazine.


