In our previous article we talked about how a good garden season can be seen as a series of great tricks that be strung together for a successful season in the growing beds. And one of the most important seasons for a grower is the very first one.
Year one—whether you are a gardener, homesteader or start-up market garden—is a make-or-break year. In a typical scenario, new growers will often be overwhelmed by weeds. They may also fail to properly prepare garden soil and neglect a solid irrigation system.
Recently I built a garden for a friend who needed a fresh start. This individual noted they were too busy to keep up with weeds and didn’t have enough time to dedicate to a proper garden setup.
So, we applied several of my favorite grower tricks to make a foolproof first-year garden. In this article and the two that will follow, we’ll look at these pro grower tricks—what they are and why I like to use them.
Read more: You can develop and link growing “tricks” for greater success in the garden.
Proper Plot Layout Is Key
We measured the space available and settled on building six 25-foot beds with 12-inch paths and 36-inch bed tops (48-inch beds). We also allocated space for a 48-inch perimeter to the entire garden. This allows for easy access and prevents encroachment of weeds from the periphery.
A proper layout is key to any good garden. You need to fit your garden into spaces you have available. Looking to your fence lines, edges of woodlot, garage sides and even old fence lines as guiding lines to square off your new plot.
I call all of these lines “common lines.” They exist on all properties. So we can trust them to serve as starting points for new garden space layout.
It is also important to settle on a good number of garden beds that fit sensibly in the space and also work well for overall garden practices. In this case six beds were chosen because the space would fit five to seven beds, and I design garden guilds using three-bed units called triads.
We flagged the area needed to fit six 48-inch by 25-foot Permabeds.
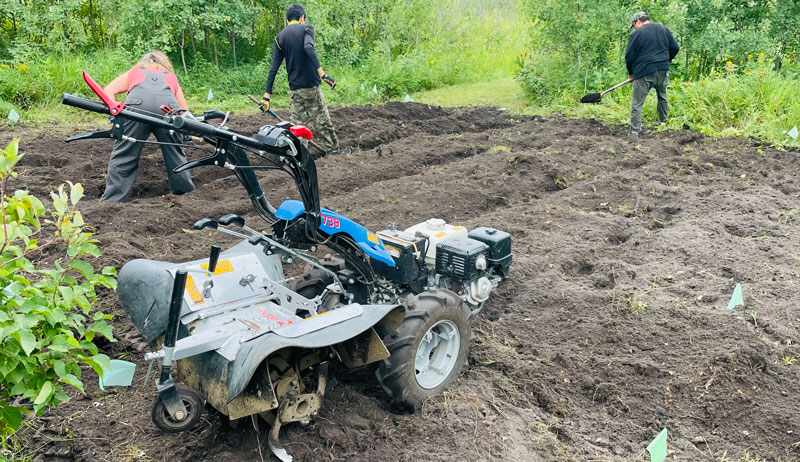
Next up: Primary Tillage
Next this area was micro-plowed using a BCS 770 walking tractor with a rotary plow. We needed to completely loosen the garden soil at the beginning to ensure we could easily form raised garden beds. This was, the grass and weeds currently present will start to die. In this way, further defines the growing space.
I always plow a little wider and longer than I need to. This way, I can have more flexibility in squaring up my plot afterwards.
Read more: Permabeds, cover crops and tarps keep the garden ready.
Carefully Choose Permabed Layout
Next came the time to build our six Permabeds. Because the soil was sandy and had good organic matter, I saw we could move ahead and form the raised beds without any secondary tillage.
We re-flagged the edges of the garden plot, then, moving from right to left along the south side, we stuck a flag in the ground every 4 feet. This marked the center of all the paths.
We then proceed to mark the four-foot markers on the northern side of the garden. Then we worked as a team of three, with two people holding the tape measure at each flag and the third person running the back of a shovel along the soil to mark a line in the soil.
We did this for all of the paths between all of the future beds.


