
In my last article, I started a three-part series on establishing a first-year garden bed from scratch. We talked about choosing location and planning out plots. We also covered primary tillage and determining Permabed layout.
Now we’ll look at the next steps my friend and I took while preparing her first-year garden.
Building Paths
Garden paths are important for obvious reasons. They allow the gardener easy navigation through the growth. Paths also protect crops from getting trampled during weeding, watering and casual strolls through the garden.
I used the Ridger attachment for the BCS walk-behind tractor to furrow out paths, lining up the wheels to straddle the fresh line marking each. Driving with the tractor centered on the line centered left a nice furrow.
Because the soil was very sandy, we still needed to go in and hand-shovel the extra soil out of the paths. Each path’s material was shoveled onto the adjacent left-hand bed, resulting in an 8-inch high Permabed with a 12-inch wide path.

Zach Loeks
Rake the Bed Top
Now it was time to rake the bed tops. Using a 36-inch wide rake, we worked up and down the raised beds, raking them smooth and allowing the soil to fall into the paths little by little to form a more gradual shoulder.
We raked the bed top until it was the width of the rake (36 inches) along the entire length of the bed.
Apply Compost
Next, we applied compost 1 inch thick across the tops of all the beds. Adding compost and fertility at this stage is critical to bring up the soil organic matter in the top inches of your bed. Compost also improves the fertility for those first-year crops.
Now our soil is loose, fertile and well organized!
Read more: You need these 7 tools for handling manure and compost.
Perimeter Weed Barrier
Because this garden was fit in a tight spot and not easy to mow around, we opted for a 4-foot-wide run of weed barrier to go around the entire garden perimeter. We topped this with wood chips to make a clean, weed-free perimeter.
This allows good access to the garden. It also provides clean spaces to set tools and harvest bins, and to organize irrigation.
Everything gets lost in the weeds, which grow very quickly along the edges of gardens. So if you can’t mow on a regular basis, use this strategy!
Zach Loeks
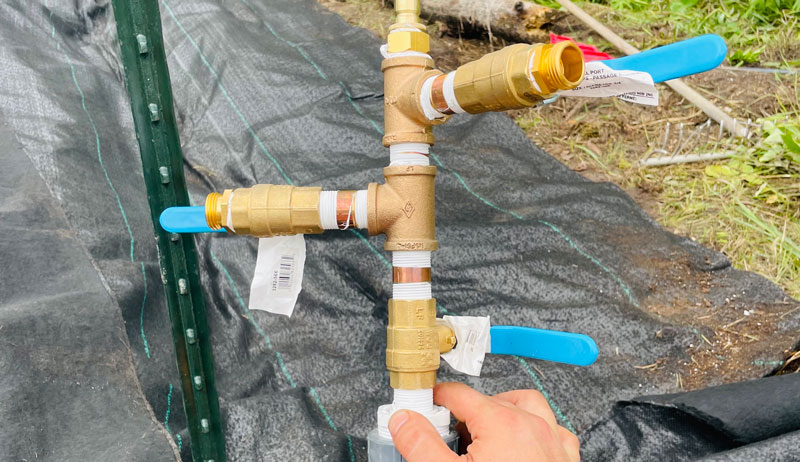
Multi-Connector
Irrigation is important for any garden, and it’s an important consideration in a first-year garden. Often, our growing spaces need multiple types of water available, too.
We built a simple multi-connector using brass 3/4-inch fitting, Ts, nipples, elbows and shut-offs. We adapted the system to accept an input from a normal garden hose, with three shut-offs adapted to male 3/4-inch garden hose ends.
This multi-connector was mounted on a T-bar at the corner of the new plot.
The three-connector shut-offs allowed for:
- a house hook-up for a small wash station
- a hose connection to water in the adjacent greenhouse
- a direct line into an irrigation system
Read more: Check out this DIY rain collection and irrigation system!
Irrigation System
The irrigation system consists of the following:
- a pressure gauge to monitor incoming water pressure
- a filter to keep water lines clean and drip lines clog-free
- a pressure regulator to make sure the drip system receives correct pressure
We assembled this unit in the shop, then brought it to the garden site where we mounted it to the T-bar and connected a 1.5-inch oval hose.
The oval hose is a standard irrigation “header.” This will allow the grower to transport water a far as they need along the head of the plot. It punctures easily for the installation of small connectors and shut offs for each bed’s drip tape.
We ran this header a length of 25 feet in our 6 by 48-inch beds—that’s 24 feet with 6 inches at each end for wiggle room. We ended it with a 1.5-inch plug to stop the water. And we used large hose clamps to tighten all fitting against drips.
Next, we used a normal irrigation hole punch. We punched holes in the oval hose at exactly 6 inches from the center line of each Permabed for shut-off valves. These valves have a small 1/4-inch barb at one end, which we just pushed right into our holes.
Running Drip Tape
We ran two 25-foot runs of drip tape per bed and tied their ends off with a double knot. Then we connected these drip tape runs to the shut-off valve’s 5/8-inch barb:
- First, we ran a little water through the header hose to open the valves.
- Then we screwed back the swivel nut and pressed the drip tape against the end.
- Water filled the drip tape, expanding it and providing good leverage to press the drip tape over the 5/8-inch barb.
- Finally, we screwed the swivel nut tight over the drip tape.
And voilà—efficient water management!
In our next and final article in this series, we’ll look at the final steps in our first-year garden beds!


