Categories
Equipment Farm & Garden Homesteading

An Earth Day Guide To Renewable Energy & The Farm

April 22 is Earth Day, the perfect day to ponder adding renewable energy sources to your farm.

Maybe you want to source all your electricity needs from solar panels. Maybe you live in a windy region and want to use wind turbines to generate electricity, or a windmill to pump water. Maybe you’re looking to reduce heating and cooling costs with a geothermal system for your home.

In any instance, Hobby Farms has you covered with this Earth Day roundup of renewal energy insights:

Living Off the Grid: Create Renewable, Farmable Energy 

For an in-depth look at solar and wind energy, culminating with a mini-case example illustrating power production and cost, check out this detailed piece. An important takeaway? You can still be on the grid even while powering your farm with renewable energy sources.

Solar Power Basics, From Financing to Installation (& More)

If capturing the power of the sun has captured your attention and you want to learn more about financing and installing the necessary equipment, this article has you covered.

Bringing Solar Power to Your Farm

Here’s another look at solar energy options, with details on the pros and cons of going off-grid versus staying tied to the grid.

Solar Power & Sustainable Farming Power This Couple

If you want to be inspired by the possibilities of solar power, read the story of this Kentucky couple and their sustainable farm.

DIY Solar Panels Put the Power in Your Hands

Have you ever considered building your own solar panels? If you’re unafraid of complex DIY projects, this article is a good starting point in explaining the process and requirements.

Harvesting the Sun: A Guide to Leasing Land to Solar Developers

In some cases, leasing your land for the construction of solar arrays can be a sensible endeavor. We’ve got all the details here.

Go Off-Grid With a Solar-Powered Chicken Coop

To power lights and ventilation in your chicken coop, why not set up a small solar system?

Solar Fence Chargers: Pros and Cons

Electric fences can be powered by solar fence chargers. But of course there are pros and cons to going off-grid with your fencing. We break it all down here.

Use a Solar-Powered Portable Electric Fence to Pasture Your Pigs

This story about keeping pigs inside a solar-powered electric fence provides a real-world example of the benefits offered by solar fence chargers.

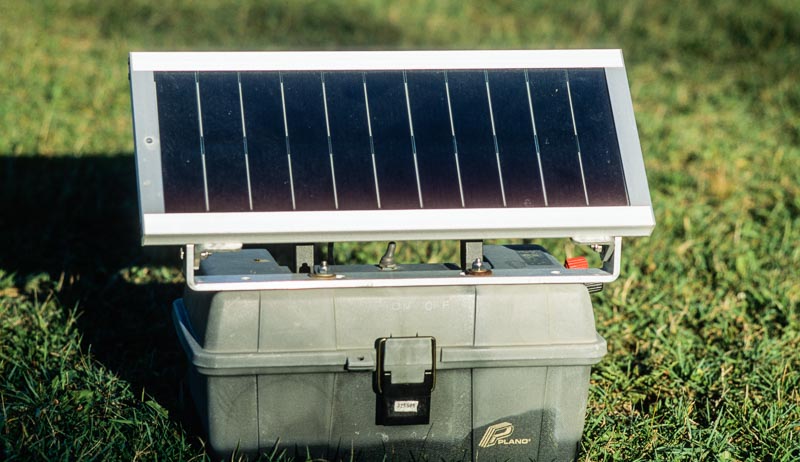
4 Reasons You Need a Portable Power Station

A portable power station uses a battery to charge USB devices, power AC outlets and more. The best part is, a portable power station can be charged with solar panels, making it an off-the-grid power option.

Bringing Back the Windmill

Windmills provide an electricity-free means of pumping water from underground. They’re also part of the classic farmland aesthetic. To learn about the benefits of windmills, check out this in-depth guide.

Wind Energy Pros and Cons

Windmills are great for pumping water, but what if you want to generate electricity with wind turbines? Like most things in life, there are pros and cons to wind energy. This story breaks down the advantages and disadvantages.

Geothermal Systems for Your Home

By capitalizing on the consistent temperatures found underground, geothermal heating and cooling systems can heat and cool your home at a lower cost than more traditional methods. Plus, they reduce carbon dioxide emissions and don’t require sunny or windy weather, as this article outlines.

Make Plans for Earth Day

You can celebrate Earth Day year round by adopting Earth-friendly practices around your farm, around your house, and in your life and community. This story gets you started with lengthy lists of ideas. Enjoy!

Categories
Crops & Gardening Equipment Farm & Garden Homesteading Permaculture

Use A Cold Frame To Jump-Start Your Growing Season

Are you looking to harvest more out of your same garden space? Want to get growing and keep growing longer on each of the shoulder seasons? Adding a cold frame can be part of the solution. Using passive solar energy to warm soil sooner helps northern gardeners get a jump on the season—naturally! 

After considering existing microclimates in your yard (like noticing those spaces that melt first, where bulbs or perennials pop up first) my next go to are cold frames or low tunnels 


Read more: Extend seasons and boost productivity with hot and cold frames!


Cold Frame & Low Tunnel

Both of these structures provide heat-trapping benefits that warm both the soil and air temperatures to get you planting cool weather crops weeks earlier. Low tunnels are easy to construct and move around, following your crop rotation. Cold frames are stationary and built out of heavier, more insulating materials, which typically equates to warmer temps inside those structures.  

Cold frames are basically a bottomless box, with an angle on top, facing south, to capture solar energy. I suggest going no more than 3 feet front to back because you’ll need to be able to easily prop up the window or plexiglass piece.  

The exact materials you use to craft a cold frame with are up to you. Most likely you can use what you’ve got! We’ve built ours out of both wood and windows, and wood and plexiglass.

Using concrete blocks and even straw bales works, too.

You’ll want the top of your cold frame 18 inches to 3 feet off the ground so you can angle the ‘window’ section to capture the most sun. The exact angle isn’t crucial. Try for between 25 to 55 degrees, and make sure it faces due south for the most intense warming benefits.  

cold frame
Michelle Bruhn

How Warm? 

My cold frame warms up sooner than my low tunnels. These structures tend to warm up soil temps between 10 to 20 degrees F more than uncovered soil. Air temperatures will always fluctuate more than soil temps, but hitting the timing right you’ll have seeds that can germinate in 40 degree F soil and grow happily in 50 degree F air temps.  

For me, the trickiest part of growing early-season crops in a cold frame is not letting them overheat! Once the sun becomes more powerful, you’ll have to prop open the window to keep air temps comfortable for the cool-weather crops.  

My favorite crops for starting out the season in the cold frame include those that start germinating around 40 to 45 degrees F, such as: 

  • Arugula
  • Spinach
  • Lettuce
  • Kale
  • Beets
  • Radishes
  • All the spring salad greens  

(Note: If you start playing with season extension, consider getting a dedicated soil thermometer.)

My favorite way to get a jump start on growing the earliest spring veggies is using my cold frame.  But I not only plant directly into my cold frame, I also place my winter sowing jugs inside my cold frame to double on the layers of ‘cover.’ Season extension pioneer Eliot Coleman introduced this idea, estimating that the double layers moves your garden beds about 1,000 miles south.  

And up north, that 1,000 miles makes weeks of difference in our first harvest!

Categories
Animals Farm & Garden Large Animals

Sheep Facts: More To Ovis Aries Than Meets The Eye 

I’ve had sheep now for four years, and I am constantly learning new things from either reading about sheep or just watching my own livestock. 

Lambing, of course, is fascinating … even when it doesn’t always go according to how you’ve planned it. But there are a lot of other interesting things I have learned that you may be interested in. You can learn a lot about sheep from just observing your own flock and watching the individual interactions in your pasture.  

Still, here are some interesting facts about the sheep on your farm: 

Look Ewe in the Eyes

I’ve often noticed that sheep have rectangular pupils. According to a blog from Hadlow College in Kent, UK, a sheep’s rectangular pupil allows them to have a 270 to 320 degree field of vision. If you think about it, this makes perfect sense. 

Sheep are pretty, and they always need to be watching for predators. They can see all the way around except directly behind them–which is useful for us if you need to get up close to a sheep. 

Wild & Wooly

I also learned that wool sheep never stop growing wool. (This is why they must be sheared once or twice a year.)

I also learned that 1 pound of wool equals 10 miles of yarn. Depending on the breed, you can get between 2 and 30 pounds of wool a year. That’s a lot of knitting! 


Read more: Learn the fundamentals of fiber animals.


Back Trouble

If you see a sheep lying on its back … help it up or get someone to help you. The sheep is probably pregnant, overweight or possibly has too much wool to get back up on its own.

A sheep in this position is called a “cast sheep” Check out this video of a sheep being helped to get up when it was “cast.” 

Ancient Animals

Sheep were among the first of all animals to be domesticated somewhere between 11,000 and 9,000 B.C. in ancient Mesopotamia. They were originally used for milk and meat. Around 6,000 B.C., humans started developing the wool sheep to add to their usefulness.

Interestingly, ancient Egyptians thought sheep were sacred, some sheep were even mummified at their death.

Well-Traveled

When Columbus sailed the ocean blue for the second time, in 1493, he brought sheep to Cuba. And later, (in the early 1500s) Cortes introduced descendants of those sheep to Mexico and western America.

Historians believe that the uniquely American sheep breed, the Navajo Churro, comes from these lines. 

Underrated Intelligence

I know many people think sheep are not very smart … but I disagree. They probably are labeled that way because they are flock animals and do not act independently.

But sheep are far from stupid. And now a Cambridge University study shows that sheep have similar face recognition abilities to primates like monkeys, apes … and even humans, 

So there you have some fascinating facts about the complex and fascinating world of the Ovis aries (sheep). Next time you walk out to feed your flock, take a new look at this interesting animal in your own barnyard.

Categories
Crops & Gardening Farm & Garden Urban Farming

6 Ways To Grow More Food In A City Landscape 

There are many opportunities to grow food in the city. It is interesting to see that the opportunities actually abound. Here are some of the best ways to grow more plants for food in the city. 

Urban Food Forest

If you have a backyard, even just 15 by 15feet, and even if it is north facing, you can plant an urban food forest. Create raised concrete, stone or wooden planters around all your fence lines in your backyard. Leave an innermost courtyard space to enjoy the future food forest. 

Mix in great soil and compost and choose a high density of various fruit trees right for your growing zone.

  • Zones 7 through 8: nectarines, figs, cherries
  • Zones 4 through 5: mulberries, apricots, pears
  • Zones 2 through 3: plums, apples, saskatoons  

These will grow up around the courtyard and eventually shade it. In the meantime, plant other herbs and ground covers that like partial shade and even some that can eventually enjoy full shade. 

Always plant more than you will need so varieties that do best can be left. Varieties that are less well-suited (you’ll only learn this with time) can be cut out and removed. 

Movable Planters

You can also grow in moveable planters on the sidewalk in front of your row home, apartment, etc. These planters can be built out of thick wood with pallet style bottoms for moving with a fork. You can also use large horse troughs to move with a dolly-type set up. 

Alternatively, these can also be built right into the ground by removing a square of concrete (make you you apply for this if its city-owned) to create a permanent tree spot. Plant tree fruits, berries and herbs ideally on a sunny side of your house. 


Read more: Concerned about lead in city soil? This study looks at ways to get the lead out!


Remove Concrete

Remove a thin (3- to 6-inch) piece of concrete from along your stoop and plant climbing plants like hardy kiwi, grapes, peas, beans, red runner beans, or other vining edible or medicinal plants. 

You could do this using planter pots. You could also remove thin slices of concrete along the front of the building where there are no stairs and railing. Here, you can allow narrow strips of wildflowers or edible herbs to grow along the brick or stone façade of your apartment. 

Community Garden/Allotment Plot

Get a community garden plot or allotment in your neighborhood. The best suggestion here is to steer away from a more typical design that involves lots of bricks, stone, cinderblock or wooden walls around the entire plot to separate it from the neighbors. 

Instead, prioritize the space to a series of 48-foot wide, 8-foot tall and 15-foot long (or longer) Permabeds with chip mulch paths. A lot of space is wasted in abiotic materials (like stone or brick walls) in your community gardens, so prioritize square footage for plants. 

Rooftops & Balconies

Rooftops and balconies also provide great opportunities for growing food in the city. Here, large planters, pots and custom boxed beds can have special water proof liners and be filled with pot herbs like basil, rosemary, sage, thyme, parsley, etc. 

You can also grow cherry tomatoes, basil and other pasta/salsa garden plants! Make use of your spaces. 


Read more: Growing in the city is more than possible—it’s beautiful and sustaining.


Windowsills & Boxes

Windowsills and window boxes also provide great opportunities for city growing. Inside or outside the window is an area of light. Light equals photosynthesis, and that, put simply, is how food is made. So grow in your window environment! 

Those are some of my top picks for growing more in the city, but there are surely other creative ways to grow food in a city or urban environment. Get creative, and get growing! 

Grow On,

Zach 

Categories
Crops & Gardening Farm & Garden Food Recipes

Recipe: Fermented Taqueria-Inspired Carrots  

We enjoy fermented carrots as a delicious condiment to top of tacos or nachos. We also use scoop it generously over pulled pork and chicken, and stir it into scrambled eggs. The ways to use fermented carrots are endless. 

Yield: 1 pint jar 

Ingredients 

General
  • 1.5 cups carrots, sliced into 1/4-inch coins 
  • 1/2 yellow onion, sliced 
  • 3 jalapeños, sliced (or hotter pepper of choice) 
  • 3 garlic cloves, chopped 
Brine
  • 1 tbsp. coarse kosher salt, dissolved in 2 cups water 

Instructions 

Wash and scrub carrots, trim off the ends. No need to peel. The skin on the carrots will aid in the fermentation process.  

Prepare the remaining ingredients and add all to a clean pint-sized jar.  

Mix the brine and pour it over the produce, covering the carrot mixture by at least 1/2 inch. Leave at least 1 inch of headspace so that the ferment has room to bubble without overflowing.  

If you have a small fermentation jar weight, add it to the jar to hold down the produce under the brine. Remove any small pieces of food that float up to the top of the brine, as anything above the brine will increase the risk of mold and ultimately the ferment spoiling.

Wipe off the rim of the jar with a clean dampened towel. Add the canning jar lid and tightly screw on the ring. 


Read more: Here’s what you need to know to get started with lacto-fermentation.


Fermentation 

These fermented carrots are a seven-to-10-day ferment. Ferment at room temperature, ideally between 60 and 75 degrees F (15 to 23 degrees C) and keep out of direct sunlight. 

Check on the ferment daily to make sure the brine is covering all the produce. If any produce has floated above the brine level, use a clean utensil to push it back below the brine or scoop it out.  

Burp the jar daily. Unscrew the lid briefly and tighten it back on to allow any built-up gas to release (and avoid possible jar breakage or the ferment from overflowing). 

Once fermentation is complete, transfer the jar into the refrigerator, with the brine and all. 

Fermentation does not stop once the ferment is transferred to the refrigerator, however it does slow the process way down. The taste and texture will continue to change, therefore this ferment is best enjoyed within 12 months. 

Side Notes 

If you do not have a glass jar weight, you can improvise by using an easily removable small food-grade glass dish that fits inside the jar. Or, if you have a smaller glass canning jar that can fit into the mouth of the jar you are fermenting with, you can use that to keep the produce pushed under the brine. 

If you are unsure if your water is safe for fermentation, you can boil it and allow it to cool to room temperature before stirring in the salt to make your brine. 

You may substitute fine sea salt instead of coarse kosher salt if you prefer. The measurement will remain the same for this recipe. 

Consider adding additional herbs to change the flavor of the pickles. Pack them in the bottom of the jar, under the carrots, to assist in holding them down under the brine. 

Through fermentation, the brine will become cloudy and you may see white sediment appear at the bottom of the jar or on the carrots. This is a normal part of the fermentation process. 

Categories
Animals Chicken Coops & Housing Farm & Garden Poultry Poultry Equipment

Chicken General Store: Chic(k) Poultry Products

Door Mat

This colorful, coconut-fiber door mat (above) is naturally textured to remove mud and dirt, and features three chickens hand-painted using eco-friendly dye. entrywaysusa.com 

Wreath Hanger

This hand-crafted, 16-gauge steel chicken wreath hanger is approximately 17 inches from bend to top of the curve and available unfinished or in silver, black or white. etsy.com

Little Pecks Crumble

Little Pecks, an all-natural, nonmedicated crumble, can be fed as a complete diet to chicks from hatching to 20 weeks old. It includes essential vitamins and minerals for healthy growth and probiotics to aid digestion and sustainably harvested grubs, veggies and whole grains. grubblyfarms.com 

Little Farmer Fish & Shrimp Treats

The shrimp and minnow Little Farmer Fish and Shrimp Treats provide crude protein, essential for hen health and egg production. The added calcium helps with egg production and Omega-3s, which assist with heart and nervous system health. littlefarmer.farm 

Hand-Drawn Digital Portrait

A hand-drawn digital portrait of your feathered friend(s) is available as either a digital download or as a printed canvas. With loads of outfit options, your best hen could be the Mona Lisa, posed with her ladies in waiting, royalty, a superhero and so much more. etsy.com

Hen Pen Pop-Up Brooder

The completely enclosed Hen Pen Pop-Up Brooder keeps cats and other critters at bay while preventing chicks from escaping. The octagon design doesn’t allow chicks to become trapped in corners. Waterproof and foldable, this brooder can also be used as a hospital or quarantine for sick or injured birds. mypetchicken.com


Read more: Check out these brooder tips for baby chicks!


Knot Wool Cashmere Chicken Sweater

This Knot Wool cashmere chicken sweater is designed with a shoulder opening with buttons and a round neck and fits children up to 24 months old. maisonette.com  

This article originally appeared in the March/April 2023 issue of Chickens magazine.

Categories
Animals Chickens 101 Farm & Garden Poultry

Can You Identify This Mystery Chicken Breed?

Chickens and other poultry members come in all sizes, shapes, colors and personalities. Nearly 400 recognized breeds and varieties of poultry exist, including large-fowl and bantam chickens, ducks, geese, turkeys and guinea fowl. Using our illustration above and a few selected hints, can you guess which breed we have depicted here?

Find out the answer below!

Hints

  • This breed lays a beautiful blue egg. 
  • It’s a popular auto-sexing breed (in which the sex of newly-hatched chicks can be determined from the color and markings of the down).
  • Murray McMurray Hatchery describes this breed as such:  Hens sport a small crest and are silver gray with a salmon-colored breast. Roosters are cream with long saddle and hackle feathers, and dark gray barring on the breast and tail.”
  • You would get a “leg” up raising this small, rare breed of poultry. 

Read more: Get the egg color you want with these chicken breeds!


Mystery Breed Answer

The mystery breed depicted above is the Cream Legbar, a popular English breed created by crossing Barred Plymouth Rocks and Brown Leghorns with Araucanas. The Cream Legbar can easily be sexed at hatching because males appear much paler in color than females. It was bred this way.

The Cream Legbar is not recognized by the American Poultry Association. It has, however, been recognized by the Poultry Club of Great Britain. The Cream Legbar Club is working to gain the breed’s U.S. acceptance. Because of her Araucana genetics, a hen will lay blue and sometimes olive-hued eggs.

This proflic layer averages nearly 175 eggs each year and does go broody.

To purchase the Cream Legbar, please visit Murray McMurray Hatchery online. Murray McMurray Hatchery provides the highest quality poultry and auxiliary products to its customers, and has been a trusted, knowledgeable industry resource for more than 100 years. Whether you are an experienced or novice enthusiast, Murray McMurray is sure you will enjoy its wide selection of breeds and supplies to assist you with raising your flock!

This mystery chicken breed feature originally appeared in the March/April 2023 issue of Chickens magazine.

Categories
Animals Chickens 101 Farm & Garden Flock Talk Poultry

From Feeding To Sleeping, Chicks Have Unique Behavior

Our birds communicate by performing behaviors. These behaviors are strong indicators as to what they need and want and can change depending on age. Looking specifically at the behavior of newly hatched chicks, we can use our observations to better support their needs for health and proper growth. 

At a very basic level, chicks need a good quality feed, fresh water and the right temperatures (around 95 degrees F during the first couple of days). Healthy chicks follow their instincts and begin with pecking behaviors to help increase their chances of finding food and water. While they’re motivated to perform instinctual behaviors, they need time to develop these while also learning other specific behaviors which may or may not be observed in all chicks or flocks.

Learning to eat and drink (referred to as foraging behavior) is key to chicks’ survival and, just like humans, the sooner they locate food and water the better. There are many different behaviors to observe in newly hatched chicks to ensure they’re properly eating and drinking. 

During the first days of life, it’s normal for the chicks to peck at objects with their beaks closed. This behavior is thought to be exploratory where they’re learning what objects may or may not be nutritious. Chicks depend on each other to develop these learned behaviors, which is one of the reasons why chicks should be purchased in groups of four to six at a time.

Interestingly enough, chicks in isolation eat less. 

You may also notice that chicks will peck at each other’s beaks. This isn’t aggressive, but an encouraging behavior among the flock to find food and water. Lightly tapping our chicks’ beaks with a pencil or our finger can help to stimulate this searching behavior. 

When it comes to eating and drinking, we can encourage our chicks to search for water by dipping their beaks in their drinkers and assess if they are eating enough by their crop fill. The crop is a muscular pocket of the esophagus located at their throat and is enlarged and easy to feel when full. The goal is to have all chicks with a full crop by the first 24 hours of life. 

Another well-known behavior of new chicks is to gather under the heat source. To encourage feed intake, the heat source should be close to the feeder, so birds spend more time pecking at feed and not at each other. 

Another foraging behavior that has shown to be beneficial is litter pecking. Providing wood shavings or straw in the brooder for just 10 days after hatching can help reduce feather-pecking in adulthood.


Read more: Here are some seasonal tips for free-ranging chickens.


Sleep & Play

Do you sometimes check on your chicks and wonder if they are dead or sleeping? Don’t worry! Seeing your chicks sleeping on their tummies with their necks and feet stretched out is a very normal sleep position. Sleep is essential for all animals and especially important for younger animals. 

When a young animal sleeps is the primary time the growth hormone is released. Think of it this way: When they’re sleeping, they’re growing. Egg-laying chicks grow by about a third of their body weight each week for the first 6 weeks of life. Limited research on chicken sleep exists, but in a study published in the Journal of Poultry Science (“Feeding Condition and Strain Difference Influence Sleeping Behavior in Newborn Chicks,” 2003), researchers suggested breed differences exist: Broilers (meat birds) sleep more than egg-laying birds.

They also observed that fasted birds sleep more than fed birds, hypothesizing that these chicks are trying to conserve energy. 

Where and how chicks are sleeping and spending their time is also an indicator of their comfort level with the brooding temperature. A huddled flock of chicks is a sign they are cold, whereas the opposite happens when they’re too warm. If the chicks are avoiding the heat source, the temperatures are too hot, and they may even begin to pant.

A comfortable flock of chicks will be evenly distributed around the brooding area. 

Chicks also can exhibit some play behaviors such as sparring and frolicking. Sparring is the chick version of play fighting. Chicks may jump, kick or peck at each other without touching or causing injury. Sparring behaviors in young chicks don’t appear to be a predictor of aggression in adults. 

Frolicking is when a chick spontaneously starts to run then rapidly changes direction while flapping their wings. This behavior typically appears in young chicks and seems to trigger the behavior in other chicks, where one chick frolicking will cause another chick to start frolicking. The more space a chick has, the more they’ll likely perform these play behaviors.

chick chicks behavior behaviors
Tomsickova/Adobe Stock

Broody Business

Unless we hatch out our own chicks, our birds are raised without any chicken parental guidance. The study “Effect of broody hens on behaviour of chicks” (Applied Animal Behaviour Science, 2010) showed that chicks brooded with a hen for the first 25 days after hatching are more active, less fearful and even develop adult behaviors such as dust bathing and pecking at the floor sooner than chicks not brooded with a hen. 

Providing a broody hen also reduced the amount of gentle feather-
pecking between chicks. However, we don’t know if this effects feather-pecking later in life. 

Broody hens are better suited to be with a flock of chicks than one that isn’t broody. A hen is required to provide maternal support to these chicks. Placing a nonbroody hen in with the chicks, then, will likely do more damage than good. 

Another potential benefit of raising chicks with a broody hen is the transfer of microbes. Some evidence suggests that mother hens can transfer some microbes to the chick via the egg, but their environment influences the microbial abundance and diversity. Because most of our chicks aren’t raised with a broody hen, providing a chick with the right bacteria early on via a probiotic is another way to ensure good bacteria are colonizing the gut.

Having a flock of newly hatched chicks can be exciting and a little nerve wracking. Rest assured, keeping a close eye on their behavior can help you to better support their needs to raise comfortable, healthy, growing chicks. Don’t be afraid to help them by encouraging foraging behaviors to support eating and drinking, understanding their sleeping habits and adjust accordingly, and provide room for play behavior. 

Most importantly, whether the chicks are raised with a broody hen or not, keeping the chicks together in a flock is required and key to expressing the behaviors necessary for survival and happiness. 

This article originally appeared in the March/April 2023 issue of Chickens magazine.

Categories
Animals Chickens 101 Farm & Garden Health & Nutrition Poultry

Keep Chickens Without Getting Sick With These Tips

First-time flock owners sometimes feel completely lost, as though they’ve been tossed into an ocean without knowing how to swim. It’s a common sentiment, one shared even by those you’d expect to be experts when it comes to raising chickens.  

Mike reached out to me over Easter weekend. He felt it was the perfect time to talk chicks. Not only does he come from a long line of chicken keepers—his parents, grandparents and great-grandparents all kept breeding flicks—but Mike has a leg up on other poultry owners.

He’s a veterinarian with his own clinic in southern New Mexico.

During vet school, Mike had a required poultry unit, which involved learning about viral, bacterial and fungal infections common to poultry as well as conducting necropsies. From time to time, he uses that training outside of his clinic, inspecting poultry-processing facilities. All his studying about poultry illness and morbidity left a lingering effect on the good doctor.

When I asked him what questions I could answer for him regarding starting a microflock of chickens, Mike immediately replied, “How do I avoid getting sick?” 

Avian Influenza 

The hot topic right now for chicken owners is Highly Pathogenic Avian Influenza (HPAI), otherwise known as bird flu. Bird flu has infected flocks in the US and around the world for years, with the latest American outbreak occurring in 2014. The current outbreak, however, has far more drastically affected poultry due to its presence in thousands of migratory birds, which spread the disease via their droppings and through direct contact with other birds.

Agriculture officials, working with avian veterinary pathologists, have been euthanizing infected flocks to reduce the contagion. We’ve seen the results: sky-rocketing egg prices as millions of laying hens—more than 6 million in Colorado alone—are euthanized. According to the Centers for Disease Control (CDC), almost 60 million commercial, hobby and backyard chickens and wild birds have tested positive for HPAI since January 2022.  

Despite the dire conditions, there is encouraging news: only one case of avian-to-human transmission of HPAI has been confirmed in the U.S. since the start of this poultry pandemic. The infected individual was not a backyard or hobby flock owner but rather one of the specialists tasked with directly handling and culling the infected birds. Also, his only symptom was fatigue.

The CDC has actively monitored the more than 2,500 people involved in the nationwide culling operation and otherwise exposed to the current strain of HPAI and, so far, only this one infection has been confirmed. As a result, the CDC considers the risk of transmission to be low.

This is welcome and reassuring information for anybody concerned about getting sick from bird flu via their chickens.  


Read more: Here are 4 great reasons to keep chickens (that aren’t egg prices).


Salmonella 

The more realistic health threat posed by backyard flocks is Salmonella infection. The CDC estimates that there are approximately 1.35 million confirmed cases of Salmonella in the U.S. each year, with more than 25,000 resulting in hospitalization. Not all of these cases are caused by contact with chickens or eggs. Most result from eating contaminated food or drinking contaminated water.

In fact, the CDC estimates that only one out of every 20,000 eggs is contaminated with Salmonella. 

Still, the potential threat of getting sick from Salmonella is nothing to ignore, especially by owners of backyard chickens. Chickens can carry Salmonella and spread the bacteria to their eggs and chicks. Such basic flock-keeping activities as collecting eggs, refilling feeders and waterers, cleaning out coops, and cuddling chicks can be enough to spread the bacteria from bird to human. Fortunately, contamination is easily preventable.  

Steps to Take 

Putting measures in place to prevent the transmission of avian-based illness is rather easy. It’s making these practices routine that involves repetition and effort. It may seem inconvenient to not just dash out to the coop for a couple of fresh eggs, but every step taken helps keep everyone healthier.

Consider implementing these measures as part of your everyday flock upkeep:  

  • Wash your hands with antibacterial soap and hot water after handling birds, eggs or any poultry equipments or housing.  
  • Throw away cracked eggs and eggs with feces-covered shells. 
  • Cook egg dishes to an internal temperature of at least 165 degrees F. Both the yolk and white should be firm, not runny.  
  • Designate footwear that is to be worn only inside the chicken run and coop and nowhere else, including the yard or garden. This will limit the spread of Salmonella via droppings carried on the soles of the shoes or boots.  
  • Consider purchasing a set of coveralls to wear over your regular clothing when working in the coop or run. Keep the coveralls in a sealed storage bag in your coop or garden shed, not inside your home or garage.  
  • If you free-range your flock, rinse off or scrub the tires of your tractor, lawn mower and any other vehicle that comes into contact with the flock’s range.  
  • Sanitize your bird feeders and waterers regularly. 
  • Avoid hanging wild-bird feeders or installing wild-bird nesting boxes and baths in your yard. 
  • If at all possible, install a roof over your chicken run or cover your run with fine bird netting to keep wild birds out. If you are building your first coop, consider a fully contained coop with a covered run and 1/4-inch mesh fencing. Small birds such as English house sparrows can easily fit through traditional 2×4 mesh fencing.  

Michael was relieved to hear that common-sense measures similar to those already in practice at his clinic was all that was needed to safeguard himself against getting sick once he begins keeping chickens. For now, he is planning to review blueprints for fully contained coops and quite possibly design his own to ensure not only his health but also that of his flock. 

Categories
Animals Chicken Coops & Housing Chickens 101 Farm & Garden Flock Talk Poultry

ID & Defend Your Flock Against Predatory Birds

Without much cover in which to hide, predatory birds can pose a very real threat to a flock of free-ranging chickens, especially small ones such as bantams, juveniles and chicks. On the whole, they move quickly and leave little evidence behind.

One of the most common raptors in North America is the keen-sighted red-tailed hawk. It’s identified by its broad wingspan and short, fanned tail. Of the nocturnal predator birds in North America, the common barn owl is the most likely to pay a visit to your chickens. The barn owl uses its immaculate hearing, rather than sight, to locate and capture prey. 

While it takes a rather large raptor to carry off an adult, standard chicken, do not underestimate the audacity of a hungry raptor. Most predatory birds will focus on small or weak prey, but they are still capable of inflicting damage on any member of your flock. 

If you suspect your property or neighborhood is home to any species of predator birds, call your county extension office or enlist the help of avian experts at your local bird or wildlife sanctuary.

Don’t attempt to trap or capture any predatory bird on your own. Many native North American raptors are federally protected and to illegally capture one could land you with some serious jail time and fines.

predatory birds hawk
Guy Sagi/Adobe Stock

Calling Card

A bird of prey is the archetypal hunter. Unlike the other predators mentioned, true birds of prey are strictly carnivorous. They’ll rarely forage or scavenge for food to supplement their taste for meat. 

Daytime predatory birds usually take only one chicken at a time, but they may return for more. Truth be told, raptors rarely leave a calling card. More often than not, chickens that fall prey to raptors will simply disappear.

Here are a few clues they might leave:

  • Chickens disappear while free-ranging (usually thanks to hawks, eagles and falcons).
  • Chickens missing, with only scattered feathers remaining (also hawks, eagles and falcons).
  • Surviving chickens have deep puncture wounds (from talons).
  • Dead chickens found on the roost at night with missing heads or only the head and neck eaten. Dead or injured chickens will have puncture wounds around the head and neck. (You can blame owls for this one. Once inside, an owl may be moved by blood lust and kill more chickens than it can eat.)
  • Piles of feathers under fence posts or similar structures where the raptor has consumed its prey (a habit of nearly all predatory birds). 

Read more: Check out these 4 tips for protecting chickens against common predators.


Your Flock’s Defenses

To safeguard your flock from overhead predators, provide some sort of aerial barrier. Cover outdoor runs with roofs or netting. Anything that disrupts a raptor’s line of sight and ability to maneuver will prevent them from effectively grabbing a member of your flock. Some chicken-keepers hang old DVDs from ropes above outdoor pens to confuse aerial predators. The sharp glare in the sun can weaken a raptor’s vision during a hunt.

Also, provide something pastured birds can hide under in the event of an attack, such as low bushes, potted plants and other vegetation. Chickens are incredibly perceptive to anything flying overhead and will quickly seek cover if they feel threatened.

If your city or neighborhood allows it, add a rooster to your flock. He will keep one eye overhead for any aerial predators and alert the hens to any danger. As always, securely lock up your flock each night. Close any windows or doors that do not have a mesh lining to keep nighttime birds of prey—namely, owls—from getting inside. 

This article originally appeared in the March/April 2023 issue of Chickens magazine.