Picture the scene. It’s spring, fruit trees are in bloom, and you’ve finished reviewing the post-winter condition of your farm buildings. And, hmm … the paint jobs are looking a little worse for wear.
A good coat of paint can make all the difference for extending the life of wooden buildings. If paint is peeling and flaking off your barn, garden shed, farmhouse, etc., it’s time to freshen up the paint. You’ll seal out moisture and block harmful ultraviolet rays.
But before you start painting, you need to remove the peeling and flaking paint. That means a lot of paint scraping or pressure washing, depending on the size of the job and the time and tools you have available.
Perhaps you’re thinking, “Do I really need to scrape all that paint?” When faced with a big project, it’s tempting to simply paint over old paint and assume the fresh coat will stop any further peeling and flaking.
Unfortunately, skimping on scraping is a bad idea. Painting over loose paint increases the likelihood of the new paint peeling off with the old.
You might think you’re saving time and effort. But if your paint job needs to be redone the following year, your work has been largely wasted.
But Wait … There’s an Exception
Before you dive in and start scraping paint, there’s an important exception to keep in mind. If you’re dealing with an older building (especially those built before 1978), there may be lead paint. Even if the outermost layer of paint isn’t lead-based, it’s possible older layers contain lead.
Lead paint is a health hazard and scraping it can generate dangerous lead dust. So identification and removal of lead paint is best left to an expert.
Do I have to Scrape It All?
If you’ve determined your peeling paint isn’t lead-based, then you’re free to start scraping away the old paint so the new paint has a solid surface to which it can adhere.
But here’s the thing: You don’t necessarily have to scrape away it all.
The point is to eliminate peeling and flaking paint. If some of the paint is in good shape and doesn’t want to scrape away, that’s fine. You don’t need to damage the wood trying to scrape away every last bit of paint.
Circling back to the beginning, scraping isn’t the only way to remove old paint. If you have the means, pressure washing can actually be a better approach.
Certainly scraping all the paint off a large barn would be an onerous (and unrealistic) job. A pressure washer makes quick work of large tasks and has the added benefit of washing away dirt, mold, mildew and more. You’ll wind up with freshly cleaned surfaces stripped of paint and ready for fresh coats.
Removing old paint might not be as fun as applying new paint. But it’s a necessary job that reaps dividends.
It’s springtime again and calves, lambs and kids are likely on many hobby farmers’ minds. If you’ve got young stock arriving, hopefully you’re having a busy and enjoyable time. But as the Spiderman-turned-farmer quote goes: With great cuteness comes great responsibility.
Newborn animals (the term “neonate” is used for just-born livestock up to roughly a week of age) are fragile, sensitive little things. It’s on us to watch them closely during the first week of life to make sure they get the strongest start possible.
One health aspect that is incredibly important for young animals is their hydration status. Newborn mammals, humans included, are made up of a lot of water. If they don’t maintain that high level of hydration, things go downhill at an alarming rate.
Not surprisingly, severe dehydration can kill newborn livestock. So let’s take a closer look at this aspect of neonate health.
Scours
How would a young animal become dehydrated in the first place? Most commonly, it’s because they have diarrhea. Periods of lengthy loose stools can deplete a neonate of vital fluid and electrolytes. There are numerous causes of neonatal diarrhea. Most are either bacterial or viral in origin and are so common in ruminant species they are often all clumped together as “neonatal calf diarrhea,” commonly called “scours.”
If diarrhea isn’t caught and treated early enough, it quickly spirals into a disaster. First, the calf is weak and doesn’t feel good, so it doesn’t nurse. This then prevents the neonate from restoring any lost fluids and she gets weaker, then feels worse, then really is not nursing at all, meanwhile still having diarrhea and losing fluids.
See how this is a nasty vicious cycle? Severely dehydrated neonates are not able to stand on their own and become cold. If they are not treated aggressively at this point, they will die.
One more word of caution: Some causes of scours are zoonotic, meaning the infectious agent can be transferred from animal to human (and vice versa). Always practice strict hygiene when handling a young animal with diarrhea. Remember to wash your hands immediately after handling it.
Additionally, don’t share equipment between sick animals (or disinfect between use).
Whether an animal has diarrhea or not is obvious. But how do you measure dehydration in newborn livestock? It turns out there is a lot of solid science behind a simple pinch. “Skin tenting” is what is measured when you pinch skin and see how long it takes to snap back against the body.
Testing by Tenting
Try it on yourself—pinch the loose skin on the top of your hand. Hopefully, it pops back in place within a second or so. If it stays tented, go drink some water.
Now let’s apply this practice to young ruminants. A good place to pinch the skin of a calf is directly below its eye. Unlike skin around the shoulders, the skin on the face is relatively tight and should snap back readily if the calf is healthy. Once you pinch and let go, start counting seconds.
If the skin takes longer than a second to pop back in place, you’ve got a clinically dehydrated animal on your hands. If skin takes longer than five seconds to pop back in place, this animal is severely compromised.
It’s in the Eyes
In conjunction with skin tenting, look at your calf’s eyes. The more dehydrated an animal gets, the more sunken its eyes are in the sockets. With a ruler, measure the space between the lower eyelid and the actual eyeball in millimeters. In a normally hydrated animal, there shouldn’t be any space there.
However, as the animal becomes dehydrated, the eyeball will start to sink back into the skull, creating a measurable space. Check out this table from Oklahoma State University on how to use skin tenting and eyeball scores to calculate how dehydrated your calf is. Consider printing it out and putting it in the barn for easy reference.
If a your newborn livestock has dehydration of less than about 8 percent (equating to a one- to three-second skin tent time and no more than 4 mm eyeball recession), you should supplement him with oral fluids to replace the amount he has lost. If skin tenting takes longer than three seconds and the eyeball is more than 4 mm recessed, this calf requires more serious fluid therapy in the form of IV fluids.
At this point, you should call your veterinarian for help.
Keeping a close eye on your young livestock and investigating further when you suspect something’s not quite right are the best ways to help the animals on your farm get off to the strongest start this year.
Raising chicks is an exciting experience. Enthusiastic beginners spend a great deal of time deciding which chick breeds to raise, but what setup and equipment do you need to have ready for the arrival of feathered additions?Whether this is your first spring getting chicks, or you’re a seasoned pro, it’s good to create a chick equipment checklist to make sure you have everything in place and ready to go when your new chicks arrive.
Chic Chick Housing
The first thoughts for your new arrivals are probably about where to put them. The brooder, no matter how rudimentary, should be your first piece of chick equipment to consider. Chicks, whether to-be layers or broilers, are generally the same size for the first couple of weeks, after which the broilers really start to develop their figures. We have a mixed flock each year, so I have witnessed that period of divergence time and again.
The numbers say that for ample room your brooder should provide roughly 1⁄2 foot square per chick until they reach 5 weeks of age. From there, your chicks (broilers, in particular) will require an entire foot square as they progress to 8 weeks.
This room need not come entirely in the form of indoor floorspace. Though they do receive more housing space, during this period our chicks will spend all the daylight hours possible in their outdoor pen.
In all corralling scenarios, your brooder space must be very adaptable. If you’re beginning with a cardboard box, start looking for its larger replacement almost immediately. If you have built straw bales into a pen in a room, make sure there are bales and space enough to expand in short order.
As chicks will need more space so quickly, why not start them with the extra space to begin with? Not only do they require adequate space, they need that space at a certain temperature. Chicks need to be kept at 95 degrees F for the first week of their lives. By the second week, the temperature should drop to 90 degrees; by the third, 85; 80 for the fourth; and 70 degrees thereafter.
These toasty temperatures are achieved with infrared heat bulbs when dealing with smaller chick quantities (of 200 or fewer). At 250 watts and 110 volts, you must make sure you have lamps with porcelain sockets and adequate wiring to accommodate them. Brooder lamps usually have guards over the bulbs as well.
Naturally, these are hung low enough so heat is not lost and not so low as to overheat any chicks or create a fire hazard. This typically means adjusting lamps from 1 to 1 1/2 feet above ground level. A thermometer will help you keep temperatures on track, as will watching your chicks’ behavior.
Crowding under the lamps means they are too cold. Crowding to get away from lamps and panting means they are too hot.
Setups usually concentrate heat at the center of the brooder, as it’s important to provide room for chicks to move away from it. They’ll exercise themselves and feather better when given access to slightly cooler areas (if they can make it back to the heat when they wish to).
Though one lamp is adequate for 50 to 75 chicks, bulbs can always go out (as with any bulb). Having an additional lamp going during the colder, unsupervised night periods is advisable, as well as having replacement bulbs on hand and the means to cover your brooder up in cases of extreme cold. With annual April deliveries, we have a lot of experience with cold nights!
Use tarps, cardboard or blankets with supports to do this. No matter what you use, though, don’t let it sag into your brooder or sit too near the lamps.
Note: Never close your brooder tight when it isn’t necessary. Chicks need fresh air, so whenever possible, provide good ventilation and even open windows. Ventilation will also remove moisture out of the pen and help keep bedding drier, all of which results in healthier chicks.
Leah Smith
Another important component of brooders is the bedding, which will help to control moisture levels, offer some insulation, and aid in cleanliness. Chicks must never be housed on slick surfaces such as cardboard or newspaper, as this could lead to leg problems. They also should not have any dusty bedding materials, which may compromise their breathing.
Though many mediums are often suggested, including sand, shredded newspaper, rice hulls, peanut shells and burlap, I find straw or big-flake pine chips to be the best choices. If you opt for wood chips, avoid cedar or other aromatic woods as well as any shavings or small chips that the chicks may ingest. Start with a 2-inch-thick layer, adding to it as needed to provide a clean surface.
One of the most fundamental requirements of new chicks is their feed. Starter feed is absolutely required. It typically contains a 19- or 20-percent protein level. Hen layer crumbles and pellets are down to 17 or 18 percent protein. Though this may not seem like a significant difference, rapidly growing chicks require the extra protein found in their formulation.
When they’re small, they don’t eat much, so what they eat must be the best. Feed consumption will seem slight at first, but be prepared for a dramatic increase as they really begin to grow.
Leah Smith
Provide enough feeder space so that each chick could eat simultaneously. This may certainly be the case if you practice any food withdrawing, and in a mixed flock, your pullets will lose out to the broilers. The prescribed length is 1 1/2 inches per chick for their first 4 weeks, increasing to 2 1/2 inches from there on out.
Clearly, you’ll need additional feeders to add to the initial ones. Do yourself a favor from the start by selecting stable ones, unable to be flipped or tipped.
Many homesteaders are tempted to try providing their chicks with rations or partial rations that are home-produced. With extra milk on the homestead, we get to enjoy milk-fed broiler meat from our birds. But, as with other homegrown feedstuffs, this should be done supplementally and never to the exclusion of the starter feed, and not at all during the first few weeks of life.
Again: Pay attention to labels and protein percentages. There are chick feeds (as opposed to “starter”) which are typically down to 18 percent, and “meat bird” formulations as high as 22 percent. If you feel there is a cost incentive for switching to either of these or the need to ramp up or slow down growth, this may be done after the month-old milestone.
As a boost to our new arrivals after their trip through the mail, we give them sugar water (instead of plain water) on their first day with us. Our mixture is 3/4 a cup of sugar for a gallon of water.
Hatcheries and other suppliers have in-house brands of different chick(en) supplements. For chicks, this combination of vitamins and electrolytes can counteract shipping stress and give an overall boost for the first few weeks. We use a basic chick formulation. There are special ones for heavy breeds (Jumbo Cornish Cross or Cornish Roasters, other broilers or other especially heavy chicken breeds) as well as more elaborate supplements that include proteins, carbohydrates, fats and even probiotic bacteria.
You can also find chick grit, which should promote the fuller digestion of feed with its grinding action. If you ever feel your chick growth isn’t what it should be, try grit or a more elaborate supplement mix. Again, access to the outdoors will be an asset here, offering grit and bugs for free!
Clean water is equally as important as food, and a good waterer is a critical piece of chick equipment. Chicks have a habit of fouling their waterers, and you should freshen them, at minimum, every day. To begin, use suitably small ones or don’t completely fill larger ones, which will be needed in the future.
During their first week of life, 70 chicks consume something like a gallon of water a day. After 4 weeks, that same daily gallon will only provide for 10 chicks.
If you begin by using a large waterer with a large trough, displace the water with marbles or stones so the chicks can’t wade through the trough, only drink from it. Wet chicks don’t just look untidy. If they manage to move too far from the heat when wet, they can get very cold, very fast and die.
Leah Smith
As with feeders, waterers must allow enough “elbow room” so that each chick is able to drink at the same time. Again, smaller chicks will lose out in any crowding scenarios. And life is short (especially with meat birds), and they have a lot to do in a short time, which they can’t afford to waste. Never let waterers go dry!
Have waterer lifts of some sort (pavers, board scraps, etc.) to raise their height as your chicks grow. Waterer/water levels at back height are ideal to minimize the dribbling of water while drinking, which is inefficient and another source of dampness in the pen (dampness being one more potential health hazard).
If you have month-old chicks when outdoor temperatures exceed 70 degrees Fahrenheit, get them outside. The fresh air is good for their health and reduces dirtying of bedding material (and, therefore, its cost) as well.
Of course, food and water must be moved outside with them. They must be well protected from aerial and ground predators (even of the pet variety!) and must be shut in at night to guard against aggressive nocturnal predators. They also shouldn’t be out in stormy weather.
Chicken wire, put up firmly and with no ground-level gaps, is critical chick equipment to contain them as pullet chicks are eager to escape!
More Information
Cutting Corners
You’ll frequently see chick guard rings or circular shields offered from poultry suppliers, usually made of corrugated cardboard or plastic. They aren’t trying to sell you unnecessary paraphernalia, as shields serve a good purpose. However, you can always craft this piece of chick equipment yourself (as we did).
For piecemeal pens such as ours, shields provide a solid, draft-free wall. Perhaps more importantly, you’ll learn that chicks have a habit of sitting together in clusters. While a sweet image, it’s frequently the case that someone will get squeezed into a corner and suffocate.
Remarkably, removing corners with these rings and shields goes a long way to preventing anyone from feeling the squeeze! Rings are also an easy way to create your initial, smallest brooder space that can be easily removed. In a week or two, the chicks will already have outgrown it.
This article originally appeared in the March/April 2023 issue of Chickens magazine.
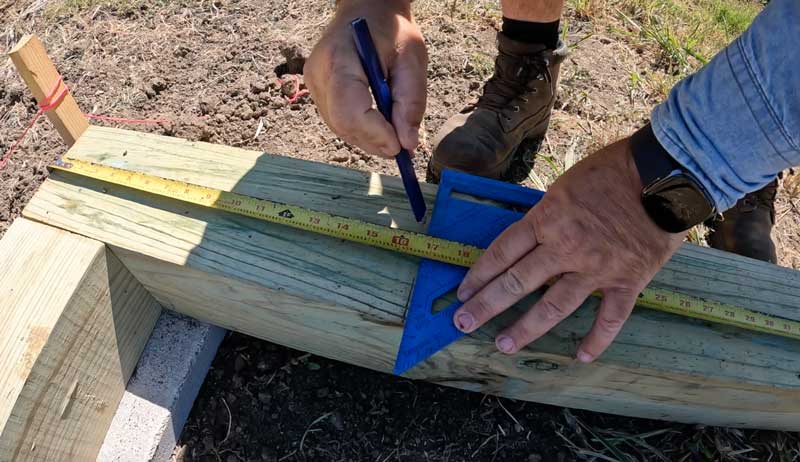
I’ve sited the plot for my new garden shed and placed the blocks, the latter of which took me some time to level. I consider this time well-spent, though, as I don’t like any wood, even treated lumber, to contact the ground, which will rot any wood over time. I also placed the perimeter beam for the structure, so now it’s time to fill in the base frame with floor joists.
Granted, I’m building the base of my structure much stouter than necessary, but the project allows me to use materials left over from a previous project. The upside, of course, is that this structure will be very durable, and the process was pretty simple—I was able to use long timber screws to quickly and securely attach the beams to each other at the corners.
After a quick application of the “x method” of checking for square—I simply measured interior corners to ensure they were equidistant—I was ready to cut and attach my floor joists.
Installing floor joists isn’t difficult. If your frame is square, you cut the lumber to the same length and attach using a nail gun. But one thing you do want to do is, before attaching the joist, look down the length of the lumber and look for the natural crown. The bow of the crown (which shouldn’t be extreme—an extreme bow indicates poor lumber) needs to go up when you install it in the structure’s floor base.
You’ll see in the video that I go for overkill by installing my farm garden shed joists 16 inches on center. Again, I had the wood, and this project isn’t overly large, so I did that simply because I could. I explain more economical measuring options in the video above, though.
I show you in the video how to measure for joist installation, but it’s worth reiterating that you need to measure for the same distance on both sides of your frame to ensure your joist beams are parallel. After the joists are installed, you can go ahead and put on plywood for the flooring.
My family has made baked spinach artichoke dip for decades. It’s a great appetizer to serve at gatherings. We even bake up a casserole dish to snack on “just because”—we love it so much. We’ve been known to bake up a batch and use it to smother over grilled chicken, or stir into zucchini noodles or other pasta and eat as a meal in itself (or as a side dish).
I’ve made this spinach artichoke dip so many times that I don’t even measure anymore. That just goes to show you that there is a lot of flexibility with the recipe and room for you to make it your own. Add more garlic if you’d like, or less spinach if you want—get creative. Sometimes if I don’t have enough mayo or sour cream, I just improvise. It’s always turned out great.
I originally found this recipe in an old Cooking Lite magazine that is no longer in print. I’ve adapted it over the years, and here is the general outline for you to work with.
Serves: 6
Ingredients
8 ounces cream cheese, softened
1 can artichoke hearts
Frozen spinach, thawed and drained
1/4 cup mayonnaise
1/4 cup sour cream
1/2 cup shredded mozzarella cheese
1/4 cup shredded parmesan cheese
3 garlic cloves, pressed in a garlic press (or finely chopped)
Stir together the remaining ingredients, then combine with the artichokes. Transfer to a 2-quart casserole dish.
Bake the spinach artichoke dip uncovered for 25 minutes and check to see if the top has begun to brown and that the edges are bubbly. If not, cook another five minutes. Enjoy with warmed pita bread, cucumber slices or tortilla chips.
Notes
I have suggestions for a few other unique ways to use this spinach artichoke dip, too. Use it as a filling for pull apart bread (my friend did this over the holiday season and it was a total hit!). Add it to a melt sandwich to make it stand out from all the rest. Or use it to stuff large shells and make an entirely different meal of it.
I lost one of my favorite old trees this year and have been doing all I can to put it to good use. As I continue to collect all of its fallen branches and limbs, I’ve noticed that several are nearly the same length and diameter. This, in turn, has me thinking about rustic-looking trellises.
Just what could be built out of so many sticks?
I’ve been experimenting with all kinds of new configurations. One of my favorites is the tall obelisk trellis I fashioned out of four large, supporting limbs and a dozen smaller sticks. I plan to use it to shore up my multi-headed, branching sunflowers as well as some vining plants this season.
Whether you have a fallen tree to contend with as well or you’re just picking up a few sticks after the last big wind storm, you can (and should!) make some DIY trellises, too. In fact, once you become accustomed to working with both dry and green sticks of all sizes, you’ll be limited only by your imagination.
Until then, check out the video to make an obelisk trellis for your garden. To get started building the obelisk, you’ll need:
assorted tree limbs and sticks with all side branches removed
Cut four upright supports, each roughly the same length and diameter. (You’ll also need to gather three sets of four smaller cross supports.)
Use cinder blocks to help position upright supports. Mark potential drill sites at the top of each upright post.
Drill holes through the marked areas. Connect the tops of the posts to one another either with threaded wire or with twig/dowel pegs and wood glue. Wrap twine around the top of the obelisk trellis to reinforce these joints.
Measure and trim a set of four cross supports. Position these near the top of the obelisk and mark potential drill sites. Drill through both ends of each cross support and drill the upright supports where the cross supports will be attached. Connect these with threaded wire or with twig/dowel pegs and wood glue. Use twine to reinforce each of these joints.
Repeat step 4 two more times—once around the middle of the obelisk and again near the base of the obelisk.
When not scooting around pursuing adventures in a self-built 1989 Skoolie bus, you’ll find Lexis tending to hobby farm duties at Cardinal Creek Homestead. Situated in rural eastern Kentucky, the farm is fueled by a coterie of fur-laden and feathered friends, including some pretty spectacular Orpington chicks.
We spoke to Lexis about her homesteading roots and the joys of overcoming farming challenges. We also got to meet a chocolate rooster named Ghirardelli
“As a young girl I grew up on my grandparents’ hobby farm in New York raising chickens, horses, goats and pigeons,” recalls Lexis. “My favorite thing was waking up in the morning and getting to feed and take care of all the animals.”
Over the ensuing years, Lexis always managed to stay close to animals. “I told myself when I was ready to purchase my own home I would have my own hobby farm and raise my own livestock,” she says.
Chickens play a central role in the running of Cardinal Creek Homestead. Lexis characterizes them as “the funniest and strangest animals I have ever met.” She adds that each chicken’s personality really comes to the fore as you begin to spend time with them on a daily basis.
“My heart chicken is actually my Silkie rooster, Raven,” she says. “One of my favorite things he does is make the craziest sounds when I put treats down in the run to show his ladies that he found them the treats.”
When it comes to the most eye-catching chickens frolicking at the homestead, Lexis pinpoints both the Chocolate and Lavender Orpingtons.
“Both are a gorgeous color, full of feathers and lots of fluff,” she explains. “They add great color to a flock, and it’s hard to get a bad picture of them!”
A chocolate Orpington rooster named Ghirardelli has emerged as one of the standout personalities down at Cardinal Creek Homestead. “He is an absolute sweetheart!” says Lexis. “He is a super docile rooster and loves his ladies to the max!”
Lexis adds that Ghirardelli has also stepped up and embraced a role as a flock protector—and shows his gracious side by always “making sure his girls eat first” when it comes to meal times.
Reflecting on her hobby farm journey to date, Lexis says that she takes joy from the nourishing feeling that comes with “being able to continuously learn new things everyday” in a bid to become self-sufficient.
“Learning to raise different kinds of animals and challenging myself every day on the farm is, to me, the most rewarding,” she says.
New York urban farmer Maya Marie talks about building your relationship to land, her Deep Routes educational project, irrigation and more.
Hear about how various family members, educational settings and even Sesame Street have contributed to Maya’s life path. She talks about farming Afro-Indigenous crops at East New York Farms, including trying her hand at growing rice and keeping the pollinators in mind. Maya gets into what she sees as the current challenges of growing food for urban and rural farmers and how to be flexible, and then she gives her best advice for finding places to garden when you don’t own your own space.
Learn about Maya’s Deep Routes educational project to connect people with Afro-Indigenous agricultural and culinary traditions and uplift these stories and foodways. She also covers her work in teaching with Farm School NYC. Keep listening to hear about Maya talk about her favorite topic to teach and one that most of us could learn more about: irrigation.
As “refugees” from the hustle, bustle and often chaos of urban living, my wife and I retired to a rural setting. We purchased some raw acreage and began the process of developing it with a house and a couple of outbuildings for storage and shop facilities. We attempted to be as self-reliant as possible. Having had little previous experience in rural living, we have spent years living on a “learn-as-you-go” basis in adapting to our new lifestyle.
With the advent of our first spring, we considered livestock and settled on raising chickens for eggs and meat, buying 15 chicks at the local feed-supply store. We took home 13 hens and two roosters.
While the chicks were housed in temporary brooder facilities, we quickly constructed a coop and an outside run for that size of a flock. Once matured, the hens laid anywhere from six to a full dozen eggs a day in the first year, depending on their moods, the weather and the season. The roosters fought and played Casanova to the hens throughout the year. One became dominant and the other so intimidated that he wouldn’t go outside without being chased back into the coop.
Let’s Try Incubation
After a year of working with our original flock, and because our hens hadn’t gone broody, during the first week of the following April a co-worker loaned us a tabletop device for incubation. We planned to try our hand at hatching eggs because it became apparent early on the idea of motherhood seemed completely foreign to our existing girls.
Egg laying became a daily drop-and-walk-away event in the coop’s nests.
Not knowing what we were doing, we hit the books, reading up on egg incubation. We learned it would take approximately 21 days to hatch and that the temperature needed to be maintained continuously at 99 degrees with a 10-minute cooling period twice a day. Also, we had to make sure the incubation humidity whould be a constant 75 percent, meaning adding water to a trough in the incubator at least once a day.
We also calculated that a percentage of the eggs wouldn’t hatch, and some chicks wouldn’t survive the hatching process. Hatched chicks were to be kept in incubation conditions for 24 hours after hatching, and on and on.
With a possible 30 to 50 percent loss during the process and wanting to successfully hatch maybe 10 new chicks, we loaded the incubator with 23 eggs (about three days of laying). Then, we began the process: checking the thermometer in the incubator every couple of hours, adjusting the heat control accordingly and filling the water trough when needed to keep incubation conditions right.
All the while, we wondered if we were just wasting our time and electricity.
Pay Attention to Murphy’s Law
Like clockwork, on the 21st day, we watched the first chick pip, then break, the shell and emerge, wet and pathetic. By 6 p.m., three had hatched and were drying and fluffing up. At 9:55 p.m., while other shells were beginning to crack, the power shut down!
(We had received a letter from our electric utility announcing power outages in our area for up to 12 hours for replacement of sub-station equipment but with no scheduled date.)
Power wasn’t re-established until 5:55 a.m. The outage lasted exactly 12 hours to the minute. When the lid of the incubator was opened, we expected the worst but were instead inundated with chirping and scurrying chicks: 18 eggs had hatched and more were cracking open.
By the end of it all, 22 of the original 23 eggs hatched successfully. Two other chicks subsequently died within a couple of days, which is commonplace, leaving us with an even 20 chicks to care for. As it turned out, we had an even split of 10 hens and 10 roosters.
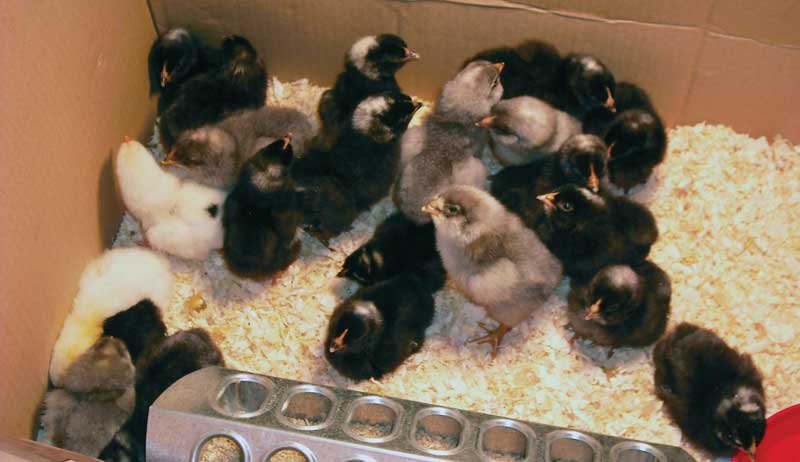
Because a large cardboard box in the laundry room isn’t much of even a short-time solution to hold 20 chicks for very long, a 4-by-8-foot brooder (coop/pen) was built for the chicks, with plans to build a second one within days, as the first will become overly crowded within a couple of weeks.
With the first one finished and the chicks relocated, the construction of the second one started. A couple of hens from our original flock decided, within a week of each other, that motherhood was not such a bad idea, going broody and refusing to leave the nests in their coop. One was setting on 10 eggs while the second hen was setting on six more.
Trying to move them only caused them to growl and peck at one’s hands. (Yes, chickens can growl.)
Broody hens should be separated from the flock to hatch and raise their young until the chicks are big enough to protect themselves. Chickens don’t have the smarts to consider small chicks anything but a meal, like the bugs that they scrape up from the ground! Adult chickens can appear to be aggressive to another’s young.
We adjusted our plans and priorities and constructed two broody hen pens (aka, maternity wards), one for each setting hen. This allowed them a peaceful place for their 21-day hypnotic trance and to raise their young until they were old enough to join the main flock and hold their own.
With the onset of heat of an early summer arriving at the same time, this meant a crash program in coop and brooder building in temperatures reaching into triple digit readings. The first brooder built was getting too small for 20 growing chicks, so once the maternity wards were finished, it was time to finish the second brooder pen.
The next step was to separate the hens from the roosters in the original incubator-hatched batch and build another henhouse and yard, complete with roosts and nests.
To keep fighting to a minimum, and to give the hens a break, a rooster coop and pen also had to be built before the boys discovered what their “mission in life” was. Upon completion of the hen-house and pen, the only thing left was to build a rooster house so that the roosters could be systematically cycled between the henhouse and their rooster quarters, giving all of the hens a break from their incessant mating activities.
And what did we do with the setting hens? Well, the first one hatched all 10 of her eggs, so there were 10 more chicks. The second one hatched three of the six eggs and abandoned the other three once her chicks were hatched. Of the 13 chicks that had hatched, the rooster population grew by five more.
Combined with the incubated chicks, we ended up with a total of 15 roosters and 18 hens.
Lessons Learned
Continuous cohabitation of roosters and hens in a single coop and pen was not the greatest idea, as we learned from raising the original flock. Roosters are aggressive when it comes to their favorite hens and have only one thing on their minds. They constantly fought and mated, tearing the feathers off the hens and literally running them ragged.
Because of the competition for the ladies, when more than a single rooster occupied the flock’s living quarters they tended to be extra aggressive, even to us and would turn on us at a drop of the hat.
What started out as an experiment in self-sufficiency as far as eggs and meat is concerned expanded proportionally. We went from one henhouse and pen to a couple of additional full-sized coops, a couple of brooder pens that doubled as emergency isolation facilities for sick or injured birds, and a full-time rooster house.
Beginning with a flock of 15 and ending the spring with a total flock of 48 meant that as the older birds aged beyond a productive life, others were readily available to take their place. Eggs were in abundance, allowing us to supply extended family members and sell off the excess at a local farmers market along with crops that we had begun growing.
The roosters and some of the hens were sold either as meat or as pets. Twice every year, a regular customer buys all of the roosters we put up for sale.
While it initially appeared as an overwhelming situation, things worked out to our benefit despite forcing us to expand more than we wanted to at the time. In subsequent years, we now have adequate facilities available to each success. We learned quickly to be realistic in what we wish for, making future hatching seasons more manageable and, though not entirely, more predictable.
In the following hatching season, incubation involved 25 eggs with a success rate of 23 hatched. However, the disproportional number of six hens and 17 roosters that resulted has made us rethink the idea of purchasing sexed chicks rather than facing the unknown of incubation of our flock’s eggs, which may make more economic sense.
This article originally appeared in the March/April 2023 issue of Chickens magazine.
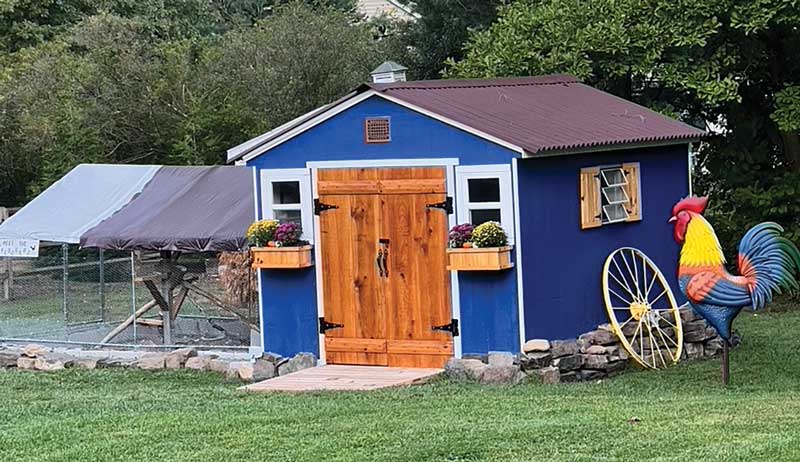
When we moved to bucolic Bucks County, Pennsylvania, 6 years ago, one of the first things we did was name our property the “Almosta Farm.” It was a bit of our humor showing through there since we had five dogs (three French bulldogs and two pugs) but no other animals—only a dream.
Early last spring, we decided as a family to dive into the world of chickens. Luckily, our elderly neighbors were looking to pare down on some things, one being a 10-by-12-foot old storage shed that hadn’t been of use to them for many years.
It was structurally sound, and we had to have it moved. But we thought we could make it our Almosta Farm hen house with a bit of hard work and modifications.
Building Better
We did all the repair, rebuild, construction, retrofitting, painting, etc. ourselves on weekends or evenings as weather permitted. We installed a whole new roof with a corrugated one, added a new window for increased cross-ventilation, added better top venting and built new shutters and matching doors.
We also built a wooden ramp for better access, separated the interior into two sections so there were human and chicken sides, installed an automatic door and hand wrapped 2-by-4s with sisal rope for roosting bars.
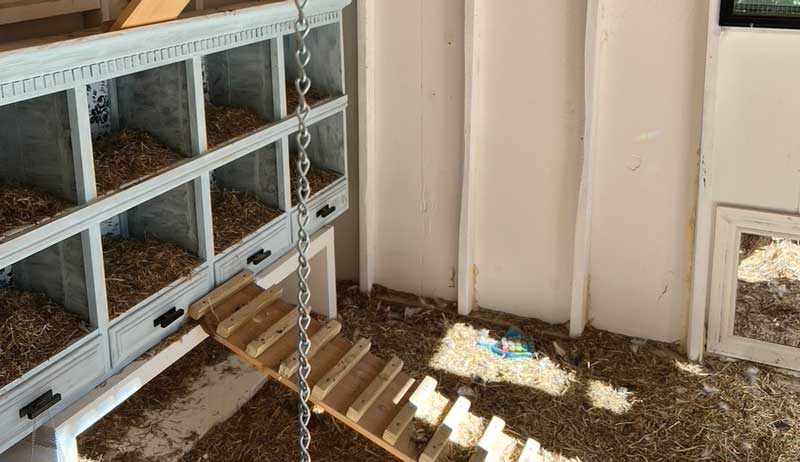
I even purchased an old hutch top at Goodwill for $35 and, with some carpentry modifications, paint and contact paper was able to create an adorable nesting box for the ladies to gift us with their beautiful eggs. I then created all the ramps out of lumber scraps that were laying around my shed and built a storage area as well on the human side to help with food prep and storage of supplies.
On the other side, I used some flea market finds for seating so we can hang out with the ladies and chat in their crystal chandelier-lit home. The run is a bit temporary for now, just a metal one purchased online, but we have predator-proofed the entire setup.
We’ll build a wooden one next spring and add an additional run on the other side.
I placed an order with Meyer Hatchery for a batch of spring hatchings, so we have a May deadline in our minds. Our flock had started modestly with our four Golden Girls. However, chicken math being what it is, we now have multibrooder setups. As they say: If you can count how many chickens you have, then you just don’t have enough!
I think that may end up being our new family mantra here on our little “Almosta Farm” heaven.
—Brooke, Nick & Tristan Henningsen,
Doylestown, Pennsylvania
This article originally appeared in the March/April 2023 issue of Chickens magazine as a “Cool Coop” feature. Have a cool coop you’d like to share? Email us a short write-up (~250 to 500 words) about your chicken coop along with a few images to chickens@chickensmagazine.com with the subject line One Cool Coop, and include your name and mailing address. Check out Chickens magazine for current prizes and contest rules.