Happy International Carrot Day! That’s right—April 4 is International Carrot Day, a day dedicated to celebrating carrots, the carotene-rich root vegetable that is a quintessential part of any garden.
If you want to try your hand at growing carrots, you probably have a basic idea of how to begin. You know you’ll need a place to plant them—in your backyard, perhaps. And you know you’ll need to water them. And weeding … well, it’s not fun, but you’re willing to pull out rogue plants so your carrots can shine.
But achieving the best results growing carrots may require a little more thought and planning. To give you the best chance at harvesting a delightful carrot crop, here are three less obvious items and tools you should consider.
Granted, raised garden beds aren’t a necessity for growing carrots. But they can make a big difference if your natural soil is problematic.
I tried for years to grow carrots in the clay soil on my farm, but they never grew particularly large or attractive. Everything changed when I switched to growing carrots in raised beds filled with rich, fluffy compost generated from horse manure. Carrots like loose and even sandy soil, so the compost fit the bill.
Now I harvest large, picturesque carrots from my garden.
2. Protective Fencing
For best success growing carrots, you may need to install fencing to stop animals from having a feast. The classic image of Bugs Bunny munching away on a carrot is a little deceiving since wild rabbits aren’t in the habit of uprooting carrots to eat the roots. But aboveground leafy greens are fair game for rabbits, deer and other types of wildlife.
If you’ve planted carrots in a raised garden bed, a relatively short fence of chicken wire or hardware cloth wrapped around the bed’s frame might be sufficient to keep out rabbits while still allowing easy access for weeding, watering and harvesting. But to keep out deer, you may have to enclose your garden inside an 8-foot perimeter deer fence.
Building one isn’t as hard as it sounds. In fact, we have some tips for doing so below.
One organic approach to dealing with weeds is to use a flame weeder, which kills weeds by briefly subjecting them to intense heat. The strategy is to kill the weeds shortly before the carrots are slated to sprout, so that the carrots emerge into a weed-free bed.
A flame weeder isn’t perfect. Grasses and perennial plants with established roots may need to be flame-weeded multiple times before they give up. But a flame weeder can significantly reduce the weeds in a garden bed and do so without disturbing the soil, which would encourage more weeds to sprout.
It goes without saying that a flame weeder must be used with caution. It shouldn’t be used around dry plant materials or in the midst of a drought. Indeed, you should steer clear of anything that’s at risk of catching fire—for example, the frames of wooden raised garden beds.
Protective footwear and pants are a must. And you should check on the legality of flame weeders in your area. You made need a permit to use one. To get the best results with a flame weeder, check out these tips for using one.
With a little extra effort and investment, you’ll soon be harvesting large, delicious carrots that would make Bugs Bunny proud. Have fun!
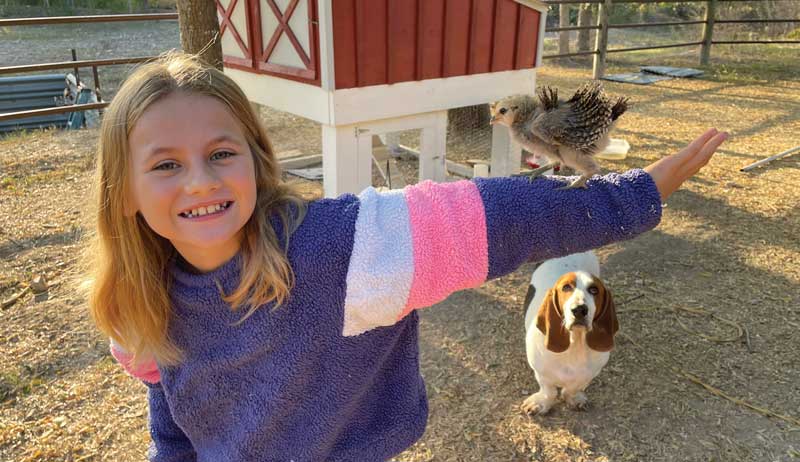
My love for chickens began in 2020 when my parents decided to get backyard chickens for eggs. We started with five Rhode Island Red hens and a Barred Rock rooster, named Doodle Doo. I didn’t know much about chickens when we got them, but I fell in love with them immediately.
I learned as much as I could about chickens by listening to podcasts and researching online. I even took a poultry class! My dad converted my playhouse into a beautiful coop and made a run under it. The chickens are my responsibility, and I have become a crazy chicken lady already—even though I’m just 10 years old.
When my flock started free-ranging, our basset hound, Flash, made himself their babysitter. He is the gentlest dog and follows them around watching their every move. The cats don’t think as lovingly about them. The chickens will steal food from the cats and pull their fur by pecking them if they hang around the cat food bowl or try to fight for the food.
First Unique Chicken
After I fell in love with our chickens, I started to research chickens and follow Instagram accounts about chickens. I decided I wanted a Silkie and went to a local poultry breeder. However, while trying to pick out my chicken, I realized that keeping a Silkie looking clean and beautiful might be a challenge.
All the adorable little Cochin bantams had caught my eye, as well.
The breeder told me if I wanted a “lap chicken,” the Cochin bantams would be a perfect fit. I went home with a lovely, molted Cochin that I named Speckles. What made Speckles even extra special is she was the only one of 50 other bantam Cochins to survive at their farm.
She quickly formed a strong bond with our family. The other chickens, however, bullied her so badly that her neck was bare.
I decided the little Cochin needed to come inside the house to get away from the bullies at night when I couldn’t separate her. My mom wasn’t happy about a chicken in the house, so I trained her to sleep on the toilet! This helped my mom not be upset about her in the house, and there was no mess to pick up.
Speckles slept on the toilet a few weeks until the bullying was under control.
Speckles was the only chicken I have had that went broody. I loved watching the process of seeing the chicks grow through the eggs. Before I knew it, it was day 21, and chicks were hatching! Unfortunately, soon after hatching, the chicks died. This was very sad and hard for me.
However, Speckles quickly went broody again, and now has a healthy baby named Blossom. Speckles is a very good and protective mother, and I am so happy to get to see Blossom grow up.
I am always researching chickens and wanting to get different unique chickens to add to my flock of Cochin bantams. My mom promised me that when I got my gymnastics skill, called a pak, she would get me a Polish chicken. I was so excited when I got my pak. Not only was it a great accomplishment, but I knew I would finally get a Polish chicken.
When I went to get her, I saw Seramas and Polish all in a pen together. A little white Polish stood out, and I named her Pac. I later got a spunky little Serama rooster, Rowdy. These two are always together and make such a sweet couple.
Funky Flock
My dad built me another small chicken coop so I could add a few more funky chickens to my flock. For the first time, I ordered chicks and had them delivered through the mail. I decided to add two Easter Egger frizzles, a White Crested Black Polish, and a Green Queen bantam. I’m so excited to watch my baby chicks grow up and see my flock grow.
All of the chickens have their own personality, and I love to spend time with them. When I’m not doing school or gymnastics, I’m outside with them! One of my favorite things is to take pictures and make videos of them to post on Instagram or YouTube to share with everyone. I hope everyone will follow my flock on Instagram and Youtube!
Macy B. is 10 years old and lives in Floresville, Texas. You can follow the Funky Flock Farm on YouTube or Instagram.
This article originally appeared in the March/April 2023 issue of Chickens magazine. Have a great story about your flock? Email the story of your birds in ~750 words to chickens@chickensmagazine.com (subject line: Chicken Chat). Be sure to include high-resolution images of yourself, your chickens and/or your coop. The author of each issue’s published essay receives a prize from one of our ad partners. (See print magazine for rules. Sponsor: EG Media Investments LLC)
Spring always brings a degree of optimism. Don’t laugh. Really, it does. On the farm, the reason is simple. Despite all the crazy things that are happening elsewhere, spring on the farm carries thoughts of planting, rebirth and new growth. Springtime to chicken lovers across the country means that chicks are available once again.
For the past few winter months, chilly hens have been on hiatus. Most laying breeds will continue to lay through the winter. Egg numbers are usually down, and very few, if any, hens ever go broody. Many will molt in the fall so even the hatcheries don’t bother trying to supply chicks through the winter months. The point is that those of us who have chickens are finally finding healthy chicks available once again.
In fact, springtime means keepers even have breed choices. Maybe you raise your own chicks to replenish your flock, but the suburban chicken-keepers I know can’t have roosters and simply want to keep their flock numbers small in modest-sized houses and runs.
Almost everyone that keeps chickens must replace or add chicks to their flock from time to time, or annually. I consider myself a typical small-time keeper with 15 to 20 hens and no rooster. You may be larger or smaller or maybe just considering a few hens for the first time. Regardless, the excitement of getting new chicks is certainly fun and a time for optimism.
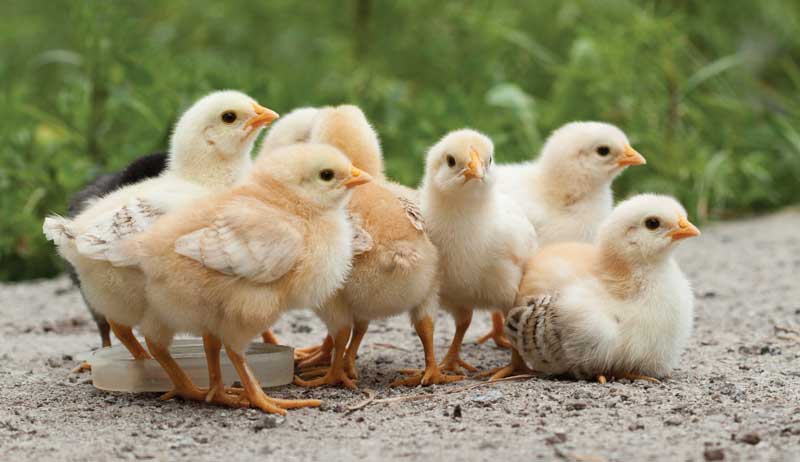
However, here’s the deal with new chicks. They come with a degree of responsibility. It can even be a great learning experience for youngsters if you also keep an eye on things. Day-old chicks, whether from a feed-supply store or chicks you order on your own, are just that. They are 1 day old, and they need attention. Specifically, they need constant feed, water, warmth and cover.
So, let’s assume you have all those basics taken care of. Don’t worry! Everything is cool. Well, indeed you may be right, but it’s extremely important to check on those baby chicks often during those first few hours and days, beginning as soon as you pick them up or when they’re delivered.
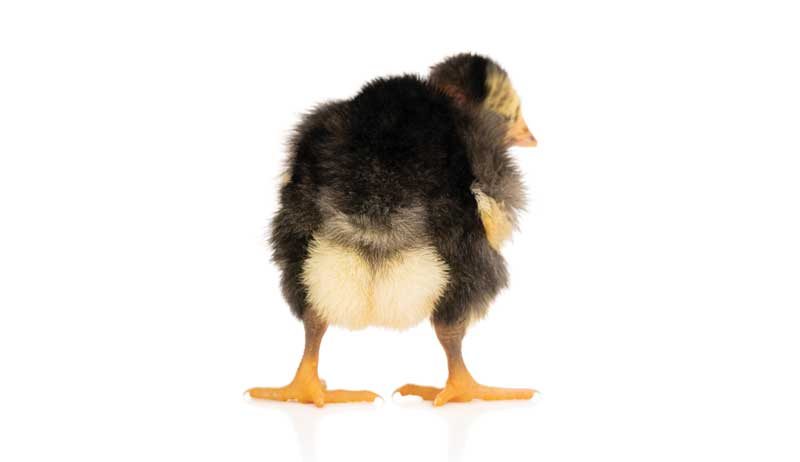
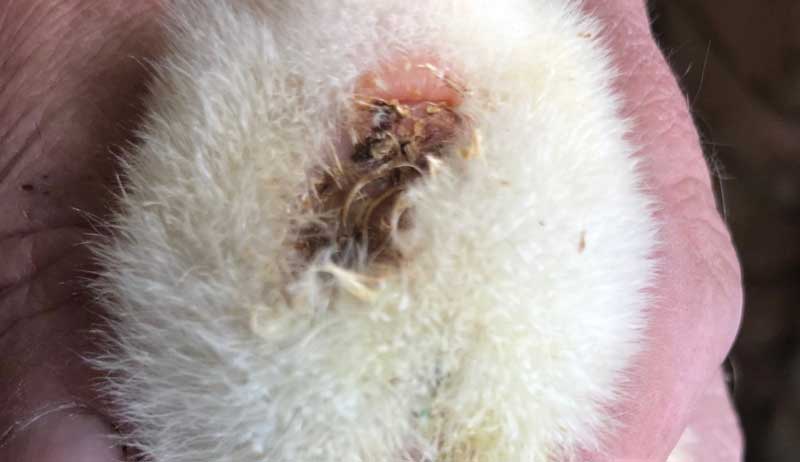
Your procedure may be different, but I purchase from a supplier that lets me look over the chicks from under his heat lamp at the feed-supply store. In that situation, I can look for all kinds of health and/or genetic anomalies. Each chick should be fluffy, dry and active. No crooked legs or toes and no bent or malformed beaks, etc. I also look for pasty butt. If you have never heard of pasty butt or have never seen it, you’re probably new to raising day-old chicks.
What It Is
Pasty butt isn’t a disease but, rather, a condition that can be fatal to the newly hatched chick if it remains unchecked. Pasty butt is also not a deformity or something that can spread from chick to chick. In the beginning stages, pasty butt is relatively easy to spot and relatively easy to remedy. Remember, that’s in the beginning, and you’ll want to observe your new chick additions closely and frequently.
Pasty butt is exactly as the name implies. There’s no discreet way to discuss a simple condition that displays itself as an accumulation of pasty, gooey manure that begins to gather at the baby chick’s vent. You should note that pasty butt most often occurs in young chicks up to about 2 weeks old.
It would be very uncommon in chicks 3 weeks old and nearly unheard after that.
Cases in chicks that old probably started earlier and went unnoticed when the chicks were younger. A baby chick is a tiny animal, especially bantams and some other breeds. That being the case, and since babies are covered with down, some poop (excreta) that doesn’t completely pass by the down near the vent may dry there and begin to gather each time the little hen or rooster poops. Pasting can eventually clog the vent causing the chick to go off feed and water, resulting in weakness, lethargy and eventual death.
Early on, I stated that pasty butt isn’t a disease. However, it is, or can be, a sign of symptoms or conditions that must be remedied. Anything that causes diarrhea in chicks will very frequently manifest into a case of pasty butt. Some of the conditions that may contribute to pasting are:
variable temperatures
stress
poor feed or diet
poor digestion that may lead to difficulties with high protein starter
any number of bacterial or viral diseases
Let’s deal with each of these separately.
Bill Graves
Temperature
Temperature within the brooder box is as important as any of these factors and is usually the easiest to monitor. In the beginning, the brooder box should be around 95 degrees, depending on the time of day. Use a safe heat lamp and watch the chicks.
If they cluster under the center of the light and peep loudly or often, it’s a sure thing that the chicks are too cold and they’re trying to warm themselves under the light. The solution is to simply lower the light or increase the wattage of the lamp. Be sure to minimize or eliminate any drafts by keeping the brooder indoors and watch the babies’ reactions.
If babies now form a ring around the edges of the light cast by the lamp, they’re plenty warm and can’t tolerate the very center of the light source where the heat is too extreme. Remember, be safe with light sources as they can be a fire hazard if too close to flammables.
Stress
Another concern can be stress. If you purchase baby birds from a feed-supply store, you can bet that they were hatched elsewhere and then sent through the U.S. postal service via same-day or next-day air. The result can be stressed baby chicks that have been away from a heat source, away from a natural mother hen and may have been handled poorly.
It’s best to bring your chicks home in a dark, closed cardboard box and in an enclosed and quiet vehicle. Have your brooder box ready with feed, water and warmth. As you place each chick in the brooder, check its vent and make sure it’s clear and clean from any initial stages of pasting.
This should be done at the store before purchase, if possible. If pasting is spotted, it can be dealt with right then and there. Put the chick in question back in your transport box, and take care of all the others so they begin to calm down and get used to their new digs. When all the others are settled its time to deal with the problem chick.
When chicks are just 1- or 2-days old the excreta probably hasn’t hardened and can be easily wiped with a warm, moist cloth. If the poop has begun to harden, hold the damp cloth on the clump long enough to soften the mass and again try to wipe it free.
The harder the mass is, the longer this will take. But it will come free, and it must. Just be gentle!
After removal, dry the chick’s butt with a paper towel using light, gentle pressure. Many chicken handlers will apply a tiny amount of olive oil or other lubricant with a fingertip to the area once dry. Now that a case of pasting has been noted, take special care to check on that chick and all your new chicks more frequently.
In the case of disease or digestive problems, only a couple of courses of action work. A newly hatched chick has a slightly underdeveloped digestive system, so the best practice is to keep water and feed as clean as possible for the first two weeks. That is always true much beyond two weeks, but pullets and older birds have higher bacterial tolerances.
Fortunately, diseases in chicks are infrequent and to bring in a vet for a single chick or two isn’t financially feasible or even productive. The best practice is to purchase from reputable feed-supply store or hatchery and simply feed medicated chick starter for the first two weeks or more.
Most feed-supply stores carry medicated chick starter at a reasonable price. The medication will at least prevent coccidiosis and other minor disorders.
Once pasty butt becomes evident, one is never totally sure of the cause. Treat the pasty butt, and nearly 100 percent of the time, the chick will fully recover if it isn’t related to some other serious disease. A true infestation of a virus or bacteria can be transmitted throughout your flock, so managing that situation is for a future discussion.
Fotikphoto/Adobe Stock
Poor Diet
The final condition we’ll discuss that may manifest as pasty butt is poor feed or diet. I can’t stress enough that you should make every effort to keep chicken starter clean, dry and free of mold. Any of those could cause digestive disorders and stress to the young chicks’ systems. Again, we’re only here to discuss pasty butt, but this involves its prevention. Prevention is always better than a cure.
If you have spotted pasty butt and you’re sure all other factors are at acceptable levels, check their feed. Feeding a probiotic recommended by your feed-supply store and adding some corn meal to the chick starter is another alternative. Lastly, store your feed in a container that keeps out rodents that might urinate and soil otherwise clean appearing feed.
The treatment of pasty butt is quite simple if you make constant observations when cleaning brooders, feeding, watering or just making frequent stops. Cleanliness and keeping the temperature right until the chicks are fully feathered—at about 8 weeks—are all best practices.
The bottom line is that pasty butt is common and normally a minor issue if you keep on top of the situation and its possible causes. By the way, chicks raised in natural situations by the mother hen almost never experience pasty butt.
Good luck with your new chicks, and don’t let a case or two of pasty butt shoot down that springtime optimism.
This article originally appeared in the March/April 2023 issue of Chickens magazine.
This recipe is ideal for a spring brunch or when you need a hearty breakfast to feed the family. Strata is a breakfast casserole, but one that resembles more of a savory bread pudding than an egg bake. It’s full of seasonal vegetables and provides a filling, warm meal to start the day.
Feel free to swap out your favorite bread for the sourdough in your strata. Fresh basil or cilantro create another flavorful option if you don’t prefer dill.
Preheat oven to 375 degrees F. Grease a 9-by-13-inch baking dish with butter or cooking spray. Place the baking dish on a baking sheet in case there is any bubbling over while baking.
Layer half of the bread cubes in the baking dish. Arrange half of the asparagus, potato, carrots, broccoli and shallots on top of the bread.
In a medium bowl, whisk together the eggs, milk, dill, salt and pepper. Pour half of the liquid evenly over the bread and vegetables. Sprinkle with half of the cheese.
Layer the remaining bread and vegetables into the dish. Pour in the rest of the liquid, and top with the remaining cheese.
Bake your strata for 40 minutes, until the top is browned and the center is firm. Let rest 5 minutes before cutting into squares. Serve warm.
More Information
A Bit of Breakfast History
In All About Eggs, by Rachel Khong and the editors of Lucky Peach, contributor Sascha Bos noted that ancient Romans ate breakfast and included eggs, if available. When they were pushed out of Europe, breakfast left with them.
“Throughout the Middle Ages, Europeans ate two large meals (in contrast to the Roman three),” she writes. “Physicians and religious leaders of the time suggested that it would be gluttonous to eat before dinner, and so breakfast was a meal reserved for children, the elderly and manual laborers.”
It wasn’t until 1620 that an English medical writer, Tobias Venner, actually suggests eating eggs for breakfast: poached, with salt, pepper and vinegar, and served with bread and butter.
This article originally appeared in the March/April 2023 issue of Chickens magazine.
My husband is the bread-maker of our family. As much as I love cooking from scratch and preserving food, I really don’t enjoy baking breads or other treats. Thankfully my daughter loves baking as well, so between the three of us, all the bases are covered.
We’ve been making sourdough for around 10 years now, but my husband started a new tradition of “sourdough Sunday” this past December. Every weekend he bakes a loaf of heavy crumb sourdough bread and/or a pan of focaccia. He prefers the heavy crumb because he uses it for making sandwiches during the week.
The more airy bread with the large holes tends to lose some of the ingredients, so he prefers a more dense sourdough.
This past weekend, it dawned on me that we should make some homemade butter to go with his homemade bread. Why had I not thought of this already? We’ve made homemade butter several times in the past, but it’s usually reserved for holidays or other special occasions.
I remember the first time I had homemade butter. I was in kindergarten and we took turns shaking a jar of milk. Each student took turns with the jar, shaking it until we lost steam and passed it to the next student.
At the end we had butter that our teacher spread over a saltine cracker. I thought it was the most delicious “simple” treat I’d ever tasted. Fast forward 25 years and my daughter had a similar experience in grade school.
So this past weekend I picked up a pint of organic whipping cream. My husband, daughter and I all took turns shaking up our own jar of butter to enjoy over our fresh bread.
Fill a clean canning jar with 2 cups of whipping cream. Add a pinch of salt. Add the canning jar lid and tightly screw the ring on the jar.
Now, shake, shake, shake the jar. Shake it up and down and side to side, but be sure to keep a firm grip on it. You’ll shake for 15 to 20 minutes before it’s finished.
The milk will go through different phases. It’ll become whipping cream, then it begins to break. At this point, just before you’re ready to give up, keep shaking and the cream will break and the butter will separate from the butter milk.
Shake a bit more and use a fine mesh sieve to separate the buttermilk from the butter. Store the buttermilk separately to use for pancakes or salad dressings.
Once the buttermilk is strained from the butter, put the butter on a large piece of parchment paper and form it into a roll. Think of it as if you’re rolling up a large piece of homemade caramel. If you have one of those adorable butter molds stored away somewhere, now would be the time to use it.
Transfer to the refrigerator to set. Skip the roll step if you intend to use the butter immediately.
Notes
You can mix the whipping cream with a kitchen stand mixer and save yourself the shaking experience. But, hey, that’s part of the fun!
You can mix in herbs or flower petals into the butter before wrapping it if you want to make a beautiful and delicious compound butter.
If you want to skip the parchment paper, you can just spoon the butter into small dishes and store it away that way.
Consider freezing any butter that won’t be used within a couple weeks.
When growing up, Carlie Barry recalls her grandparents running a sheep and cropping farm. That experience helped instill a passion for farming and agriculture that’s bloomed into Woolvie Jerseys and Milking Gyr, an organic farming venture based in the state of Victoria in Australia, which Barry now oversees.
Taking a break from tending to the Gyr cows, Barry spoke with us about being around cattle all day and the importance of budgeting. We also got some tips on making raw milk ice cream.
“My grandparents had a sheep and cropping farm, which I guess gave me an insight into agriculture very early on,” recalls Barry when she looks back over the early steps of her farming journey.
“I have always loved animals, and when my parents bought a hobby farm, at the age of 10 I was able to have baby lambs and calves and my horse. I was in heaven.”
When it comes to day-to-day farms duties, Barry says that finance-based issues can be some of the most pressing things to stay on top of.
“It’s probably budgeting and making sure there is enough money to pay the large bills and maintenance costs that come with running a dairy farm,” she explains. “Managing staff can be stressful too. Milking cows is the somewhat easy part of running a dairy farm!”
Gyr cows make up a central part of Barry’s farm. She characterizes them as “very intelligent” and says “the most surprising thing I have learned from them is that they usually sleep close to the house at night.”
This behavior, she explains, is due to self-protective reasoning. “It goes back to their ancestors in India where there are tigers in the wild, so it makes sense to stick with their human family at night.”
Looking over her farm and cows, Barry says that the most fulfilling part of the process comes from “building relationships with them, seeing their calves born, caring for them and watching them grow into either breeding stock or yummy steaks!”
Whether you’re a professional grower or more of a casual backyard gardener like I am, you’re likely already on the lookout for various invasive plants and insects. Many of these are simply nuisances which we eventually learn to manage. But others—including the species collectively known as Asian jumping worms—are doing significant damage to our forests and farmland.
Some researchers suggest that at least three Asian jumping worm species may have arrived along with Japanese cherry trees donated to Washington, D.C., and Bethesda, Maryland, in the early 1900s. In the ensuing decades, many more jumping worms have hitched rides in potted plants and bagged soil products imported from Asia.
Warming temperatures and changing weather patterns also may contribute to the spread of these invasives. At present, various Asian jumping worm species have been discovered in nearly 40 states and in southern Canada.
European Worms
It’s worth noting that, although we expect to see nightcrawlers and other types of earthworms slowly plowing through the organic matter in our soil, “our” worms aren’t native to North America either. During a December 2022 presentation on Asian jumping worms, Bob Bruner explained, “The worms that we have [in the United States] are almost entirely European worms.”
Bruner serves as exotic forest pest specialist in the Department of Entomology at Purdue University. He continues, “Most of the North American native worm species were eliminated in glaciation.” Although European worms aren’t native to the U.S., Bruner says, “They have adapted to our environment over the course of several hundred years. European worms can help aerate soil—they can do a lot of beneficial things. Whereas Asian jumping worms ruin soil in terms of being able to develop plants that we want there.”
To understand why Asian jumping worms are so problematic, it helps to compare their habits and lifecycle to those of European earthworms.
Unlike European worms, Asian jumping worms remain at or very near the soil’s surface—usually in very large numbers. As a result, they can quickly devour many layers of leaf litter. They then leave large quantities of grainy, nutrient-poor castings behind. Soil that is infested with Asian jumping worms may have the consistency of finely ground coffee or sand. It is more susceptible to erosion and the effects of drought.
By contrast, European worms tunnel up and down through the top 4 to 6 feet of soil. After feeding on dead plants and leaves above ground, these earthworms burrow back down, creating vertical channels as they go. These channels benefit plants by facilitating improved aeration as well as access to water and nutrients via the worms’ nutrient-rich castings.
“European worm castings … tend to be partially digested,” Bruner says. “They provide nitrogen in a way that’s more easily accessible by plants.”
For now, adult jumping worms can’t survive the hard freezes of winter. But their egg casings can successfully overwinter even in very cold climates. (Depending on the species, a single jumping worm may be able to produce 10 to 50 cocoons per year.) What’s more, these cocoons are tiny—and, therefore, easily moved from place to place in soil, compost, leaf litter and even via the soles of our shoes.
Spotting Jumping Worms
While European earthworms gradually propel themselves through the soil, jumping worms flip and slither with snake- or eel-like movements. (In fact, they’re sometimes also called “disco worms,” “crazy worms” or “snake worms” because they can move so erratically.)
Aside from their unusual movements, jumping worms also look markedly different. While European earthworms are reddish-pink, segmented and moist, Asian jumping worms range from dark brown to dark gray and look much smoother. The jumping worm also has a very noticeable, light-colored band that wraps all the way around and is flush with the rest of its body.
On a European earthworm, this band is slightly raised and its color doesn’t contrast as much with the rest of its body.
The best ways to prevent the spread of jumping worms? Purchase bare root stock rather than potted plants in order to avoid potentially infested soil. Also, use only your own compost or compost from a trusted source.
If you purchase bagged compost, soils or mulch, leave the bags out in the sun for several days. Extreme heat will kill Asian jumping worms and any cocoons that may be present.
For the successful incubator hatching of chicken eggs, you must first have a rooster. Without a rooster, those unfertilized eggs won’t produce chicks. Roosters need to mate with a hen two or three times a week in order for the hen to lay fertile eggs.
Now that this is settled, gather enough fertilized eggs to create a clutch (storing them at the proper temperature and humidity as you do so). You must then decide if you wish to do a single clutch or practice continuous hatching.
For best results, you need access to a location that will maintain a stable temperature outside the incubator so as not to disturb conditions inside. Sporadically sunny windows and drafty spots won’t do.
During incubation, an egg much be maintained at a proper and even temperature and correct humidity. Also, turning eggs regularly in order to encourage proper embryo development is also required.
Lastly (with the often-preferred method of continuous hatching), some separation is required between eggs that are still in the developing stages and those that are ready to hatch. Their optimum environmental conditions are somewhat different and the hatching process itself creates a mess that is better kept contained.
Egg Incubation Notes
Some people choose to construct DIY incubators to save on cost while (hopefully) not sacrificing successful hatching rates. Extensive research and building competence is required to achieve this, plus a thorough knowledge of the conditions you must maintain throughout as you will be in sole charge.
Of course, many incubators are available to buy of various volume capacities, complexities and costs. The cost tends to increase proportionally with the simplification of your hands-on duties. You must have a firm idea of how much money you wish to spend and how largely you want hatching to figure into your homesteading goals to choose the incubator that will fit your requirements.
Alternatively, nature has provided the hen, who knows everything there is to know about hatching chicks. Due to breeding and trait selection, the broodiness that is required to give you a successful sitter/hatcher isn’t present in several breeds.
If you want a hen to take on hatching responsibilities, here are a few of the breeds (and some common varieties in parentheses) to choose from, plus notations on their conservation status where appropriate.
Note that bantam breeds often share the broodiness of their corresponding standard breed. Also, be aware that the Silkie is a standout amongst broody hens and is frequently used to hatch the chicks of other breeds.
Barbu or Belgian Bearded d’Uccle bantam—Critically Endangered
Brahma
Cochin (Partridge)—Recovering
Delaware—Critically Endangered
Dominique—Watch
Dorking—Endangered/Maintained
New Hampshire Red—Watch
Orpington (Buff, White)
Plymouth Rock (Barred)—Recovering
Silkie
Sussex (Speckled)
This article originally appeared in the March/April 2023 issue of Chickens magazine.
Cleavers (Galium aparine) and many other traveling seed bearers may be lumped into the common name “stick-tights.” I am pretty sure I didn’t have them at my home until my dogs brought them home on their fur. Before I recognized these tiny seeds as cleavers, even as they were accumulating in hairy mats, they seemed friendly to me compared to other “stick-tights” (like burdock or cocklebur), whose barbs would painfully stab the skin of a dog or my fingers extracting them.
I think of a cleavers as a friendly hitchhiker. I have heard kids refer to them as “velcro plant” because you can throw a stalk at someone and it will cling to almost any clothing on contact.
Identifying Cleavers
With leaves resembling a bottle brush, their stiffness gives them away, as does as their shape. Identifying cleavers’ growth pattern is rewarding, as its habits are very uniform and consistent. Early leaves have the same form as later leaves, just smaller and shorter.
In spring, the plant’s green color is consistent down to its minimal and pale roots. Older plants can grow to over 3 feet high if they have something to lean on, which could be as simple as a nearby stalk of grass or a forb. Cleavers are less trellising climbers and more “neighbor-clingers.”
But they may also simply crawl along the ground. They are also known as “bed straw” as the plant’s more fragrant cousins were used as bedstuff. When they form large clumps and begin to lay across the ground, cleavers do seem to me a perfect bedding.
cleavers tree
The Benefits of Cleavers
Cleavers are somewhat “brushy” when you touch them, kind of like a scratchy sponge or cat tongue—not scratchy enough to hurt, just hard enough to comb and scrub.
This quality seems to determine cleavers’ benefit to our lymphatic system. The body works hard to clean itself, and the lymphatic system has a huge hand in that. We can imagine cleavers as a bottle brush to our internal fluid pumps, helping us scrub out things left behind from the hard work the body does to protect and repair.
Cleavers are perfect for spring, as we emerge from slow winter activities (and resulting slowed digestion) and want to wash out the seasonal sluggishness. Cleavers may help us get moving with lubricated joints and systems in full pump.
I learned the best way to use cleavers is to gather them fresh, then pack as many as you can into as tight a jar as possible. Cover it in some good water, stick it in the fridge overnight, and drink the whole thing the next day.
I typically prepare a gallon of tightly packed fresh plant, but you can use whatever quantity you gather.
But be sure to also drink as close to a gallon of water as you can that same (or next) day after your cleavers preparation is gone. This will contribute to the flushing action, “forcing” the cleavers infusion to more fully saturate your system. You can do this any time you feel sluggish, such as after a long illness, or as routine maintenance.
You can also try to make a “succus” by juicing the leaves. But good luck finding a blender that will chop them! I find they just spin around making wreaths, even in my spice grinder, whether fresh or dried.
Dried cleavers are rumored to be less potent. Plenty of people make a tincture out of cleavers or use the dried leaves for tea, but either use calls for a long, cold infusion. And a tincture of fresh cleavers will be preferable to dried, using more water than alcohol. Just about 25 percent alcohol is enough to preserve, allowing more water-soluble components to get into your preparation.
Harvesting Cleavers
These plants grow fast. They’re shooting up now in my home state of Kentucky and will be making seeds (and turning yellow) within four to six weeks. So whenever you find them is the time to try cleavers!
Depending on your climate, the year’s first shoots can sow themselves another crop for summer, given the landscape is open enough to allow them. They tend to be abundant in dry, sunny locations, easily intermingling in grasses and other so-called weeds.
The flowers are easy to miss. Tiny and white, they resemble chickweed and nestle in the crannies of stems. Invite this fast grower in any time, harvesting the entire plant up until the flowers turn to seeds. You’ll likely leave plenty behind to resow.
As always, give yourself time to acknowledge cleavers for their actions and abundance. This simple act will go a long way to increasing your ability to internalize health benefits. I am confident that the often overlooked and oversimplified places in our yards, as well as those in our bodies, will be thankful for the attention.
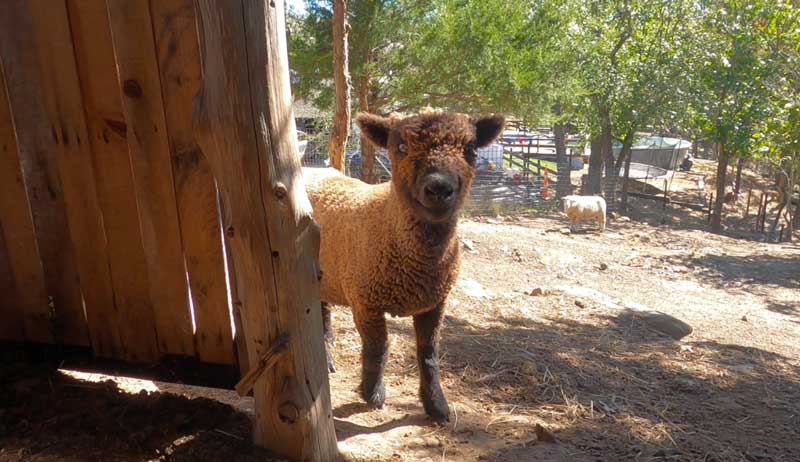
Biting lice rear their ugly heads during some of the colder months and into early Spring. When temperatures exceed 45 degrees F, lice eggs can not survive; eliminating the issue becomes a lot easier.
As with any parasite issue in ruminant animals, observation is imperative. Watch your sheep closely for the following symptoms of biting lice:
Itching
Restlessness
Wool break
Skin irritation (red and rashy)
Hair that falls out just by touching and rousing
Excessive rubbing on poles, fences or other scratching posts
Anemia symptoms
Decreased milk production in ewes
Weight loss
Check more open areas of their body not densely covered with wool, such as face and legs. Wool break is a sign of a weakened immune system. It can happen because of fevers, parasites and stress.
Lice spreads by close contact. In winter months, sheep huddle together in close quarters getting out of the weather.
Treatment
Always check with your vet for dosage and treatment plans. Common medicines for treatment include Dectomax and Ivermectin. Organic methods include diatomaceous earth and sheering (if the season is warm enough). Shearing can decrease lice issues by 30 to 50 percent but really exposing the lice to weather elements helps take care of the rest.
Always make sure the weather is going to stay above freezing before shearing your sheep. You will want to treat the sheep enclosures as well as their bodies. Spraying Permethrin and/or spreading diatomaceous earth are effective ways to treat the spaces in which your animals dwell.